Rich and Hearty Kubasa and Bean Soup

Kubasa and Bean Soup

Prep Time 10 minutes
Cook Time 20 minutes
Course Main Course, Soup
Servings 6 people

Ingredients
  

  • 1/2 medium-sized onion chopped
  • 1 clove garlic peeled and minced
  • 1 Tbsp olive oil
  • 540 ml canned white kidney beans (19 oz) drained and rinsed
  • 540 ml canned bean medley (19 oz) drained and rinsed
  • 454 g ring of kubasa (kielbassa)
  • 796 ml canned tomatoes (28 oz)
  • 3 bay leaves
  • 4 ribs celery chopped
  • 4 medium-sized carrots peeled and chopped
  • 4 cups beef or chicken broth
  • 1 Tbsp paprika
  • salt and pepper to taste

Instructions
 

Instant Pot directions

  • Set pot to "Sauté" setting and add the oil, onion and garlic. Sauté until onions are translucent. Add celery and carrots, stirring and cooking for another 3-5 minutes.
  • Add the rest of the ingredients, stirring well. Set the Instant Pot to "Soup" setting, under pressure, for 20 minutes.
  • Remove and discard bay leaves and serve.

Stovetop direction

  • Sauté onions and garlic in olive oil in a large pot over medium-high heat until onions are translucent. Add celery and carrots, stirring and cooking for another 3-5 minutes.
  • Add the rest of the ingredients, stirring well.
  • Turn heat down to medium to medium-low (soup should be simmering but not boiling). Cook for 45-50 minutes, stirring occasionally.
  • Remove and discard bay leaves and serve.
Keyword Beans, Instant Pot, Kubasa, Mixed Beans, Sausage, Soup

And now for the details…

Let’s set the scene: it’s the middle of winter. The temperature is cold and icy outside and just looking out the window causes a deep chill to set in, right to your bones. All you want is something warm and comforting to heat you up from the inside, something that feels like a hug in a bowl. This is exactly what our weather is like right now, and when I was looking in the fridge to see what was available, I came up with this recipe as a solution.

Kubasa, also known as kielbasa or kolbassa, is a sausage of Eastern Europe descent, often known as Ukrainian or Polish sausage. It’s a pretty broad term when you think about it… it seems pretty doubtful that an entire country (countries) has just one type of sausage, no? And that’s entirely true. The term “kielbassa” is a translation of “sausage” and in those countries, it refers to a wide range of different sausages. But, where I am from, the Canadian Prairies (think smack in the middle of Canada), the term kubasa/kolbassa is used for a smoked sausage, heavy on the garlic, that is most often served up alongside perogies (dumplings) and holuptsi (cabbage rolls).

In this recipe, I used the kubasa in a soup with beans and some veg to get a hearty, rich, salty, and slightly smoky soup that might actually be nearing “stew” in texture! The beans add a thick silkiness to the broth as they cook, and the addition of paprika gives a hint of heat without actually adding any spiciness. All in all, it’s the perfect meal to come home to after a cold day of skiing, skating or building a snowman 🙂

Let’s get to cooking, shall we?

There are two sets of instructions in the recipe, one for the Instant Pot and one for stovetop. They are both extremely similar, the biggest different is the amount of time to cook the soup for after adding all the ingredients in. I will go through both options, so follow along with your cooking approach!

We start with the veg. Peel and chop your onions and garlic and place in your pot with the oil. At this point, you can prep and chop your celery and carrots, and chop the kubasa into large chunks, to get everything ready to go.

A quick note on prepping the kubasa: most kubasa that I have had has edible, soft casings. But there are some that have a stiff, dry casing that needs to be peeled off before eating. You can usually tell if you try and peel a bit of the casing off. If it “flakes” off in small pieces that tear easily, it’s probably good to eat. If it easily comes off in large strips that peel off easily, peel the whole thing off to avoid unchewable pieces of casing.

With your onion, garlic, and oil in your pot, set to “sauté” setting (or medium-high heat on the stove) stirring and cooking until the onions have turned translucent. Then, add the carrots and celery, stirring and cooking for another 3-5 minutes, so that the celery and carrots soften slightly.

Next, we add all the rest of the ingredients to the pot, stirring well. In this recipe, we are using canned beans, but there is an opportunity to use dried beans if you would like. If you do use dried beans, you will need to add time (about twice the time listed here) as well as add a cup or two of water. If you are using canned beans, don’t forget to fully drain and then rinse the beans before adding them to the pot.

Next, we will be going one of two directions depending on whether you are using and Instant Pot or stovetop: If you’re using an Instant Pot, cover and seal it, and set it to “Soup” for 20 minutes. If you are going with the stovetop method, lower the heat of your stovetop to medium-low to medium heat, just enough so there is a little simmering action going on (a few bubbles every few seconds), but not a big, bubbling boil. Cover the pot and cook it for 45-50 minutes, opening it up every 5-10 minutes to stir and prevent anything from burning/sticking to the bottom of the pot.

And that’s it folks. It is that easy. Last step is to remove it from the heat and discard the bay leaves before eating. I like to have this soup with either some crunchy seed crackers, or a nice, fresh piece of crusty bread!

Happy eating.

BBQ Pork Ribs in the Instant Pot

Instant Pot BBQ Pork Ribs

Prep Time 5 minutes
Cook Time 30 minutes
Course Main Course
Servings 1 rack of ribs

Ingredients
  

  • 1 rack St. Louis style or spare pork ribs (membrane removed)
  • 1 tsp garlic powder
  • 2 Tbsps chilli powder
  • 1 Tbsp ground cumin
  • 1/2 tsp dried oregano
  • 1 tsp chipotle powder
  • 1 tsp salt
  • 1/4 tsp hickory smoke powder (optional if hard to find)
  • 1 Tbsp cornstarch
  • 2 Tbsps sugar
  • 1 cup beer (alternatives: pineapple juice, cola or chicken broth)
  • 1.5 cups BBQ sauce

Instructions
 

  • Mix together all the herbs, spices with the salt, cornstarch and sugar. Rub this powder into the ribs. Set the rack into the Instant Pot, pour the beer into the bottom. Roll the ribs into a spiral and set onto the rack of the pot, bones vertical. Close and seal, cooking on "Meat" setting for 25 minutes. Remove and slather with BBQ sauce and either place on high temp grill or under a broiler for 3-5 minutes per side to caramelize. Serve with extra sauce.
Keyword BBQ, Grill, Meat, Pork, Ribs

And now for the details…

Okay, so this is another one of those recipes that almost seems too easy to share. The Instant Pot has changed my life when it comes to cooking ribs. Remember that previous method of boiling or baking the ribs for several hours to try and get them tender? NO MORE! The Instant Pot makes this SO EASY, and so fast, that ribs on a weekday are not only a possibility, but a preferred option because of how simple it makes your evening meal.

If you want to make these even faster, you can do what I do and mix up a large batch of the rub and store it in a Tupperware container, so you can even skip measuring out spices when it’s time to make these.

Speaking of the rub, that’s where we start out recipe. In a bowl (or Tupperware), mix together the garlic powder, chilli powder, cumin, oregano, chipotle powder, hickory smoke powder, salt, cornstarch and sugar. If you cannot find hickory smoke powder, just skip that part. I know it took me a long time to hunt it down, and I’ve been treating that stuff like it’s powdered gold. Again, you double, triple, quadruple, or more the amount of those measurements, and just have the rest sitting in a container for the next time you make the ribs.

Next, it’s time to get those ribs ready for cooking! Before you rub everything in, tear off the membrane, also known as the silver skin, on the back of the ribs. It’s not the end of world if you forget this step, but the ribs will have this membrane on them when you eat, and it’s a little chewy and ropy. There are plenty of videos and info out there showing you how to do this, I found this video has great info on how and why to remove the membrane (skip to 1:30 to see the technique ;P).

Next we’ll take that rub and… well… rub… it into the rack of ribs (if you’re storing extra, make sure to set that aside so that you don’t cross-contaminate the spare rub with those ribby fingies). Get right in there and massage the rub into the meat on both sides. To save on using extra dishes, I actually do this right on the packaging the ribs came in 😛

Next, it’s time to cook! Pour the beer into the bottom of the Instant Pot. If you’re not a fan or don’t want to cook with alcohol, you can replace the beer with juice (I recommend pineapple, but orange or apple would work too), broth, or even cola or root beer.

Next, curl the ribs into a spiral and place them so the bones are vertical in the pot. In my case, unfortunately the rack was cut in half in order to fit the packaging, so I just kinda half-circled them around the outside of the pot. I have tried doubling the recipe, and a spiralled double rack JUST fits into the pot. Cover the pot up and set the lid to “Sealed” position. We are going to pressure cook these on the “Meat” setting for 25 minutes.

Once you have that set, we wait. You basically have 25 minutes of your life back. So many options on what to do here. You could make some pretty impressive sides to go with those ribs. OR. You could kick up your heels and enjoy the rest of the can of beer, since there’s more that 1 cup in a can 😉

Once the ribs are done, unseal the lid and let the pressure come back down, then open up that lid and expose the gloriousness that is the cooked ribs. Lay them on a tray and slather them with your favourite BBQ sauce (both sides).

Now you have two options here: you can either finish these off on the grill or in the oven. On the grill, set your heat to medium-high, or in the oven, set your broiler to medium-hi. Either place the ribs right on the grill or under the broiler, and cook them for a few minutes on either side, just long enough to get some darkened, caramelized bits.

Remove from the heat, and either serve up directly with your extra BBQ sauce on the side, or slather on a bit more sauce just before serving.

Happy eating.

Instant Pot Tonkotsu Ramen

Instant Pot Tonkotsu Ramen

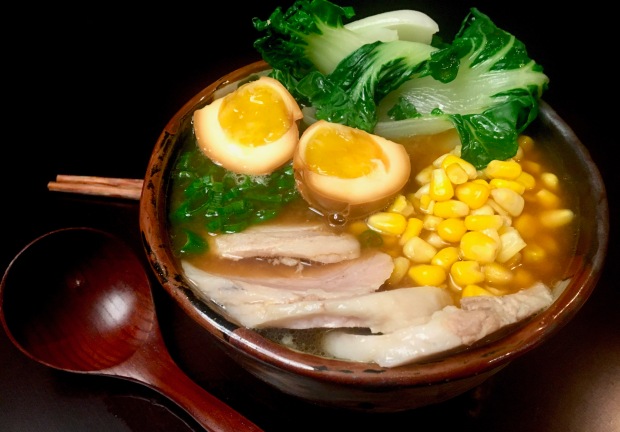
Umami-rich Ramen Soup, including a broth from scratch, in way less time thanks to the use of the Instant Pot!
Prep Time 15 minutes
Cook Time 3 hours 45 minutes
Total Time 4 hours
Course Main Course, Soup

Ingredients
  

  • 2 pork trotters (split)
  • 2 chicken backs
  • 2 leeks (green ends trimmed off, cut into chunks)
  • 2 shallots (peeled and cut into chunks)
  • 8 cm piece of ginger (peeled and cut into chunks)
  • 4 baby king oyster mushrooms (sliced, or 1 king oyster mushroom, sliced)
  • 600 g pork belly (rolled and tied tightly with kitchen twine)
  • 4 eggs (soft boiled)
  • 400 g fresh ramen noodles
  • 1 cup fresh or frozen corn kernels
  • 4 baby bok choy (leaves separated)
  • 3 green onions (chopped)
  • 2 Tbsps soy sauve
  • 2 Tbsps mirin

Instructions
 

  • Place pig trotters and chicken backs in a pot on stove of boiling water, reduce temperature to simmer. Simmer for a minimum of 10 minutes, skimming off foam as it cooks. Remove trotters and backs, set aside, discard liquid. Pick out any dark or bloody bits from trotters and backs.
  • Place trotters, backs, leeks, shallots, ginger, mushrooms, and pot belly in instant pot. Close pot and cook on "soup/broth" setting for 2.5 hours.
  • Place soy sauce, mirin and 4 Tbsps water in ziplock bag, place eggs in bag, and place in refrigerator, turn occasionally (can be done night before).
  • After 2.5 hours, release pressure and open. Remove belly, wrap tightly in cling film wrap and place in refrigerator. Close Instant Pot back up, set for another 60 minutes on "soup/broth" setting.
  • Once done, release pressure, then strain broth and throw out solids.
  • In separate pot on stove, boil water. Using a small mesh strainer, cook ramen in water until done, remove and strain, and place in bowls. Using same mesh strainer, cook bok choy leaves in same pot of boiling water for 30-60 seconds, strain.
  • Take pork belly from refrigerator, remove cling film and slice thinly. Arrange pork belly, bok choy, corn and green onions in bowl over ramen noodles. Ladle hot broth over other ingredients, top with halved eggs and serve.
Keyword Broth, Egg, Noodles, Pork, Pork Belly, Ramen, Soup, Tonkotsu

And now for the details…

Ramen. Delicious, delicious ramen. Until about a decade ago, I had no idea what real ramen was or could be. Before that, my brain associated the word ramen with Mr. Noodles or Ichiban, and I had no idea that there was so much more that ramen had to offer than instant noodles.

Since then, I have sought out ramen wherever I may roam. My favourite that I have tried so far is from the chain Tenkaippin in Japan. We made return trips to the same restaurant in Kyoto, several years ago. The broth is super flavourful, thick and rich. I have dreams about it even still. This recipe… is not that soup unfortunately. But, it is a nice rich broth that is pretty tasty, if I do say so myself. Cooking for an extended period of time in the Instant Pot is allowing the collagen to release from trotters and chicken backs, providing a thick mouth feel.

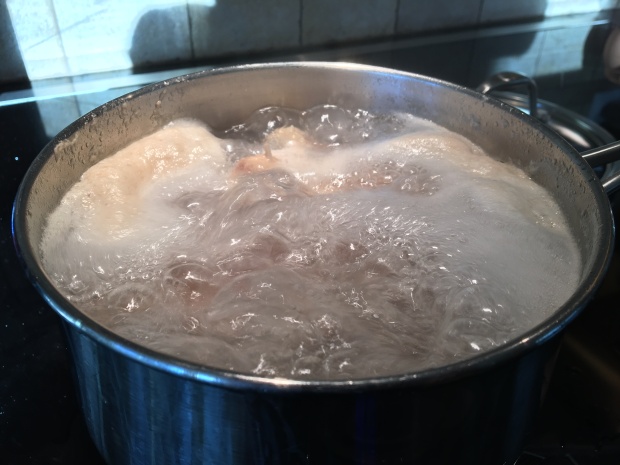
Let’s get started. We will start by “cleaning” the pig trotters and chicken backs. Bring a pot to a rolling boil and add the trotters and backs. Reduce to a simmer and cook for around 10 minutes, skimming off any gunky foam off the top. Once that’s done, dump the liquid. Using a fork, knife, or chopstick, we are going to pick at the trotters and back, removing any darkened bits or pieces that obviously have blood. We are doing this to clean out any bloody bits so we have a nice clear broth, rather than a skanky, cloudy, dark broth.

That icky looking foam is what you skim off and dispose of…

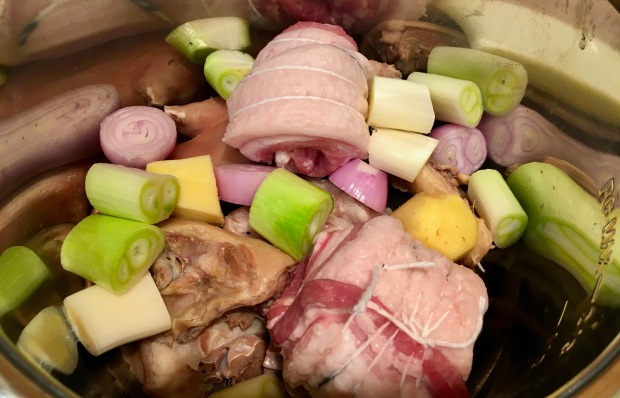
Once cleaned, place the trotters and backs in your instant pot. Stack in the leeks, shallots, ginger, and mushrooms. We are also going to roll the pork belly pieces and tie them tight with butchers twine, and place that in the pot with everything else.

Fill the pot with water up to the “MAX” line, and then close the pot, ensuring it is in the “Sealing” position and set for 2.5 hours on the “Soup/Broth” setting.

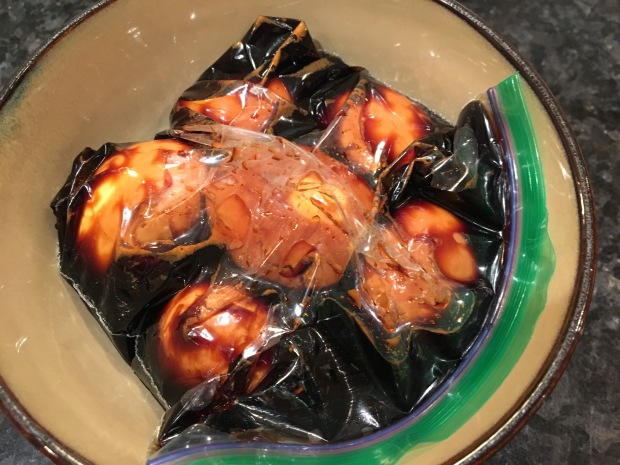
While the broth is cooking, we’ll set the eggs to marinating. We are making ajitsuke tamago, or seasoned eggs, to add to the ramen later. Mix the soy sauce, mirin, and 4 tablespoons of water in a ziplock bag, and then place your soft boiled eggs inside (need a refresher on how to soft boil an egg? Directions are included in this recipe). Close the ziplock up tight so as little air as possible is left inside, and then place in the fridge. Turn them around after an hour or two so they marinate evenly on all sides.

After 2.5 hours of cooking, release the pressure from the pot, and open ‘er up. Remove the pork belly, then close the pot back up, including resetting to “Sealing” position and set the pot back to “Soup/Broth” setting and cook again for 60 minutes. Wrap the pork belly tightly in cling wrap, and place in the refrigerator. The pork belly is more than cooked by now, and chilling the belly will allow us to cut it nice and thin to place in the bowl later.

Once the broth is done, strain it into a container, and discard any solids. I like using cheese cloth to help with the straining to get rid of any small, gritty bits.

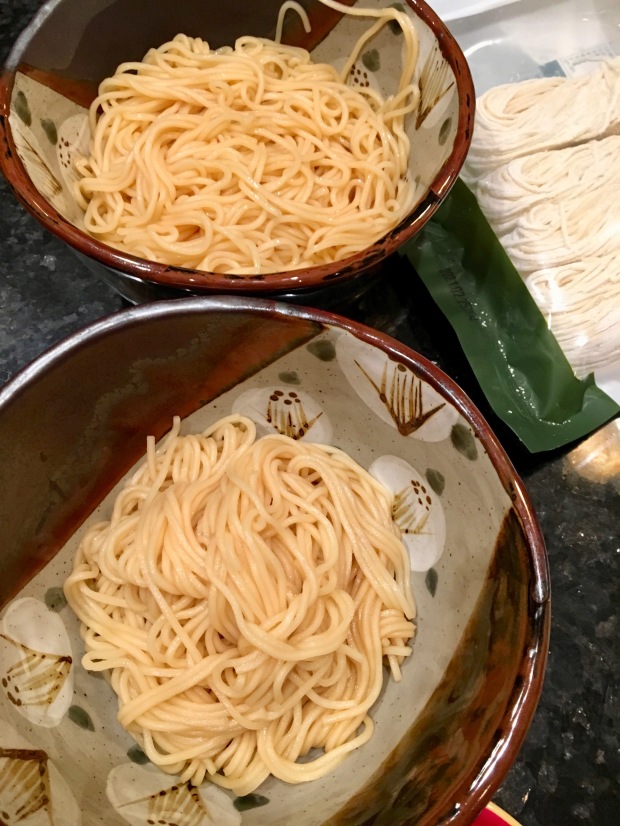
Time to get everything ready. Boil water in a pot, and place the ramen noodles in a wire mesh strainer. Dip the strainer into the pot to cook the noodles, and when done, drain the noodles and place in the bottom of a large bowl.

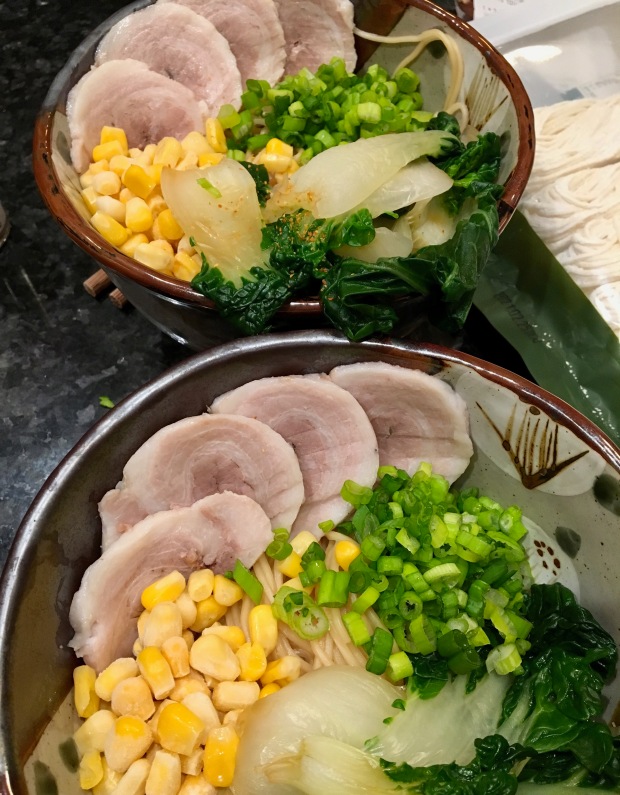
Using the same strainer and boiling water, cook the bok choy until the leave just turn vibrant green. Place the boy choy, green onions, and corn into the bowl. Remove the pork belly from the fridge, and take out of the cling wrap. Slice the pork belly thinly and place in the ramen bowl.

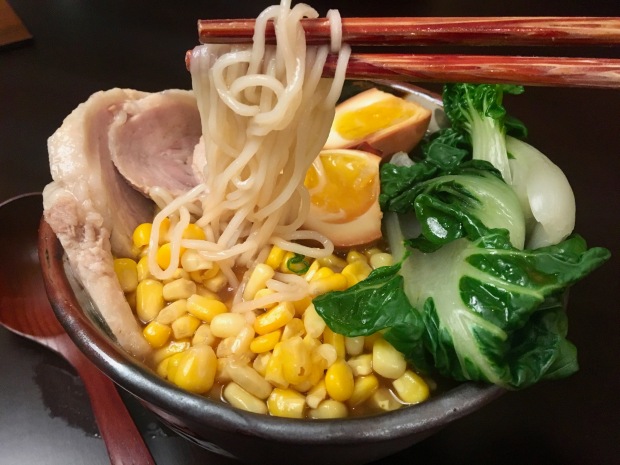
Finish the soup off by taking the eggs out of the marinating liquid, cutting in half, and placing in the bowl. Ladle the still-hot broth over the soup contents, and serve immediately. Enjoy immediately!

Happy eating.

Delicious Instant Pot Chilli con Carne

Chilli con Carne

Prep Time 5 minutes
Cook Time 35 minutes
Course Main Course
Servings 8 people

Ingredients
  

  • 2 shallots (chopped, or 1 small onion)
  • 3 garlic cloves (minced)
  • 1 Tbsp olive oil
  • 680 g lean ground beef (1.5 lbs)
  • 450 g ground pork (1 lb)
  • 800 ml diced canned tomatoes (28 oz)
  • 400 ml beef broth (1 2/3 cups)
  • 540 ml canned red kidney beans (19 oz, drained and rinsed)
  • 540 ml canned white kidney beans (19 oz, drained and rinsed)
  • 2 cups cherry tomatos (halved)
  • 1 cup frozen or fresh corn kernels
  • 1.5 Tbsp chilli powder
  • 1 tsp chipotle chilli powder
  • 1 tsp smoked paprika
  • 1 Tbsp ground cumin
  • 2 tsp salt
  • 1/2 tsp pepper
  • 1 tsp Worcestershire sauce
  • 250 ml beer (1 cup)

Instructions
 

  • On stove: Using a heavy bottomed pot, heat the olive oil on medium high heat, then add the shallots and garlic, sautéing until softened. Add the beef and pork, stirring regularly, and breaking apart large chunks, until cooked through. Add the rest of the ingredients (except corn), turn the temperature down and simmer for 45-60 minutes, stirring occasionally. Add the corn within the last 5 minutes.
  • In Instant Pot: Set the pot to Sauté, add the oil and sauté the shallots and garlic until softened. Add the beef and pork,stirring regularly, and breaking apart large chunks, until cooked through. Add the rest of the ingredients (except corn), set the pot to Meat/Stew, and close under sealing for 15-25 minutes. Flip back to Sauté and add the corn, stirring for a few minutes until the corn is cooked.
  • Once done, serve with preferred toppings, like avocado, sour cream, shredded cheese and a squeeze of fresh lime juice.
Keyword Beef, Chilli, Stew, Tomatoes

And now for the details…

Even though it’s already May, we have been hit up with some pretty chilly weather. And so I figured what better meal for chilly than… chilli. Oh I am soooo witty *rolling eyes*.

This recipe was interesting to measure and document for me, since chilli is something I have been making sans recipe since I was kid. When I was little, I would be so insistent on “helping” while my mom cooked. When she cooked chilli, it was never off a recipe card, and it has become the same for me. A bit of an eyeball on quantities, cook a little longer, taste, adjust.

The bit of research I did on chilli was interesting. There is a lot of debate on the origins of the well known stew. Whether the true origin of chilli was as a pack meal, the angelic vision of Sister Mary Ágreda, or the preparation of defeated conquistadors by the Aztecs (ewwwwwwww), it seems as though the debate will continue. After learning more, I also apologize to the hardcores on the addition of beans, which I understand is also a matter of huge debate. But the simple fact that I am spelling it “chilli”, not “chili” is probably a clear indication that we are pretty far north from the origin (which has been determined as northern Mexico/southern Texas), and since I am Canadian, of course I have to apologize at some point here! All in all, chilli has become a staple for many, with chilli competitions across the globe, canned chilli being readily available in most grocery stores, and several pop culture chilli references (El Viaje Misterioso de Nuestro Jomer, anyone?), it is a popular dish that will likely never be agreed upon, but readily enjoyed by all.

For this version, I have given instructions for both on the stove or in an Instant Pot. It is typically a stove dish for me, but I wanted to see how this did in the Instant Pot to see if I could get that “long simmer” flavour in a short period of time. It seems to have worked out quite well! For the purpose of these detailed instructions, I used the Instant Pot, but following the instruction on the stove would work just as well, it will just need a bit more simmering time.

Let’s start by sautéing the shallots and garlic in our pot (either Sauté setting for Instant, or medium-high heat on the stove). Once the shallots have softened, add the meats, sautéing until they are mostly cooked through, and stirring regularly to break the ground meat apart so it does not form into large chunks.

Next, we add the tomatoes, beans (drain and rinse them first!), spices, and Worcestershire sauce. Give it all a good stir and make sure everyone in there are close, personal friends. If in the Instant Pot, close it up on Sealing, set it to Meat/Stew and cook for 15-25 minutes. If on the stove, turn the heat down to a simmer, and let it cook for 45-60 minutes, and stir occasionally so that the meat does not burn on the bottom of the pot.

If you are using the Instant Pot, once the pressure cook is done, set the pot back to Sauté. Add the corn and cook until the corn is cooked. This should only take 3-5 minutes. I found this corn and jalapeño mix at my grocery store and thought it would be a great add to chilli! The jalapeños added their slight heat and flavour, which probably would have been lost if added at the beginning and stewed. If you are cooking on the stove, this step would happen in the last 5-ish minutes of cooking.

Now that your chilli is ready, ladle into a bowl, top with your toppings of choice (cheese, avocado and sour cream (or crème fraîche!) are the preferred options in our house) and enjoy!

Happy eating.

Instant Pot Duck Breast (from frozen) with Baby King Oyster Mushrooms

Instant Pot Duck Breast with Baby King Oyster Mushrooms

Duck breast with crispy skin, done from frozen in the Instant Pot and finished on the stove, with a currant sauce and miso glazed king oyster mushrooms.
Prep Time 20 minutes
Cook Time 35 minutes
Course Main Course
Servings 2 duck breasts

Ingredients
  

Duck Breast with Currant Sauce

  • 2 duck breasts (frozen)
  • 1 cup red currants (frozen)
  • 1/2 cup port or sherry
  • 1/2 cup chicken broth
  • 3 Tbsps roasted garlic jelly
  • 1/2 tsp salt (more if needed, to taste)

Miso-glazed Mushrooms

  • 11 oz baby king oyster mushroom
  • 2 garlic cloves minced
  • 3 Tbsps brandy, port or sherry
  • 1 tsp cane sugar
  • 1 tsp red miso paste
  • 3 Tbsps hot water
  • salt (to taste)

Instructions
 

Duck Breast with Currant Sauce

  • Pour the port, broth, and currants into the bottom of the instant pot. Add the rack into the pot, then place the duck breasts, skin side up, on the rack and sprinkle with 1/2 tsp salt. Cook on Poultry setting under pressure for 23 minutes (resulted in doneness of medium-well). Release the steam, take out the duck breast, score the skin in a crisscross pattern and sprinkle with more salt, then sear on a medium-high heat pan until the skin has browned, remove from pan and set aside. Pour the rendered duck fat into a bowl and set aside. Add the currants and liquid from the instant pot pan with the garlic jelly. Cook down, stirring regularly, to half the original volume. Remove from heat, strain out the pips, then pour over the duck breast and serve.

Miso-glazed Mushrooms

  • Add the garlic for the mushrooms to the pan into the rendered duck fat. Once the garlic starts to brown, add the mushrooms and some salt. Stir regularly, until the mushrooms have browned and started to soften. Then add the brandy and cook down. Mix the miso paste with the water, then add to the pan with the sugar, and cook until almost all the liquid is cooked out. Serve with the duck.
Keyword Dinner, Duck, Duck Breast, Frozen, Instant Pot, Mushrooms

And now for the details…

I was at a loss for what to make for dinner this past Sunday afternoon and decided to raid our freezer to see what I could find. I had some frozen duck breast tucked into the freezer and thought “sure, why not?”

I assumed I would be able to find some kind of recipe online for an Instant Pot duck breast cooked from frozen, but all I could find was a recipe for a stew. It probably would have been good, but I was craving duck breast on it’s own, with that nice crispy skin… a little salty, a little fatty, mmmmmmmm…. *ahem* Anyhow, since I could not find a recipe… I made one up 😛

Now, I do say from frozen for the duck breast, but I did need to let them thaw just a little, since they had those soft, thin pieces in the package meant to absorb liquid; which were frozen solid onto the meat. I let it defrost just enough to be able to peel them off without ending up with a bunch of frozen plastic pieces adhered to my bird. When it made it to the pot, though, it was still pretty much rock-hard with the exception of a thin layer on the exterior (you can actually see some ice still on the meat in the photo!)

Place the breasts on the rack in the pot, skin side up, to keep it out of the liquid. Under the meat goes the port, broth and currants. Plus, of course, I sprinkled a bit of salt on top. Make sure your pot lid is set to “Sealing”, and then let it cook on “poultry” setting for about 23 minutes. This resulted in a doneness level of about medium-well. You could probably adjust to a little less or a little more if you would prefer a different level of doneness. If you are able to get the duck out of the package while it’s still frozen all the way through, I would add on a couple minutes.

While the duck is cooking, we can start to prepare the mushrooms. I found these baby king oyster mushrooms at T&T, our asian supermarket, where I went shopping with my husband and in-laws after we went for dim sum earlier that morning. As you know, I enjoy not just cooking and eating, but also shopping for ingredients. I love shopping at T&T, since the ingredient options are often quite different than the “standard western” grocery options. And I really love going there with my in-laws, since I will get all kinds of suggestions and advice from them on produce I am unfamiliar with, like whether the produce is is in good shape, if it is in season, or suggestions for different produce I would not know to take home. My husband finds these shopping trips amusingly frustrating with the three of us, since we tend to scatter and reform, which my husband, of course, refers to as “herding cats”. Mama and papa know that I LOVE mushrooms, particularly shimeji and king oyster, and brought over the baby king oysters. I was really excited to cook these. They looked so good; plump little morsels, ready to be fried up for dinner! Even though they looked fairly clean in the package, papa suggested I wash them and trim the ends anyhow, and so I did.

Attempting to maintain a pseudo-asian flavour for the mushrooms, I decided to fry them up and glaze them with some miso. If you cook your duck breast first, you can reserve the rendered duck fat (see below for more details) and cook the mushrooms in that after you’ve fried the duck breasts. For me, I happened to have some rendered goose fat in the fridge from foie gras I had made a few weeks before, so I melted some of that in the pan, and then started to sauté my mushrooms and garlic.

Add a pinch of salt to the pan and sauté the mushrooms and garlic. This will seem like a counterintuitive thing for me to say: but don’t add too much salt. The miso has some saltiness to it, and it is better to taste test and add a bit more towards the end than end up with too much salt. Cook the mushrooms until they start to soften and get patches of golden brown. Once that happens, add the brandy and allow it to cook down until there is almost no liquid left in the pan, stirring regularly.

While the brandy is cooking down, add the miso to the hot water and mix until the miso is mostly dissolved. Add the mixture to your pan, and sprinkle with the sugar, and again stir regularly while cooking down the liquid until a smooth glossy finish coats your mushrooms, and there is little to no liquid in the pan.

By now, the duck should be done. Allow the pressure to release from your instant pot, and open to reveal your beautifully cooked duck breast. Oh. Wait. Not so beautiful yet. The skin is all soggy looking and it appears as if the breast as been boiled. Ew.

We can fix that right quick. Remove the breasts from the pot, reserving the liquid, and score the skin in a criss-cross pattern with a sharp knife. Sprinkle the skin with salt, and then place in a dry pan at just below high heat. You may want to tilt and hold the meat in a few directions on the pan to crisp up the skin on all sides.

As you cook the skin and it starts crisping to a nice golden brown, it will be releasing a whole heck of a lot of fat. This fat can be used to cook your mushrooms, or you can pour it into a Tupperware and store it in the fridge to use as an olive oil or butter replacement in another dish later on.

Once the skin has crisped to your desired level of doneness, remove the breasts from the pan and let them rest to the side. Pour the fat from the pan into a container of choice, then pour the liquid from the instant pot (you almost forgot about that, didn’t you?) into the pan. Reduce the heat to medium high, and add the garlic jelly, stirring to dissolve the jelly in the liquid. Allow the liquid to reduce by about half, and then strain to remove the pips and skin from the currants. Then, slice the duck breasts across the grain into nice, moist (yes, I used the descriptor moist) slices, and spoon the sauce on top. Serve with mushrooms and enjoy!

Happy eating.

Carnitas Salad with Buttermilk Cilantro-Lime Dressing

Carnitas Salad with Buttermilk Lime Ranch Dressing

Prep Time 30 minutes
Cook Time 1 hour 10 minutes
Course Main Course

Ingredients
  

Carnitas

  • 2 lbs pork shoulder roast
  • 2 tsp cumin
  • 2 tsp oregano
  • 1 tsp chili powder
  • 2 tsp salt
  • 1 tsp fresh ground pepper
  • 1 small onion (cut in large chunks)
  • 4 garlic cloves (trimmed and halved)
  • 1/2 cup pineapple juice

Salad

  • 8 cups green leaf lettuce (washed and torn into bite-sized pieces)
  • 1 avocado (peeled, pitted and sliced)
  • 1 cup cherry tomatoes (halved)
  • 3/4 cup frozen corn (browned in a dry pan)

Salad

  • 1/4 cup buttermilk
  • 1/4 cup mayonnaise
  • 1 lime (juiced)
  • 2 Tbsps fresh cilantro (cut fine)
  • 1 garlic clove (grated)
  • 1/2 tsp salt
  • 1/2 tsp sugar
  • 1/2 tsp paprika

Instructions
 

  • The carnitas can be made in an instant pot or slow cooker.
    Either way, place the shoulder in the pot, rub down with the spices, covering as much of the surface as possible, letting the rest fall to the bottom of the pot. Add the onions and garlic, then pour in the juice. If cooking in the slow cooker, cook on low for 8 hours. If cooking in the instant pot, cook on the "meat" setting for 55 minutes, ensuring the pot is sealed for pressure cooking. Once the meat is cooked, let it cool for a bit, then tear it roughly into chunks. Reserve the liquid and add the meat to a frying pan at medium to high heat to crisp up the meat. Once the meat is starting to brown, slowly add the liquid, then allow it to cook down until the liquid has cooked into the meat and the sugars from the liquid have caramelized the meat.
    Whisk all the dressing ingredients together.
    Assemble your salad, top with the crisped carnitas and drizzle with the dressing.
Keyword Instant Pot, Pork, Pork Shoulder, Salad, Salad Dressing

And now for the details…

A bit “healthier” then the first few posts, my husband and I are resetting our eating a bit after the rich foods we had taken in over the several months. We are reducing our simple carbohydrate intake (which, to be honest, was not too hard once we started cutting out treats throughout the day, afternoon snacks, and bread with every meal), and have been focusing on dinners that are filling, fresh and flavourful.

This meal is one of my favourites because it’s got the freshness from the greens and the cilantro dressing, while also bringing in the heartiness and umami-rich carnitas.

I might be a little loose in calling this recipe “carnitas”. Traditionally carnitas is pork cooked low and slow in lard, similar to a confit. Probably a better title for what I am making here would be “pan-fried, slow-cooked pork shoulder”, but that’s just not nearly as fun to say.

We start everything off preparing our pork shoulder, since it needs the longest time to prepare and cook. I have done this recipe before in two different ways: in our slow cooker and our instant pot. Both work, but to be honest, it turns out better in the slow cooker. For the photos today, I have done the recipe in the instant pot.

Start by mixing the carnitas spices together in a small bowl. Place your shoulder in the pot, and rub the spice mix all over the meat, trying to coat the entire surface area. Place the shallots and garlic in the pot with the shoulder, then pour the juice into the bottom of the pot.

When you place the lid on the instant pot, ensure the vent is set to “sealing”, since we are going to be pressure cooking our meat. Set the pot to the “meat” setting, and cook the shoulder for 55 minutes.

While the meat is cooking, we can prepare our salad toppings and dressing. Set a dry pan on the stove at medium- to high-heat. Place the frozen corn into the pan, and stir regularly, allowing the corn to char slightly. Be cautious! Even though it’s not popcorn, some of the kernels may actually “pop” out of the pan under the high heat.

Next, let’s make our dressing. I love buttermilk dressings. They’re creamy and tangy, offering a nice balance of flavours. I also feel they necessitate a decent amount of garlic, because what goes better with richness than a nice garlicky punch to the tastebuds? To really allow the garlic to suffuse the entire dressing, I use my garlic grate plate, which basically destroys the garlic and breaks it down into a fine mash, which then lends to tiny bits of garlic spreading throughout the entire dressing. My mom got me this garlic plate over a decade ago, and it is a staple in my kitchen.

Those little ridges are what break down the garlic. Using the plate is easy; just peel the garlic, hold it in your fingers and then grind it into the plate.

Start by mixing together your buttermilk and mayo. I used the full fat buttermilk, as well as Japanese mayo for my recipe. I wanted that added richness to the dressing, to help balance the acidity of the lime juice and the freshness of the cilantro. Add the rest of the dressing ingredients and mix together.

By about now, your pork is likely ready to come out of the pot. Take out the shoulder, reserve the liquid, and tear the meat into chunks. Place a large pan on medium-high heat and transfer the pork into the pan. Once the meat has browned a bit, add the juices and let them cook down until the liquid has boiled off and the meat is starting to caramelize.

Finally, assemble your salad with your toppings, leaving a little nest in the middle of the salad for your pork. Pile the pork in the middle, drizzle with the dressing, and enjoy!

Until next time, happy eating!