Prep the veggies. Heat the coconut milk with the lime leaves over low heat for 20-30 minutes. Let cool, and mix with the rest of the dressing ingredients. Pour over the veggies and mix.
And now for the details…
I have a bit of an obsession with makrut lime leaves. They are also known by the name kaffir lime leaves, but this title is now considered defunct due to the offensive nature of the k-word. Some use makrut, or simply lime leaves to describe these items of deliciousness. These leaves impart the fabulously floral, tropical, and citrusy flavour to many Thai curries, and offer a great flavour to many other items as well. Plus, when you store them in your fridge, you are welcomed by their amazing aroma every time you open the door.
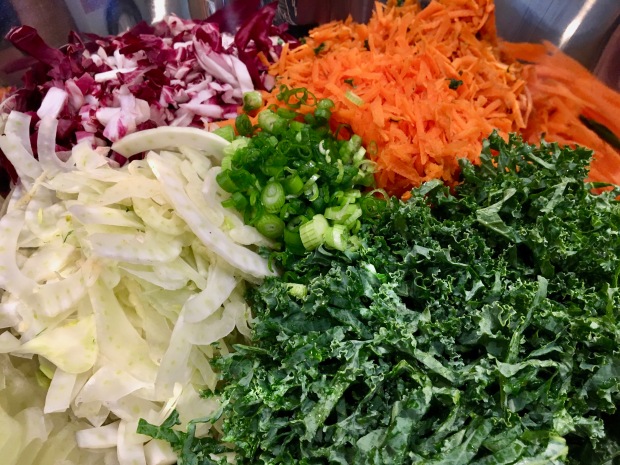
I had a salad very similar to this once and thought it was a brilliant blend of veggies. The fennel offers its freshness, with a hint of liquorice. The carrot is earthy and sweet. And the radicchio provides a slight bitterness to balance the flavours. But to up the ante on the tropical look of the salad with all the colours, I wanted to impart an exotic flavour to add to the experience. Enter lime leaves. Their delicate flavour adds an air of mystery to the salad. The taste being somewhat familiar, but at the same time foreign or indeterminate compared to most western flavours.
Let’s get to cooking. To start ourselves off, we are going to cook the lime leaves in the coconut milk. Try and use a “premium” coconut milk, as these will be higher fat, and will provide you with a creamier and less watery dressing. Place the lime leaves in the milk and cook over low heat until the milk is infused, about 20-30 minutes.
I drool now at the memory.
I actually cooked too much, using the entire can of coconut milk. I saved and froze the leftovers, which could be used for a smoothie, a delicious addition to a cocktail in place of ice, or even melted into a curry for an added punch of flavour. Tasting it frozen, it does inspire me to make an attempt at a makrut lime ice cream sometime in my near future. A forthcoming blog post, you ask? I would say likely.
Now that we have the base of our dressing ready, and we are waiting for it to cool, we will prep our veggies. Wash everything and set on a a towel to dry. Have a large bowl ready for the veggies as they are ready. Removing the core, slice the fennel very thin, either using mandolin or a very sharp knife. If you want, you can reserve some of the fennel greens to add some visual pop to the presentation of the salad at the end. De-stalk the kale and slice thinly. Slice the radicchio. Peel and shred the carrots. Slice the green onions, including part of the white. Add everything into the bowl.
This balance of colours and flavours excites all elements of the palate!
Whisk all the dressing ingredients well together (make sure you have removed and discarded the lime leaves), then drench your veggies with the delicious mix and stir all together. Serve with some of the fennel greens as adornment.
Wash the turkey, rub with the kosher salt (including in cavity), and place in a large pot. Fill pot with water until the turkey is submerged. Let sit overnight in fridge.
Melt 1 cup of butter in a large pan, add shallots and cook until softened. Tear the baguette into small-ish pieces, and mix in the butter and shallots, then the herbs and salt and pepper to taste.
Take the turkey out of the brine, rinse, and place in roasting pan. Fill with stuffing, close up, place breastside-down in the pan. Melt remaining cup of butter, and brush the entire turkey. Save excess butter to brush during cooking. Pour 1 cup of wine overtop, then place in oven heated to 325ºF/ 165ºC. Every 30 minutes, remove turkey from the oven, apply more butter, and top up wine in the pan, maintaining liquid in the bottom of the pan. At around 2/3 of the cooking time, flip the turkey breast side-up (approximately 2-2 1/2 hours), and continue with the 30 minute butter-basting and wine top-up until the turkey registers 165ºF/74ºC in the breast.
Remove from the oven, set the turkey aside to rest, and pour the juices into a pot and heat on medium-high heat until bubbling. Mix flour with about 1/2 cup water until there are no lumps. Add slowly to the juices, mixing constantly, until desired thickness of gravy is reached. Add salt, pepper or wine as desired. Carve turkey, removing stuffing, and serve with gravy.
Directions for remaining side dishes below.
And now for the details…
This Easter was a pretty special one. This turkey was made remotely, in another city. The reason for this is that I was going to pick up a good friend of mine who had just done a very selfless thing. Connie had just gotten out of hospital as a living liver donor for a coworker of ours who was in need of a new liver. A bit of a long story, but the long and short of it: cancer is an asshole.
While in the city, we were also able to visit with another of our friends and her mom, who is currently undergoing chemotherapy. Say it with me this time: CANCER IS AN ASSHOLE.
And you may be wondering… wait Emily, you said this Easter was special. And it was. I got to spend time with an extremely giving, selfless, and loving friend (Connie) who seems to be well on the mend, visit with our other friend and her mom, who is one of the most lovely, joyful, and kind people I have ever met (she passed these same attributes on to her daughter!), and have a tasty meal with all these amazing women, as well as with some additional family. Not to mention, we spent the day, while the turkey was cooking, hanging out and watching Star Wars. #starwarsnerd
I started naming my turkey when preparing turkey dinners years ago, and I guess it’s become a bit of a tradition for me. This year, the naming responsibility went to our donor, Connie. In honour of our brave and strong donee, and a story that her and her husband had told, we ended up naming the turkey “Mo”. His full name is Morton Turkington, but he prefers to go by by Mo.
Let’s start cooking. Well… preparing. Big side note before we start preparing Mo! Was Mo frozen? Yes. Standard thaw time is about 5 hours/lb in the fridge. For Mo’s case, who was 14 lbs, this means he needed 70 hours, or almost 3 days of thaw time before we would be ready. And in our case, since we are brining the night before, tack on a bit of time. It’s okay if Mo is still a bit chilly. As long as you can “clean” him properly and get him in the pot for brining, he should be okay.
Once thawed, we are going to get Mo prepared the night before his big day. The night before, find nice big stockpot that will be able to handle Mo. All of him. Before we place Mo in the stockpot, give him a clean once he is out of his package. And by clean, I mean that if he has them, remove the giblets and his neck out of where they have stuffed them (up his behind), and give him a rinse, inside and out. (Side note: save them both. You can use the giblets, if you want, for the stuffing, and the neck is great to add to the pot when making stock.) Next, we put him in the pot, and take out the coarse or kosher salt. We will be giving Mo a salt scrub, rubbing the salt into and all over his body, as well as in his cavity. Any extra salt that falls off of Mo can stay in the bottom of the pot. After his vigorous exfoliation, let’s give Mo a nice refreshing bath. Fill his pot with cold water until he is completely submerged. If the pot is a bit too small to do this (mine was), cover whatever pieces of Mo that are poking up above the surface with some aluminum foil, making sure the foil ends are in the water (this will keep all of Mo humidified, and make sure portions of him do not dry out).
Mo has had his body treatment and is ready for an overnight soak
Before moving forward, let’s check the time required for cooking. Like I said, Mo was about 14 pounds, and I was planning on stuffing him. Recommended cooking time was 3.75-4.25 hours (thanks Food Network!). Factor this in to when you plan on eating to make sure Mo is ready for dinner. We were aiming to eat at 6pm, so I got Mo in the oven by 1pm, to allow for resting, carving, and gravy preparation time.
This all means that Mo got pulled out of his bath at about noon and got a quick rinse. We’ll transfer him to the roaster, and he can rest here until we have the stuffing ready.
Start by melting the 1 cup of butter, then add the chopped shallots (and giblets, cut into smaller pieces, if you so desire), all over medium heat, stirring occasionally. As we are waiting for the shallots to soften in the butter, tear the bread into small chunks into a large bowl or container. Once the shallots have softened, pour the butter and shallots over the bread, mixing well. Then sprinkle with your chopped herbs, salt and pepper, and the cognac. Taste testing is clearly required… Y’know… for quality.
Before moving on, preheat the oven to 325ºF. And now that the stuffing is ready, we’re going to get some of that up in Mo. Stuff in as much as Mo’s cavity can handle, leaving a tiny bit of space so we can stitch Mo up without working around the stuffing. Next is time for some stitching. I… clearly made the right choice by not becoming a surgeon.
And yes, I did use red thread. This is something my mom always did. It makes sure you can find the thread easily after the turkey has cooked, so you remove all thread, instead of chancing that someone else find it in their teeth…
Now that Mo is ready to go, flip him breast-side-down before putting him in the oven. By starting the cooking process with Mo flipped down, it will give the light, typically drier, meat a chance to cook in the juices, so Mo is nice and moist (yes, moist) once he is done.
Next, pour about 1 cup of the wine over Mo, and baste him with a whole lotta butter (you don’t need to use all the butter at this time, we will be basting him more than once), and sprinkle him with a bit of S&P. Then, we place him in the oven and get him to cooking. Every 30 minutes, we will be taking him out, re-basting with more butter, and adding wine to make sure there is always liquid in the base of the pan. Here’s Mo after the first 30 minutes. Did I use a foil pan instead of a roaster? Yes I did. I’m super lazy, and it’s way easier to clean.
About 2/3 of the way through cooking, we are going to flip Mo. In this case, that was at about the 2.5 hour mark. Mo looks a little rough here, his skin ripped a bit, and it looked like he had gotten into a fight… and lost. Honestly, when it comes to most turkeys, I have not found a direct correlation between prettiness and deliciousness, so I was not too fussed.
Now is also a good time to start getting the rest of your side dishes ready to go. The side dishes I chose for this meal were mashed potatoes, peas and carrots, and haricots verts with caramelized shallots and candied walnuts (Ohhh! It’s a throwback for this one). We do not need to start cooking yet, but there some peeling and cutting to be done! Peel the potatoes (1kg worth, yellow flesh) and cut into chunks about 1.5”x1.5”. To keep your potatoes from turning brown, place the peeled and cut pieces in a large pot, half-filled with cold water. We will be cooking the potatoes in this same pot and water, but for now, it can rest on the stove, ready for action. We will trim the beans and cook the shallots and nuts to get ready for fast assembly at go-time. Now… for the mashed potatoes we are going to be making, I am inspired by a potato recipe I learned in Paris. The original is Joelle Robuchon’s recipe, which, let’s admit, I bastardized pretty badly here. The main similarity I kept was the ratio of butter:potato, as well as the method of adding the butter. Because… well, for the high ratio, it just makes sense. We’ll take 1 cup (yes, a full cup) of butter out of the fridge (cold butter cuts much easier, you may even want to stick it in the freezer for a couple minutes) and cut it into small pieces, about 1cmx1cm. Put it back into the fridge, and we will have this ready for when we are ready to mash. We will also peel and cut the carrots (3 large-ish) into little medallions and placing them in a smaller pot in the same manner as the potatoes. I just use frozen peas, you could add them now (about 1 cup) in with the carrots, or just before starting to cook.
Juicy little carrot medallions and peas, just waiting to go
Even as do all this other prep, we still need to pay attention to Mo and continue with the 30 minute basting and wine refill through until the end of the cooking. Recommended temperatures for Mo are his thigh reading 180ºF and/or is breast reading 165ºF for him to be ready to come out. As Mo’s temperature nears final, (about 10ºF below doneness), turn on the potatoes and let them cook until when you pierce with a fork, they fall off on their own back into the pot. This timing will likely be pretty close to when Mo is ready to come out of the oven.
Heresy, I know, I cooked them without the skins…
Once out of the oven, Mo will rest to the side. Here’s where things get busy. Drain the potatoes, and keep them in their warm pot. Put the peas and carrots on the stove at medium high heat. Also, heat up the frying pan for the beans, and add the oil, then the beans and salt. Stir the beans regularly. Once the peas and carrots start to simmer, turn them off and let them cook a little further in the hot water. Stir the beans. Add the juices from the turkey roaster (you may want to strain yours) to a pot, and place on the stove at medium high heat, letting them come to a boil, then reduce the heat to a simmer. Stir the beans. Mix the flour with water and a little bit of the heated juices. Mix this really well, there should be zero lumps. Check the beans, and remove from the heat to a serving dish if they are done. Add the flour mix slowly to the juices, stirring constantly, until the desired thickness of the gravy is reached, then remove from the heat. Drain the peas and carrots, and place in a bowl, top with the butter, allowing it to melt down into the veggies. Take the cut butter out of the fridge, and mash those carefully cut small pieces into the potatoes, adding the grated garlic, and salt and pepper to taste, then transfer to serving dish (did you notice how easy it was to mash all that butter into the potatoes when it was precut??) Sprinkle the beans with the nuts and shallots. Transfer everything to the table, it’s time to eat!
No food mill, just a masher. Yet again… not at all according to Joel Robuchon’s instruction, but at least it wasn’t an electric mixer!!
I luckily had a helper at the end who carved Mo before he made his grand appearance on the table, but if he was prettier, there is always the option of presenting Mo is his full glory and carve at the table. Maybe even get those white fluffy shoes for his feet. Now is the time to kick back, relax, and enjoy the fruits of your labour! And let someone else clean up the kitchen 😉
Instant Pot Duck Breast with Baby King Oyster Mushrooms
Duck breast with crispy skin, done from frozen in the Instant Pot and finished on the stove, with a currant sauce and miso glazed king oyster mushrooms.
Pour the port, broth, and currants into the bottom of the instant pot. Add the rack into the pot, then place the duck breasts, skin side up, on the rack and sprinkle with 1/2 tsp salt. Cook on Poultry setting under pressure for 23 minutes (resulted in doneness of medium-well). Release the steam, take out the duck breast, score the skin in a crisscross pattern and sprinkle with more salt, then sear on a medium-high heat pan until the skin has browned, remove from pan and set aside. Pour the rendered duck fat into a bowl and set aside. Add the currants and liquid from the instant pot pan with the garlic jelly. Cook down, stirring regularly, to half the original volume. Remove from heat, strain out the pips, then pour over the duck breast and serve.
Miso-glazed Mushrooms
Add the garlic for the mushrooms to the pan into the rendered duck fat. Once the garlic starts to brown, add the mushrooms and some salt. Stir regularly, until the mushrooms have browned and started to soften. Then add the brandy and cook down. Mix the miso paste with the water, then add to the pan with the sugar, and cook until almost all the liquid is cooked out. Serve with the duck.
And now for the details…
I was at a loss for what to make for dinner this past Sunday afternoon and decided to raid our freezer to see what I could find. I had some frozen duck breast tucked into the freezer and thought “sure, why not?”
I assumed I would be able to find some kind of recipe online for an Instant Pot duck breast cooked from frozen, but all I could find was a recipe for a stew. It probably would have been good, but I was craving duck breast on it’s own, with that nice crispy skin… a little salty, a little fatty, mmmmmmmm…. *ahem* Anyhow, since I could not find a recipe… I made one up 😛
Now, I do say from frozen for the duck breast, but I did need to let them thaw just a little, since they had those soft, thin pieces in the package meant to absorb liquid; which were frozen solid onto the meat. I let it defrost just enough to be able to peel them off without ending up with a bunch of frozen plastic pieces adhered to my bird. When it made it to the pot, though, it was still pretty much rock-hard with the exception of a thin layer on the exterior (you can actually see some ice still on the meat in the photo!)
Place the breasts on the rack in the pot, skin side up, to keep it out of the liquid. Under the meat goes the port, broth and currants. Plus, of course, I sprinkled a bit of salt on top. Make sure your pot lid is set to “Sealing”, and then let it cook on “poultry” setting for about 23 minutes. This resulted in a doneness level of about medium-well. You could probably adjust to a little less or a little more if you would prefer a different level of doneness. If you are able to get the duck out of the package while it’s still frozen all the way through, I would add on a couple minutes.
While the duck is cooking, we can start to prepare the mushrooms. I found these baby king oyster mushrooms at T&T, our asian supermarket, where I went shopping with my husband and in-laws after we went for dim sum earlier that morning. As you know, I enjoy not just cooking and eating, but also shopping for ingredients. I love shopping at T&T, since the ingredient options are often quite different than the “standard western” grocery options. And I really love going there with my in-laws, since I will get all kinds of suggestions and advice from them on produce I am unfamiliar with, like whether the produce is is in good shape, if it is in season, or suggestions for different produce I would not know to take home. My husband finds these shopping trips amusingly frustrating with the three of us, since we tend to scatter and reform, which my husband, of course, refers to as “herding cats”. Mama and papa know that I LOVE mushrooms, particularly shimeji and king oyster, and brought over the baby king oysters. I was really excited to cook these. They looked so good; plump little morsels, ready to be fried up for dinner! Even though they looked fairly clean in the package, papa suggested I wash them and trim the ends anyhow, and so I did.
Attempting to maintain a pseudo-asian flavour for the mushrooms, I decided to fry them up and glaze them with some miso. If you cook your duck breast first, you can reserve the rendered duck fat (see below for more details) and cook the mushrooms in that after you’ve fried the duck breasts. For me, I happened to have some rendered goose fat in the fridge from foie gras I had made a few weeks before, so I melted some of that in the pan, and then started to sauté my mushrooms and garlic.
Add a pinch of salt to the pan and sauté the mushrooms and garlic. This will seem like a counterintuitive thing for me to say: but don’t add too much salt. The miso has some saltiness to it, and it is better to taste test and add a bit more towards the end than end up with too much salt. Cook the mushrooms until they start to soften and get patches of golden brown. Once that happens, add the brandy and allow it to cook down until there is almost no liquid left in the pan, stirring regularly.
While the brandy is cooking down, add the miso to the hot water and mix until the miso is mostly dissolved. Add the mixture to your pan, and sprinkle with the sugar, and again stir regularly while cooking down the liquid until a smooth glossy finish coats your mushrooms, and there is little to no liquid in the pan.
By now, the duck should be done. Allow the pressure to release from your instant pot, and open to reveal your beautifully cooked duck breast. Oh. Wait. Not so beautiful yet. The skin is all soggy looking and it appears as if the breast as been boiled. Ew.
We can fix that right quick. Remove the breasts from the pot, reserving the liquid, and score the skin in a criss-cross pattern with a sharp knife. Sprinkle the skin with salt, and then place in a dry pan at just below high heat. You may want to tilt and hold the meat in a few directions on the pan to crisp up the skin on all sides.
As you cook the skin and it starts crisping to a nice golden brown, it will be releasing a whole heck of a lot of fat. This fat can be used to cook your mushrooms, or you can pour it into a Tupperware and store it in the fridge to use as an olive oil or butter replacement in another dish later on.
Once the skin has crisped to your desired level of doneness, remove the breasts from the pan and let them rest to the side. Pour the fat from the pan into a container of choice, then pour the liquid from the instant pot (you almost forgot about that, didn’t you?) into the pan. Reduce the heat to medium high, and add the garlic jelly, stirring to dissolve the jelly in the liquid. Allow the liquid to reduce by about half, and then strain to remove the pips and skin from the currants. Then, slice the duck breasts across the grain into nice, moist (yes, I used the descriptor moist) slices, and spoon the sauce on top. Serve with mushrooms and enjoy!