Warm Kale Salad with Caramelized Shallots and Roasted Apples

Warm Kale Salad with Shallots and Apples

Prep Time 5 minutes
Cook Time 15 minutes
Total Time 20 minutes
Course Main Course, Salad

Ingredients
  

  • 3 shallots (sliced medium-thick)
  • 3 Tbsps (plus 2 Tbsps) olive oil
  • 2 Tbsps dried currants
  • 2 Tbsps red wine vinegar
  • 2 tsps dijon mustard
  • 1 Tbsp maple syrup
  • 1/8 tsp salt
  • 2 small apples (cored and sliced)
  • 3 celery ribs (sliced)
  • 8 leaves kale (small leaves, reduce if large leaves)
  • 1/2 cup walnut pieces (toasted)

Instructions
 

  • Heat oven to 200ºC/400ºF. Place shallot slices on large cookie sheet lined with parchment paper. Drizzle with 3 tablespoons olive oil. Place in oven for 7 minutes. Remove and flip. Place back in oven for 5-7 minutes.
  • Remove and add celery and apples, mixing to coat all with oil. Place back in oven for 5 minutes.
  • Sprinkle kale over other fruit/vegetables, place back in oven for 3-8 minutes or until kale has softened, but not turned crispy.
  • Mix together currants, vinegar, syrup, mustard, 2 tablespoons of oil and salt.
  • Remove fruit/vegetables from sheet to serving dish. Drizzle with vinaigrette. Sprinkle with walnuts. Serve.
Keyword Apple, Kale, Salad, Salad Dressing, Shallots

And now for the details…

Back for day two of the 14-day-quarantine-recipe-posting-challenge.

Today’s recipe is a warm kale salad. This is a great recipe to throw together when you don’t want to have to spend a whole lot of time thinking about what you are putting together or spend time babysitting a recipe. Yes, there are many removals and adds back into the oven, but as long as you have cut and prepared everything in advance, you can move pretty quickly through each step and use the time in between to either prepare the other elements of your menu, or sip some wine. Or both? Wine not.

If you are normally not a fan of kale, this may be a good recipe to try. Fresh kale definitely has a bite to it that a lot of people find unappealing. To be honest, I really enjoy it, but my tastes in food might be questionable; I’m the one who hates pancakes and French toast, remember? Because we cook the kale for a short time in this recipe, it will soften the kale, as well as cut down the bitterness a little bit. If you have not enjoyed fresh kale salad recipes in the past, give this a try, you might be pleasantly surprised. But if this still is not the recipe for you, I can entirely understand. Kale isn’t for everyone.

For this recipe, I got a chance to use purple, or Redbor, kale. It is what was provided to me by that incredibly generous friend I mentioned in the last post who dropped off a slew of fresh produce for me to use! I viewed this as a sort of Mystery Box cooking challenge, where the ingredients she provided were my “basket”, and now I am finding recipes to use these ingredients for the rest of the week! If you can’t find Redbor kale, fret not. Green, curly kale or dinosaur kale will work just as well.

Let’s get to cooking.

Start out by heating the oven to 200ºC/400ºF. While the oven is heating, slice the shallots fairly thick, maybe ~5mm (3/8″). We want them fairly thick, because we will be turning them over halfway through, and thinly sliced shallots are just going to flop apart when you try to turn them over. Lay them flat on a cookie sheet lined with parchment paper, and then drizzle with 3 tablespoons of the olive oil, flipping or lifting the pieces if you need, to ensure they are well coated with the oil. Once the oven has heated up, place the sheet in oven and cook for 7 minutes.

While the shallots are cooking, prepare the rest of the ingredients. I usually start by putting the currants into the vinegar and syrup, since I like to give them a bit of soak time to soften and absorb the liquid.

Next, wash and slice the celery, and set aside.

Wash and core the apples, then slice them into fairly thin slices, no more than 5mm thick.

When the shallots are done with the first 7 minutes, remove the sheet from the oven, and turn the shallots over to the other side. I find two forks seems to work best to do this. If the shallots fall apart while you do this, don’t worry too much, try to flip the majority as well as you can, then return them to the oven for another 5-7 minutes, or until they have caramelized.

Once done, remove the sheet again, and add the celery and apples, stirring everything together to coat all pieces with the excess olive oil. Place the sheet back in the oven for another 5 minutes.

Finally, place the kale above the other ingredients on the sheet and put back into the oven a final time for 3-8 minutes (will vary greatly on whether you have a convection oven or not). We want to cook them just until the kale has softened, but has not all turn dried and crispy. A few crispy edges are okay, and I find add to the texture of the salad, but I made the mistake when I moved to our new house with the convection oven of cooking for 5 minutes, and all the kale had turned essentially into kale chips… not what I was going for…

Finally, using a fork, whisk the mustard, salt and olive oil in with the currant, syrup and vinegar, and get ready to plate your salad.

Remove the veggies and fruits from the sheet to your serving dish. I usually like to remove the kale first and lay it as the base, then scoop the rest of the items on top. Drizzle with the currant vinaigrette, spooning any leftover currants onto the salad, and then top with the toasted walnuts, crumbling slightly.

I felt as though this salad could have used a cheese element of some kind, maybe some goat’s cheese or bleu cheese. But, well, quarantine. Feel free to add either of those if you want a salty, creamy element added to the salad.

Finally, serve and enjoy.

Happy eating.

Rice Bowl with Fried Eggs, Bacon, and Kimchi Mayo

Rice Bowl with Eggs, Bacon and Kimchi Mayo

A quick, easy and delicious dinner or breakfast!
Prep Time 5 minutes
Cook Time 15 minutes
Total Time 20 minutes
Course Breakfast, Main Course
Servings 2 people

Ingredients
  

  • 3/4 cups uncooked jasmine rice
  • water (to cook rice)
  • 4 eggs
  • 6 pieces bacon
  • 1/4 cup kimchi
  • 1/4 cup mayo
  • 2 cups fresh spinach (chopped)
  • 2 green onions (chopped)

Instructions
 

  • Cook rice (don't forget to rinse the rice first!)
  • Blend together kimchi and mayo in blender or small food processor until mostly smooth.
  • In a large pan, cook bacon. Set aside, and drain any excess fat.
  • Cook eggs in remaining bacon fat until preferred level of doneness.
  • Add some of the kimchi mayo to the bottom of two bowls. Split rice between bowls, add eggs, bacon and spinach. Top with green onion and remainder of kimchi mayo. Serve.
Keyword Bacon, Breakfast, Egg, Kimchi, Rice

And now for the details…

We just got back into Canada yesterday from Spain and are self-isolating for at least the next two weeks. It was pretty stressful getting home, as we tried to push our travel forward by a week and a half, with many of the flights getting booked up before we had a chance to secure our way back. We finally managed to book the flights, and we are super lucky to have an amazing support network here. A friend of ours dropped off groceries for us at the house before we got home so we are well stocked while we stay at home to eliminate any exposure to others. What to do while in quarantine for two weeks? Why not a 14 day challenge of one post every day using what we have in the freezer/pantry, plus the fresh veggies and fruits provided by our amazing friend!

This is the meal we had yesterday evening when we got home. Jet lagged and trying to come down from the stress of essentially fleeing for home, we wanted something fairly simple and quick, but also comforting. we happened to have bacon in the freezer, kimchi in the fridge, and rice in the pantry. Along with the fresh veg and eggs our friend brought us, this seemed like a pretty quick and easy meal to throw together while chilling with some TV and a glass of red wine to take off the edge.

Rice bowls seem to be trending right now, but my husband remembers eggs and rice being served to him for a quick meal frequently as a kid. So with what we had available to us, this recipe was born. After I made this dish, it was requested that this dish become our go-to for a quick meal going forward! In its creation, I may have been inspired by Empire Provision and would highly recommend you try out their “My Bowl’s Got Seoul” if you make it there for brunch.

Okay, let’s start cooking.

We start everything out, of course, with cooking the rice. I didn’t specify what kind of white rice here, but my personal preference is for jasmine rice. Completely up to you to take this extra step, but it has been ingrained into me by my husband: wash the rice!!! This means rinsing the rice in cold water until the water runs clear. This will avoid clumpy, gummy rice, and if you are a textural eater, it will enhance your eating experience 😉

While the rice is cooking, put the kimchi and mayo into a blender or small food processor and blend until mostly smooth. If you are willing to put in the extra time and get it super smooth, all the power you. I was tired and hangry and just wanted to eat, so mine was still a little lumpy, more the texture of a pesto than a mayo.

Next, take a large pan, and cook your bacon over medium-high heat. The flexibility of this dish is huge; the amounts and measurements in the recipe are completely guidelines and easy to modify. If you want more bacon, cook more bacon! If you want more eggs, cook more eggs! Feeding four people instead of two? Double the recipe!

Once the bacon is done, set it aside in a dish lined with paper towels. Drain most of the bacon grease out of the pan (why not drain it into a container and use it as a cooking fat alternative for future meals?), and add your eggs. We did ours sunny-side up with soft yolks (a runny, bright orange yolk over the rice? YASSSSSSS), but this is totally up to your preferences. Do I need to learn how to cook my eggs so they look prettier and not floating all over the pan? Maybe. But again: hangry.

While the bacon and eggs are cooking, loosely chop the spinach, and chop the green onions.

We plate this meal by placing some of the kimchi mayo on the bottom of our bowls. Next, add your rice (still hot!), and spread it out to become the base of your bowl. Spreading the rice out is so that everything goes on top and the rice becomes the delicious vehicle that everything else soaks into. Top the rice with the spinach, then add the eggs and bacon on top. Finish it off with a large dollop of the kimchi mayo, and a sprinkling of green onions, and dig in immediately!

Happy eating.

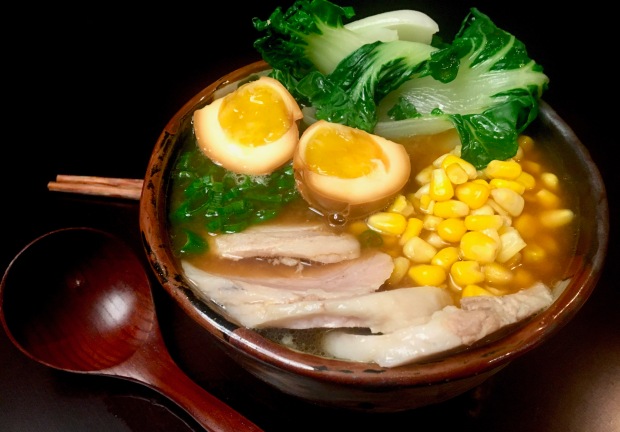
Instant Pot Tonkotsu Ramen

Instant Pot Tonkotsu Ramen

Umami-rich Ramen Soup, including a broth from scratch, in way less time thanks to the use of the Instant Pot!
Prep Time 15 minutes
Cook Time 3 hours 45 minutes
Total Time 4 hours
Course Main Course, Soup

Ingredients
  

  • 2 pork trotters (split)
  • 2 chicken backs
  • 2 leeks (green ends trimmed off, cut into chunks)
  • 2 shallots (peeled and cut into chunks)
  • 8 cm piece of ginger (peeled and cut into chunks)
  • 4 baby king oyster mushrooms (sliced, or 1 king oyster mushroom, sliced)
  • 600 g pork belly (rolled and tied tightly with kitchen twine)
  • 4 eggs (soft boiled)
  • 400 g fresh ramen noodles
  • 1 cup fresh or frozen corn kernels
  • 4 baby bok choy (leaves separated)
  • 3 green onions (chopped)
  • 2 Tbsps soy sauve
  • 2 Tbsps mirin

Instructions
 

  • Place pig trotters and chicken backs in a pot on stove of boiling water, reduce temperature to simmer. Simmer for a minimum of 10 minutes, skimming off foam as it cooks. Remove trotters and backs, set aside, discard liquid. Pick out any dark or bloody bits from trotters and backs.
  • Place trotters, backs, leeks, shallots, ginger, mushrooms, and pot belly in instant pot. Close pot and cook on "soup/broth" setting for 2.5 hours.
  • Place soy sauce, mirin and 4 Tbsps water in ziplock bag, place eggs in bag, and place in refrigerator, turn occasionally (can be done night before).
  • After 2.5 hours, release pressure and open. Remove belly, wrap tightly in cling film wrap and place in refrigerator. Close Instant Pot back up, set for another 60 minutes on "soup/broth" setting.
  • Once done, release pressure, then strain broth and throw out solids.
  • In separate pot on stove, boil water. Using a small mesh strainer, cook ramen in water until done, remove and strain, and place in bowls. Using same mesh strainer, cook bok choy leaves in same pot of boiling water for 30-60 seconds, strain.
  • Take pork belly from refrigerator, remove cling film and slice thinly. Arrange pork belly, bok choy, corn and green onions in bowl over ramen noodles. Ladle hot broth over other ingredients, top with halved eggs and serve.
Keyword Broth, Egg, Noodles, Pork, Pork Belly, Ramen, Soup, Tonkotsu

And now for the details…

Ramen. Delicious, delicious ramen. Until about a decade ago, I had no idea what real ramen was or could be. Before that, my brain associated the word ramen with Mr. Noodles or Ichiban, and I had no idea that there was so much more that ramen had to offer than instant noodles.

Since then, I have sought out ramen wherever I may roam. My favourite that I have tried so far is from the chain Tenkaippin in Japan. We made return trips to the same restaurant in Kyoto, several years ago. The broth is super flavourful, thick and rich. I have dreams about it even still. This recipe… is not that soup unfortunately. But, it is a nice rich broth that is pretty tasty, if I do say so myself. Cooking for an extended period of time in the Instant Pot is allowing the collagen to release from trotters and chicken backs, providing a thick mouth feel.

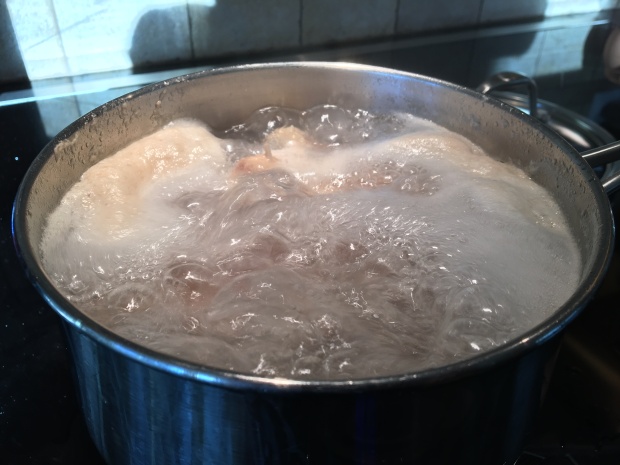
Let’s get started. We will start by “cleaning” the pig trotters and chicken backs. Bring a pot to a rolling boil and add the trotters and backs. Reduce to a simmer and cook for around 10 minutes, skimming off any gunky foam off the top. Once that’s done, dump the liquid. Using a fork, knife, or chopstick, we are going to pick at the trotters and back, removing any darkened bits or pieces that obviously have blood. We are doing this to clean out any bloody bits so we have a nice clear broth, rather than a skanky, cloudy, dark broth.

That icky looking foam is what you skim off and dispose of…

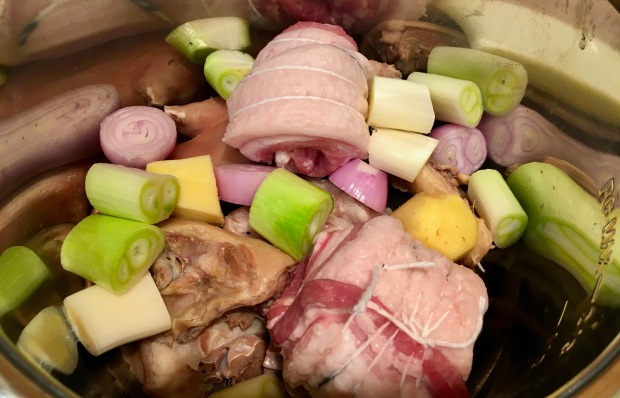
Once cleaned, place the trotters and backs in your instant pot. Stack in the leeks, shallots, ginger, and mushrooms. We are also going to roll the pork belly pieces and tie them tight with butchers twine, and place that in the pot with everything else.

Fill the pot with water up to the “MAX” line, and then close the pot, ensuring it is in the “Sealing” position and set for 2.5 hours on the “Soup/Broth” setting.

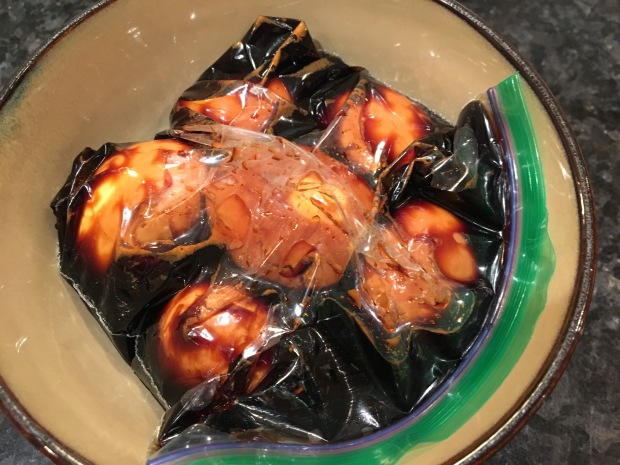
While the broth is cooking, we’ll set the eggs to marinating. We are making ajitsuke tamago, or seasoned eggs, to add to the ramen later. Mix the soy sauce, mirin, and 4 tablespoons of water in a ziplock bag, and then place your soft boiled eggs inside (need a refresher on how to soft boil an egg? Directions are included in this recipe). Close the ziplock up tight so as little air as possible is left inside, and then place in the fridge. Turn them around after an hour or two so they marinate evenly on all sides.

After 2.5 hours of cooking, release the pressure from the pot, and open ‘er up. Remove the pork belly, then close the pot back up, including resetting to “Sealing” position and set the pot back to “Soup/Broth” setting and cook again for 60 minutes. Wrap the pork belly tightly in cling wrap, and place in the refrigerator. The pork belly is more than cooked by now, and chilling the belly will allow us to cut it nice and thin to place in the bowl later.

Once the broth is done, strain it into a container, and discard any solids. I like using cheese cloth to help with the straining to get rid of any small, gritty bits.

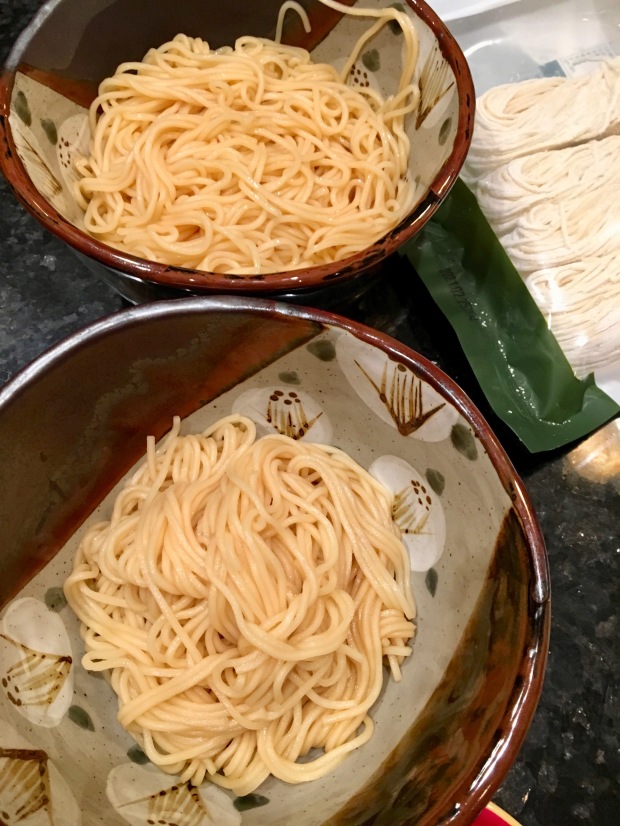
Time to get everything ready. Boil water in a pot, and place the ramen noodles in a wire mesh strainer. Dip the strainer into the pot to cook the noodles, and when done, drain the noodles and place in the bottom of a large bowl.

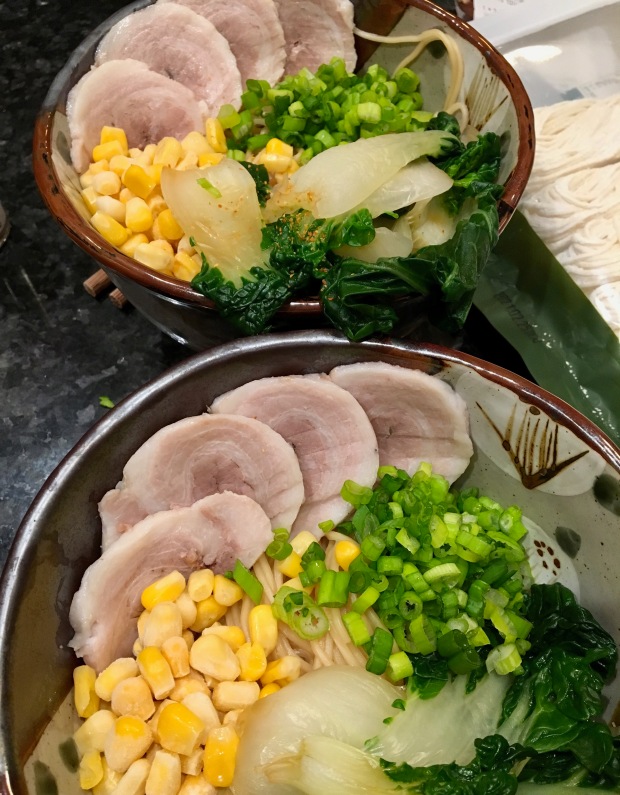
Using the same strainer and boiling water, cook the bok choy until the leave just turn vibrant green. Place the boy choy, green onions, and corn into the bowl. Remove the pork belly from the fridge, and take out of the cling wrap. Slice the pork belly thinly and place in the ramen bowl.

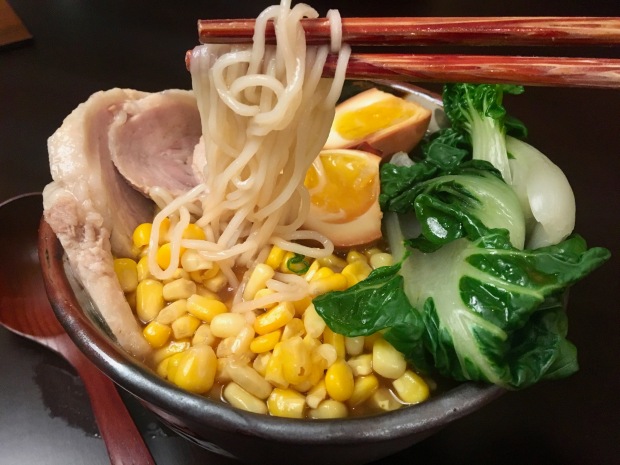
Finish the soup off by taking the eggs out of the marinating liquid, cutting in half, and placing in the bowl. Ladle the still-hot broth over the soup contents, and serve immediately. Enjoy immediately!

Happy eating.

Rich and Cheesy Scalloped Potatoes

Cheesy Scalloped Potatoes

Rich, cheesy, gooey scalloped potatoes recipe
Prep Time 20 minutes
Cook Time 45 minutes
Total Time 1 hour 5 minutes
Course Side Dish

Ingredients
  

  • 1/4 cup butter
  • 1/4 cup flour
  • 2-3 cups whole milk
  • 1/4 cup aged cheddar (3 years aged or more, shredded)
  • salt and pepper (to taste)
  • 1 dash nutmeg
  • 3 cups old cheddar (320g, shredded)
  • 1 medium shallot (peeled and sliced)
  • 10-14 small-medium yellow potatoes

Instructions
 

  • Melt butter in pot over medium heat and brown. Add flour and stir until nutty smelling. Whisk in milk, ~1/2 cup at a time until sauce forms. Cook until sauce starts to simmer and thickens slightly, adding salt and pepper to taste and dash of nutmeg. Remove from heat and stir in aged cheddar until melted into sauce.
  • Slice potatoes and shallots. Layer potates and sauce in 8"X11" oven-ready pan: sauce, potatoes, sauce, shredded cheese, shallots, potatoes, sauce, shredded cheese, shallots, potatoes, sauce, shredded cheese.
  • Bake in oven at 177ºC/350ºF for 40-50 minutes until the cheese is browned and the potatoes are cooked through. Serve.
Keyword Cheese, Potatoes, Scalloped Potatoes

And now for the details…

Scalloped potatoes are, in my mind, one of the quintessential comfort foods. There is something about digging into a mass of hot, cheesy, creamy, perfectly cooked potatoey goodness that has a hard time being beat by any other comfort food.

I’ve encountered a number of different recipes for these over the years. Some call for just sprinkling flour between the layers of potatoes, then pouring milk over top. Some call for a béchamel sauce, but no cheese. Some call for cheese, but no kinds of white sauce at all. After some trial and error to find my preference, I am inclined to all the things. Béchamel with some added cheese (would I truly be able to call it a Mornay if I’m not adding gruyère?), then more cheese on its own, and a thin layer of shallots to add additional flavour. And lo! This recipe was born.

Let’s get to cooking.

We are going to start with our sauce. Melt the butter in a pot at medium to medium-high heat. Continue to cook until the butter has just browned, then add you flour. Reduce the heat to medium. Mix the two together well (I find that a whisk is particularly good at this task) and continue to stir over the heat for another several minutes. We are cooking the flour to remove the “raw” taste of the flour, but at the same time, we do not want to cook it too long, as toasted flour starts to lose its ability to thicken the toastier is gets. It’s one of the reasons we browned the butter first, to get that very nutty and toasted flavour, but not needing to compromise the thickening super power of the flour (the Power of Flour! A potential new comic book or graphic novel? Maybe if I could draw…)

Once we have cooked the flour, we are going to whisk the milk in about 1/2 cup at a time. We’re not adding it all at once, since that would like result in lumpy sauce, but you will also need to whisk constantly as you add, since this will thicken up FAST as you add the milk. I’ve given a pretty big range of milk to add here. A lot will depend on where you are, to be honest. Elevation seems to make a huge difference. Since moving to the foothills of the Rocky Mountains and finding myself over 1000m (3280ft) above sea level, I have needed to add more more liquid to my recipes than I did when at the near-sea level of the Canadian Prairies. Add your milk until the sauce has reached the thickness of syrup (think pancake or maple syrup). Next, we are going to bring the sauce to a simmer, stirring regularly, and cooking it until it thickens. When is thick enough? Stick a wooden spoon in the sauce. If the sauce does not coat the spoon, you’re not done yet. If it does coat the spoon, run your finger down the middle of the spoon. If a line forms without the sauce running back into where you drew your line, your sauce is done. While the sauce is cooking, you can season it with salt and pepper to taste, and I also like to add a tiny dash of nutmeg.

As soon as you remove the sauce from the heat, add the shredded aged cheddar, and stir it into the sauce to melt. It may not seem like much cheese, but since we are adding even more cheese later, and using the aged (i.e. super flavourful) cheddar here, a little will go a fairly long way.

Next we start assembly. The shallots can be sliced right away and set to the side. I would recommend slicing the potatoes as you go for a couple reasons. One being that potatoes like to start turning brown fairly quickly after they have been cut. But also because it’s hard to estimate how many potatoes will be enough. Cutting as you go will allow you to stop at just the right point and avoid needing to try and cram a bunch of taters in at the last row, or worse, needing to throw them out.

We start the assembly with a thin spread of the sauce on the bottom of our 8″x11″ baking dish. The thin spread of sauce will avoid the potatoes from sticking to the bottom of the pan. Because let’s be honest, between the sauce and the cheese we are adding here, there is enough fat that greasing the pan is completely unnecessary.

Next we place a layer of the potatoes. Lay them out so they overlap, and try to avoid leaving too many gaps. The layer after the potatoes will be more sauce, a little more generous than what was on the base, about a third of the sauce you have left. Spread the sauce as evenly as you can across the potatoes, and then lay a thin layer of the shallots, using about half of the shallots you have cut.

And then? NO AND THEN! Just kidding. And then: CHEESE!!! Spread out just enough cheese to evenly cover the layer. We want to keep the bulk of the cheese for the last layer.

We are going to rinse and repeat and the layers from here: potatoes, sauce, shallots, cheese, potatoes, sauce… and we use the bulk of the cheese for this top layer, really laying it on thick. This is what will form that gooey crust at the top of our potatoes. Y’know… the part that people “accidentally” scoop too much of when they are serving themselves, and “don’t realize” they left the rest of the potatoes underneath?

We are baking this monster at 177ºC/350ºF for 40-50 minutes. Our end goal: a bubbling dish of cheesy potatoes that are cooked through and a slightly browned crust on top. If you find your cheese is browning too much, cover the dish with tin foil while it cooks.

When its done, let it cool for about 5 minutes, then scoop in and serve.

Happy eating.

Tom Yum Kai Soup (Thai Chicken Spicy and Sour Soup)

Tom Yum Kai Soup

An easy-to-make, spicy, lemongrass flavoured chicken soup, great for a chilly day or when recovering from a cold!
Prep Time 10 minutes
Cook Time 10 minutes
Course Soup
Servings 2 people

Ingredients
  

  • 1 chicken breast (boneless, skinless, cut into 5mm or 1/4" thick slices)
  • 4 cups chicken broth
  • 4 cups water
  • 2.5 cm piece of ginger or galangal (1" piece, peeled and sliced into thick pieces)
  • 2 stalks lemongrass (cut into 2cm or 3/4" pieces)
  • 2 makrut lime leaves (optional)
  • 1 garlic cloves (minced)
  • 1-2 Tbsps fish sauce
  • 2 Tbsps sambal olek
  • 1/2 Tbsp sugar (optional)
  • 8 button mushrooms (quartered)
  • 1 medium tomato (cut into wedges, or 10 cherry tomatoes, halved)
  • 1/2 lime (cut into wedges)

Instructions
 

  • Place the stock and water in a heavy bottomed pot. Heat until it starts to simmer. Add ginger/galangal, lemongrass, and lime leaves, cooking for about 5 minutes. Add fish sauce, sambal olek, and sugar. Cook for 2-3 minutes. Add chicken and mushrooms. Cook for 3 minutes. Add tomatoes. Cook until chicken is cooked through. Serve immediately with lime wedges.
Keyword Chicken, Ginger, Lemongrass, Spicy

And now for the details…

When I’m feeling under the weather, or feeling chilled and want something to stoke that internal fire to feel warmed up, this soup is immediately what I crave. It’s got the warm comfort of a chicken soup, with the spicy bite from the sambal olek and ginger, and a tart or sour note thanks to the lime juice, lemongrass and tomatoes.

I have a few ingredients in here that I have noted as optional, as they do add to the flavour of the soup, but are not critical. Especially the makrut lime leaves, which can often be a challenge to find in some western markets. While the additional of the lime leaves adds a certain floral note and emphasizes the citrus notes, it is not hypercritical if you have a hard time tracking them down.

Let’s get to cooking.

Before we go anywhere, get all the ingredients ready to go. Wash, slice, cut and mince everything and have it next to you at the stove, because the time between additions to the soup are relatively short, which is great because it means we get to eating that much faster!

A tip for the lemongrass: tap it up and down its length with the dull side of your knife. This will help to release some of the oils to make your soup that much more fragrant.

A tip for the chicken: if cutting it thinly is a challenge, try placing the piece of chicken breast in the freezer for 5-10 minutes. It will not freeze completely, but will chill up enough that it is easier to handle while you are cutting. Because we are cutting it so thin, this extra chill to the chicken will not result in any extended cook time.

We start everything off by adding the broth and water into a pot and setting them to medium-high heat on the stove. Heat until the liquid starts to simmer, then reduce to just above medium heat.

Next, add the lemongrass, ginger and lime leaves. Before adding the lime leaves, give them a light squish between your hands; this will help release the oils and allow them to impart more flavour.

Cover the pot and let this simmer for about 5 minutes. Add the fish sauce, sambal olek and sugar (if you are using the sugar). And allow everything to simmer for another 2-3 minutes.

Next, we add the chicken and mushrooms. Yes, I know that the dishwasher will likely sanitize the cutting board and I do not need to be so anal retentive about using multiple boards, but I am just too cautious when it comes to cross contamination.

Let the soup come back up to a simmer, and then cover and cook for about 3 minutes.

Our final addition are the tomatoes. Whether you use a large tomatoes and cut it into wedges, or simply slice up some baby tomatoes, it is really about preference and what you have on hand. Add the tomatoes and stir them in, then simmer everything for another 2-3 minutes, or until the chicken is fully cooked and the tomatoes have softened slightly.

Serve immediately with chopped cilantro and green onions and enjoy that heart-warming deliciousness!

Happy eating.

Chefs Salad (a.k.a. Operation Use Leftover Ham) with Chipotle Ranch Dressing

Chef’s Salad with Chipotle Ranch Dressing

Prep Time 20 minutes
Total Time 20 minutes
Course Main Course, Salad

Ingredients
  

  • 6 cups arugula (or other green leaf lettuce)
  • 1 cup cherry tomatoes (halved)
  • 2 mini cucumbers (sliced)
  • 1 avocado (peeled, pitted and sliced)
  • 1/2 cup shredded cheese (cheddar, havarti, or other)
  • 1 cup cooked ham (cut into bite-sized chunks)
  • 2/3 cups walnut halves (roasted)
  • 3 eggs (soft- or hard-boiled to preference)
  • 4 Tbsps sour cream
  • 2 Tbsps mayonnaise
  • 1/2 tsp salt
  • 1 tsp dried dill
  • 1 clove garlic (shredded)
  • 1 tsp chipotle oil or chipotle powder
  • 1/4 lemon (juiced)

Instructions
 

  • Whish together the sour cream, mayonnaise, salt, dill, garlic, chilli oil and lemon juice. Arrange the other ingredients on a large plate or platter. Drizzle with the dressing. Serve.
Keyword Avocado, Egg, Ham, Salad, Salad Dressing, Vegetables

And now for the details…

Yep, it’s another fairly simple recipe I’m putting forward today. But I couldn’t help it; we had so much ham leftover after our New Years Eve party that I needed to find a number of uses for it. This recipe actually only put a small dent in the leftovers. I am making this ham and bean soup tonight in an effort to use up even more. And we still have some left. Seriously. That’s too many hams. Although it does remind me of Robert Kelly’s (ew, no, not THAT Robert Kelly, I’m talking comedian Robert Kelly) skit about his love of food… “ham, just give me ham” (the whole thing is hilarious, but skip ahead to 4:40 for the quote).

I got a bit liberal with the different ingredients in this salad. Feel free to mix and match the toppings depending on what you have on hand. I did really enjoy the texture combination I had here, but it’s not prescriptive. Typical chef’s salad has some combination of meat, cheese, egg and veggie assortment.

Start with roasting the walnuts so you have them mostly cooled and ready for the last step. Place the walnuts on a small pan and spread them out so they are in a single layer. Place in a 350ºF/175ºC oven for 5-8 minutes until they smell toasty. Let them sit to cool once done.

Next up: the dressing. I made a chipotle ranch-style dressing. Again… because, well, these were the ingredients I happened to have on hand. A good ol’ “let’s clean out the refrigerator” kind of recipe.

Mix together the sour cream, mayonnaise, salt, dill, garlic, lemon juice, and chilli oil. I used Huipi Chil mango-chipotle salsa for my chilli flavour, but if you want the same flavour and don’t have a chipotle chilli oil available, use 1/2 tsp of dried chipotle powder instead. If you prefer a less viscous dressing, you could use buttermilk instead of sour cream.

Next, we need to cook the eggs. I prefer a soft boiled egg, but the traditional chefs salad seems to be a hard boiled egg. Go with you preference. I went into detail on how to do a soft boiled egg in my Rainbow Vegetable Bowl recipe, but long story short: boil water, add eggs, simmer 6-7 minutes, ice bath, peel.

Finally, we assemble the salad. Arrange the rest of the ingredients on a large plate, with the arugula serving as your base.

Drizzle the dressing over the salad, and gently crumble the walnuts with your hands over the salad. The walnuts are serving as the crunch for this salad, eliminating the need for croutons, while giving us an added bite and richness.

Serve immediately and enjoy!

Happy eating.

Homemade Tart and Sweet Holiday Cranberry Sauce

Homemade Cranberry Sauce

Prep Time 5 minutes
Cook Time 25 minutes
Total Time 30 minutes
Course Side Dish
Servings 4 cups

Ingredients
  

  • 680 g fresh cranberries (24 oz)
  • 2 medium oranges (juiced and zested)
  • 1+1/2 cups granulated sugar
  • 1 tsp cinnamon
  • 1/4 tsp ground nutmeg
  • dash ground cloves

Instructions
 

  • Add cranberries, juice and zest to a saucepan. Stir well and place on medium-low heat. Add sugar and spices and cook until cranberries have popped and sauce has thickened to desired consistency.
Keyword Cranberries, Holiday Dinner, Sauce

And now for the details…

Long time no post, and this one is so easy, it seems like a good one to come back with. Timely, too, since Christmas is tomorrow and turkey needs it’s cranberry sidekick!

Need help with the rest of turkey dinner? Fret not! Remember Mo’s the Turkey’s Grand Adventure? It can provide you with step by step instructions for a tasty turkey, starting with the brining of said turkey this evening!

Homemade cranberry sauce is super simple. Maybe not as simple as opening a can, but then again maybe it is, since you don’t have to attack it with a spoon to try and smoosh it down from a cylinder to try and make it look like something resembling sauce…

To start, simply toss the cranberries into a large-ish saucepan and place on the stove at medium-low heat.

Next, zest two oranges into the pot, then juice those same two oranges and add both zest and juice to the pot.

Stir in the sugar and spices, and let the sauce cook away, letting the cranberries cook and break down.

The great thing about cooking this sauce is that you do not need to keep constant watch. Let it simmer away, stirring occasionally, but it will cook for about 15-25 minutes as it slowly turns into a nice, thick sauce. As it cooks, the natural pectin in the cranberries will thicken up the sauce. If you want to cook it for longer but it is becoming too thick, add a little bit of water and let ‘er go.

In the end, you will have a nice thick sauce to have with delicious turkey!

Happy eating.

Crispy Sweet and Salty Maple Bacon Brussel Sprouts

Crispy Maple Bacon Brussel Sprouts

Prep Time 5 minutes
Cook Time 25 minutes
Total Time 30 minutes
Course Side Dish

Ingredients
  

  • 454 g brussel sprouts (1 lb; trimmed and halved)
  • 4 slices bacon (cut into lardons)
  • 1 garlic clove (peeled and sliced)
  • 2 Tbsps butter
  • 2 Tbsps olive oil
  • 2 Tbsps maple syrup
  • 1/2 tsp salt (or to taste)
  • 1 tsp chilli oil (optional)

Instructions
 

  • Trim and halve the brussel sprouts.
  • In a large pan, cook the lardons over medium-high heat until browned and crispy. Strain and remove to plate lined with paper towels, set aside.
  • Put pan back on the heat, add the butter, oil, and garlic. Cook until butter is completely melted and garlic is slightly browned. Add sprouts and salt, toss to coat with butter/oil.
  • Cook until sprouts are cooked through and slightly browned. Add the syrup and cook until syrup starts to caramelize the Brussels sprouts. Add the chilli oil and bacon back into the pan. Cook for 60 seconds, stirring constantly. Serve.
Keyword Bacon, Brussel Sprouts, Maple Syrup, Vegetables

And now for the details…

This is one of my favourite side dishes. Crispy, sweet, and hot Brussel sprouts, that are rich and satisfying. This is saying a lot for me. I used to hate brussel sprouts. Remember my thoughts on cooked cabbage? (Reminder: smells like farts.) This extends to brussel sprouts. Especially if they have been steamed. Blech.

However, when I discovered pan fried brussel sprouts for the first time, I was shocked at the transformation of this veggie from a mushy, flatulent predicament, to a crispy, caramelized bundle of joy.

This recipe pulls together sweet, salty, spicy and rich. Is it still a vegetable dish? Oh sure. But are they just a vegetable when they’re browned, slightly crispy and oh so goooooood.

Let’s get started.

Prepare the brussel sprouts by washing them, trimming the ends, and cutting them in half. If any excess leaves come off when you trim the ends, dispose of those, especially if they are looking a little rough. Prepare the garlic by peeling it and cutting it into slices.

Before we start cooking the sprouts, we are going to cook the bacon. Cut the bacon into small slices, also known as lardons. Cook them on medium-high heat until they are browned and crispy. Set the bacon aside on a dish lined with paper towels. Drain off most of the bacon fat from the pan, but don’t worry about wiping it down.

Next, add the butter and oil to the pan, then add the garlic slices. Cook until the garlic has just started to brown, then add the brussel sprouts and season with salt to taste. Stir the sprouts regularly, allowing the sprouts to cook through and brown on the outsides.

Once the sprouts have cooked most of the way through, add the maple syrup and chilli oil to the pan. Stir, coating all the sprouts with the syrup, and allowing the syrup to start caramelizing and crisping up the sprouts.

Once the liquid has completely cooked down and the sprouts are your preferred level of brown and crispy, add the lardons back into the pan and cook for one more minute to heat everything through. Transfer to a dish and serve!

Happy eating.

Fennel and Kale Salad with Grainy Mustard Dressing

Fennel, Kale and Potato Salad with Grainy Mustard Dressing

Prep Time 20 minutes
Course Salad
Servings 2 servings

Ingredients
  

  • 1/2 fennel bulb (cored and sliced thin)
  • 2 kale leaves (destalked and sliced thin)
  • 4 small potatoes
  • 1 Tbsp mayonnaise
  • 1 Tbsp grainy mustard
  • 1 Tbsp apple cider vinegar
  • 1/4 lemon (juiced)
  • 1 garlic clove (shredded)
  • 1/4 cup Emmentaller or Swiss cheese (shredded)
  • salt and pepper (to taste)

Instructions
 

  • Wrap the potatoes in aluminum foil and place on preheated bbq or oven for 10 minutes on medium high heat. Place the kale and fennel in a bowl. Mix the mayonnaise, mustard, vinegar, juice, and shredded garlic. Add salt and pepper to taste. Once the potatoes have cooled enough to touch, cut into 3-4mm slices and add to the bowl. Toss the veggies with the dressing. Serve.
Keyword Kale, Potatoes, Salad Dressing

And now for the details…

Okay, so this dish was totally another one of those “what do I have in the fridge” moments to bring something together at the last minute. I was having a friend over for dinner, already had steak on the roster, but needed a veggie to go with it. The result? A garlicky, creamy salad that has a freshness hit from the fennel, the added bite of the potatoes and earthiness of Emmentaler cheese.

If you have no Emmentaler, fret not, readily available “Swiss cheese”, as we know it in North America, is actually based on Emmentaler cheese. Because, yep, you guessed it, Emmental is a region in Switzerland. (Fun fact: did you know that the holes in Swiss cheese are known as “eyes” and if the cheese has no eyes, it is considered “blind”?)

Let’s get to the cooking.

Before starting to assemble the salad, we need to cook the potatoes. I used the barbecue, since it was already on to cook the steaks for our meal. But you could always cook them in the oven, or even boil them, as alternatives. I cleaned the potatoes well, since I wanted to keep the skins on, and placed them in tin foil, then cooked them for about 10 minutes. They were just wee, so they didn’t need much time to cook through. Adjust your cooking time as you need, depending on what size of potatoes you are using.

Now prepare the rest of your veggies. Slice the fennel thinly, and chop the kale into bite-sized pieces. Allow the potatoes to cool after they have been cooked; if you add them hot to the salad, they will melt or cook the other ingredients and the results will be quite different.

Slice the potatoes into little medallions, and add all the veggies to your salad bowl.

Whisk together the mayonnaise, mustard, vinegar, lemon juice, and garlic. Add salt and pepper to taste. I used my handy-dandy garlic grating plate to get a nice garlic paste going. If you do not have a garlic plate, grate the garlic with a fine grater right into the dressing bowl, trying to allow any garlic “juice” to make its way into the dressing. Next, grate the cheese, adding it to the bowl with the salad dressing.

Toss everything together gently, trying to avoid breaking the potatoes up into little pieces. Serve, and enjoy!

Happy eating.

Linguine with White Wine Cream and Clams

Linguine with White Wine Cream Sauce and Clams

Prep Time 5 minutes
Cook Time 25 minutes
Total Time 30 minutes
Course Main Course
Servings 4 servings

Ingredients
  

  • 1 shallot (minced)
  • 1 Tbsp olive oil
  • 1/2 cup white wine
  • 1+1/2 cups chicken broth (or seafood broth)
  • 284 ml canned baby clams (usually 2 cans, 142ml/4.8oz each)
  • 1/4 tsp dried oregano
  • 1 dash hot sauce
  • 1/2 cup cream cheese
  • salt and pepper (to taste)
  • 2 Tbsps parmesan cheese (grated)

Instructions
 

  • Sauté the shallots on medium high heat in the olive oil until soft.
  • Add the white wine, and cook down until reduced by over half.
  • Add chicken broth and clams, stir. Add oregano and hot sauce, stir.
  • Cut the cream cheese into smaller pieces, then add to the sauce. Allow to melt and stir into the sauce.
  • Cook the linguine. Add 1/2 cup of the pasta water to the sauce.
  • Cook until sauce coats the back of a wooden spoon. Add salt and pepper to taste.
  • Drain the pasta, add to the sauce, and toss to mix.
  • Top with parmesan cheese and fresh ground pepper, serve.
Keyword Clams, Cream Cheese, Linguine, Pasta, Wine

And now for the details…

This dish was a family favourite. We were introduced to it by a family friend when I was young, and it quickly became a special dish in our household. We had it often enough, that after a bit of time my mom would not even bother pulling the recipe card out when making it, she had made it so often. We had a tradition in our household that on our birthdays, we would get to choose what we wanted for dinner. The amount of times that I would choose this dish as my birthday dinner are innumerable. Not… because of my age… but because… I liked it so much… I can’t remember how many times… Okay, I’m getting old. Regardless, this is a special dish in my heart, and any time I’m feeling homesick or want some comfort food, this is the dish I turn to.

It’s also a fairly quick and easy meal to come together. So even though it was a special dish, it was still something that could come together on a school/work night in a fairly short amount of time. Pair it up with a simple green salad, and you’ve got yourself a great meal!

Start everything off by mincing the shallot and sautéing it in a large pan on medium high heat with the olive oil just until the shallot has started to soften and turned translucent. Add the white wine to the pan, stirring to mix.

We are going to let the white wine reduce until the liquid has almost completely boiled off. Just a small amount of liquid should be left in the pan.

Next, add your chicken broth and clams. Yes, I am suggesting to drain the clams, and yes, this is an opportunity to use the clam juice to increase the “clamminess” of your dish. But to be honest, I actually find the clam juice a bit too salty (I know, it’s shocking, I’m calling something too salty, call the press) and not as rich in umami flavour as using chicken broth as your liquid source. It’s also important to use baby clams in this dish. I made the mistake once of not paying attention when buying the canned clams and ended up with whole clam pieces. The texture is just not the same as the small, juicy bites of baby clams.

Stir, bringing the sauce back up to a simmer, then add the oregano and hot sauce. Just a few dashes of the hot sauce, we are not trying to burn our faces off (I mean, unless that’s what you are looking for, then have at ‘er), just adding an extra layer of flavour to the dish. Now is also a good time to start cooking your pasta so it is ready around the time as your sauce.

Cut the cream cheese into smaller pieces. This will allow the cream cheese to melt faster, and meld into the sauce a bit faster. A quick note on cream cheese: you can use low fat cream cheese, but I would recommend the full fat. The low fat cream cheese does not melt as quickly, and it takes quite awhile before your sauce looks homogenous without a whole bunch of white chunks floating around.

Let the sauce simmer for a bit as you stir the melting cream cheese in. At this point, your pasta should be fairly close to being done as well. Before draining the pasta, add about 1/2 cup of the pasta water to the sauce and allow it to continue to simmer until the sauce coats the back of a wooden spoon. The addition of the pasta water helps the sauce to thicken, and will help it adhere to the pasta. Give the sauce a final taste test and add salt and pepper to suit your tastes.

Once the sauce is ready, add the drained pasta to the pan, and stir to mix the sauce into the pasta. Transfer to a wide serving platter, and top with the parmesan and fresh ground pepper, then serve!

Happy eating.