Slice the tomatoes into 1.5-2cm (1/2-3/4") slices. Slice the halloumi into 1/2-1cm-thick slices. Oil the tomato and halloumi slices, reserving some of the oil. Grill at medium-high heat on either side for several minutes per side. Place tomatoes, top with the halloumi. Drizzle with reserved olive oil. Sprinkle with cilantro and Maldon salt and serve.
And now for the details…
Yeah okay, so this was a super simple recipe. But it is also super delicious. Field ripened tomatoes are just starting to become available, and I have a bit of an infatuation with halloumi.
Halloumi. How could one not enjoy this fabulous creation. It is a cheese that is strong enough to withstand being placed on the grill or a hot pan. The result? Melting, salty, creamy tastiness that has the crispy finish of toasty cheese on the outside. Good enough to eat on its own with no further additions, we are going to balance that creaminess with the slight tang from our tomatoes and the fresh herbaceousness of the cilantro. Did I just make up a word there? Perhaps, but its appropriately descriptive.
We start by slicing our tomatoes and halloumi, and oil each side. Slice the tomatoes nice and thick, as they are going to have to withstand the high heat of the grill. If your tomatoes are very ripe and quite soft, slice them a little thicker yet.
Next we move to the grill. A medium-high heat on the grill, place the tomatoes and halloumi directly on the grill. Heat them just enough to get a nice brown grill mark on one side (3-6 minutes), then flip and grill on the other side.
Am I grilling pineapple as well for another salad? Why yes, yes I am.
As soon as the tomatoes and halloumi are ready, place the tomatoes on a plate and top with the halloumi (I cut each of my halloumi pieces in half to have the right tomato-cheese ratio). Drizzle the entire salad generously with the olive oil, and finish by sprinkling the chopped cilantro and Maldon salt overtop (sea salt or kosher salt will work too), and serve. Highly advised to serve with some crusty bread to soak up that rich, tomatoey oil left on the plate after you have cleared off the vegetables!
Prep the veggies. Heat the coconut milk with the lime leaves over low heat for 20-30 minutes. Let cool, and mix with the rest of the dressing ingredients. Pour over the veggies and mix.
And now for the details…
I have a bit of an obsession with makrut lime leaves. They are also known by the name kaffir lime leaves, but this title is now considered defunct due to the offensive nature of the k-word. Some use makrut, or simply lime leaves to describe these items of deliciousness. These leaves impart the fabulously floral, tropical, and citrusy flavour to many Thai curries, and offer a great flavour to many other items as well. Plus, when you store them in your fridge, you are welcomed by their amazing aroma every time you open the door.
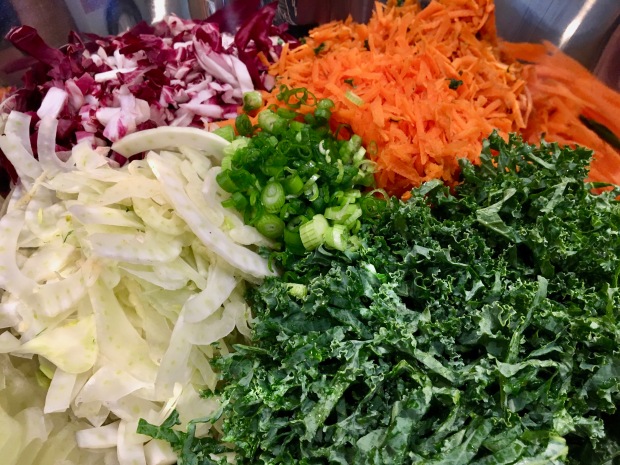
I had a salad very similar to this once and thought it was a brilliant blend of veggies. The fennel offers its freshness, with a hint of liquorice. The carrot is earthy and sweet. And the radicchio provides a slight bitterness to balance the flavours. But to up the ante on the tropical look of the salad with all the colours, I wanted to impart an exotic flavour to add to the experience. Enter lime leaves. Their delicate flavour adds an air of mystery to the salad. The taste being somewhat familiar, but at the same time foreign or indeterminate compared to most western flavours.
Let’s get to cooking. To start ourselves off, we are going to cook the lime leaves in the coconut milk. Try and use a “premium” coconut milk, as these will be higher fat, and will provide you with a creamier and less watery dressing. Place the lime leaves in the milk and cook over low heat until the milk is infused, about 20-30 minutes.
I drool now at the memory.
I actually cooked too much, using the entire can of coconut milk. I saved and froze the leftovers, which could be used for a smoothie, a delicious addition to a cocktail in place of ice, or even melted into a curry for an added punch of flavour. Tasting it frozen, it does inspire me to make an attempt at a makrut lime ice cream sometime in my near future. A forthcoming blog post, you ask? I would say likely.
Now that we have the base of our dressing ready, and we are waiting for it to cool, we will prep our veggies. Wash everything and set on a a towel to dry. Have a large bowl ready for the veggies as they are ready. Removing the core, slice the fennel very thin, either using mandolin or a very sharp knife. If you want, you can reserve some of the fennel greens to add some visual pop to the presentation of the salad at the end. De-stalk the kale and slice thinly. Slice the radicchio. Peel and shred the carrots. Slice the green onions, including part of the white. Add everything into the bowl.
This balance of colours and flavours excites all elements of the palate!
Whisk all the dressing ingredients well together (make sure you have removed and discarded the lime leaves), then drench your veggies with the delicious mix and stir all together. Serve with some of the fennel greens as adornment.
8cupsgreen leaf lettuce(washed and torn into bite-sized pieces)
1avocado(peeled, pitted and sliced)
1cupcherry tomatoes(halved)
3/4cupfrozen corn(browned in a dry pan)
Salad
1/4cupbuttermilk
1/4cupmayonnaise
1lime(juiced)
2Tbspsfresh cilantro(cut fine)
1garlic clove(grated)
1/2tspsalt
1/2tspsugar
1/2tsppaprika
Method
The carnitas can be made in an instant pot or slow cooker.Either way, place the shoulder in the pot, rub down with the spices, covering as much of the surface as possible, letting the rest fall to the bottom of the pot. Add the onions and garlic, then pour in the juice. If cooking in the slow cooker, cook on low for 8 hours. If cooking in the instant pot, cook on the "meat" setting for 55 minutes, ensuring the pot is sealed for pressure cooking. Once the meat is cooked, let it cool for a bit, then tear it roughly into chunks. Reserve the liquid and add the meat to a frying pan at medium to high heat to crisp up the meat. Once the meat is starting to brown, slowly add the liquid, then allow it to cook down until the liquid has cooked into the meat and the sugars from the liquid have caramelized the meat.Whisk all the dressing ingredients together.Assemble your salad, top with the crisped carnitas and drizzle with the dressing.
And now for the details…
A bit “healthier” then the first few posts, my husband and I are resetting our eating a bit after the rich foods we had taken in over the several months. We are reducing our simple carbohydrate intake (which, to be honest, was not too hard once we started cutting out treats throughout the day, afternoon snacks, and bread with every meal), and have been focusing on dinners that are filling, fresh and flavourful.
This meal is one of my favourites because it’s got the freshness from the greens and the cilantro dressing, while also bringing in the heartiness and umami-rich carnitas.
I might be a little loose in calling this recipe “carnitas”. Traditionally carnitas is pork cooked low and slow in lard, similar to a confit. Probably a better title for what I am making here would be “pan-fried, slow-cooked pork shoulder”, but that’s just not nearly as fun to say.
We start everything off preparing our pork shoulder, since it needs the longest time to prepare and cook. I have done this recipe before in two different ways: in our slow cooker and our instant pot. Both work, but to be honest, it turns out better in the slow cooker. For the photos today, I have done the recipe in the instant pot.
Start by mixing the carnitas spices together in a small bowl. Place your shoulder in the pot, and rub the spice mix all over the meat, trying to coat the entire surface area. Place the shallots and garlic in the pot with the shoulder, then pour the juice into the bottom of the pot.
When you place the lid on the instant pot, ensure the vent is set to “sealing”, since we are going to be pressure cooking our meat. Set the pot to the “meat” setting, and cook the shoulder for 55 minutes.
While the meat is cooking, we can prepare our salad toppings and dressing. Set a dry pan on the stove at medium- to high-heat. Place the frozen corn into the pan, and stir regularly, allowing the corn to char slightly. Be cautious! Even though it’s not popcorn, some of the kernels may actually “pop” out of the pan under the high heat.
Next, let’s make our dressing. I love buttermilk dressings. They’re creamy and tangy, offering a nice balance of flavours. I also feel they necessitate a decent amount of garlic, because what goes better with richness than a nice garlicky punch to the tastebuds? To really allow the garlic to suffuse the entire dressing, I use my garlic grate plate, which basically destroys the garlic and breaks it down into a fine mash, which then lends to tiny bits of garlic spreading throughout the entire dressing. My mom got me this garlic plate over a decade ago, and it is a staple in my kitchen.
Those little ridges are what break down the garlic. Using the plate is easy; just peel the garlic, hold it in your fingers and then grind it into the plate.
Start by mixing together your buttermilk and mayo. I used the full fat buttermilk, as well as Japanese mayo for my recipe. I wanted that added richness to the dressing, to help balance the acidity of the lime juice and the freshness of the cilantro. Add the rest of the dressing ingredients and mix together.
By about now, your pork is likely ready to come out of the pot. Take out the shoulder, reserve the liquid, and tear the meat into chunks. Place a large pan on medium-high heat and transfer the pork into the pan. Once the meat has browned a bit, add the juices and let them cook down until the liquid has boiled off and the meat is starting to caramelize.
Finally, assemble your salad with your toppings, leaving a little nest in the middle of the salad for your pork. Pile the pork in the middle, drizzle with the dressing, and enjoy!