One Pan Dinner – Pecan Crusted Fish with Roasted Vegetables and Potatoes

One Pan Fish Dinner

A complete meal, all on one pan for a minimal fuss and muss dinner!
Prep Time 5 minutes
Cook Time 35 minutes
Course Main Course
Servings 2 people

Ingredients
  

  • 1 large piece white fish (approximately 8 oz, mahi-mahi, cod, halibut, etc.)
  • 4 Tbsps olive oil
  • 6 shallots (peeled and sliced to 1 cm pieces)
  • 4 medium carrots (cut into large pieces)
  • 1 fennel bulb (trimmed and cut into eight)
  • 1/4 tsp dried thyme
  • 12 baby potatoes (halved)
  • 3 garlic cloves (shredded)
  • 2 Tbsps mayonnaise
  • 2 tsps dijon mustard
  • 1/2 cup pecans (roasted and cut into small pieces)
  • salt and pepper (to taste)

Instructions
 

  • Preheat oven to 425ºF/220ºC. Place parchment paper on a large cookie sheet. Place potatoes in one corner of cookie sheet, drizzle with 2 tablespoons of olive oil, and sprinkle with salt. Place carrots and shallots in another corner of cookie sheet, drizzle with 2 tablespoons of olive oil, sprinkle with salt, pepper, and thyme. Place pan in oven for 5 minutes. Remove, stir, place back in oven for 5 minutes. Remove, stir (potatoes and vegetables separate), place back in oven for 5 minutes. Place fish on cookie sheet. Mix together mayonnaise, dijon, and garlic cloves. Spread over fish. Sprinkle nuts over the fish. Stir fennel in with shallots and carrots. Place back in oven for 5 minutes. Remove, stir (potatoes and vegetables separate), place back in oven for 5 minutes. Check that fish is cooked to 145ºF/65ºC.
Keyword Carrot, Dinner, Fish, Potatoes, Shallots

Now for the details…

Day 9 of 14. Today’s daily recipe was inspired by friends of ours, who actually were the patrons of our most recent batch of groceries (in other words, they went out and got us groceries and dropped them off for us on our doorstep. We waved at them through the window!) Well before all this whole isolation-stay-at-home-to-flatten-the-curve had started, we had been talking about doing a cooking class to go through some basics. The first “theme” that my friend Andrea had suggested was “stuff you roast in the oven and learn to do other stuff with the oven real good too”. Fair. Being a Zoolander fan, this theme truly spoke to me.

And so, for our first ever (though virtual, cause we need to social distance y’all!) cooking class today, we did a one pan meal of pecan-crusted fish, roasted potatoes, and vegetables.

Let’s get started, shall we?

We start by preheating the oven to 425ºF/220ºC. When the oven is preheated, place the pecans in a pan in the oven and cook for 3-5 minutes or until the pecans are toasted, but not burnt. Set aside and let the pecans cool.

Next, we move on to prepping our vegetables. We will keep our potatoes separate from the rest of the veggies. We do this in order to allow the potatoes to dry out slightly and get nice and brown and crispy. Cut the baby potatoes in half. Place them in one corner of a parchment-lined cookie sheet, then drizzle with 2 tablespoons of olive oil. Stir a bit to coat all that potatoey-goodness with oil, then sprinkle with salt.

Next, peel your carrots and cut into large chunks, about 1 1/2″ or 3 cm. Peel the shallots and cut into large slices. In another corner of your cookie sheet, place the carrots and shallots. Drizzle with the other 2 tablespoons of olive oil, and stir. Sprinkle with salt, pepper, and the dried thyme. Place the cookie sheet in the oven for 5 minutes.

This will get the cooking started. But after 5 minutes, take the cookie sheet out of the oven, and stir (potatoes and veggies separate!) then place back in the oven for another 5 minutes. Remove from the oven and stir again, then place back into the oven for another 5 minutes.

Remove from the oven, and stir the fennel into the veggies. Then place the fish onto an open space on the cookie sheet. I used mahi-mahi (again, we had some in the freezer that we bought out of the back of some dude’s truck), but any fillet of white fish should work.

We are going to dress our fish before placing back in the oven. Mix together the shredded garlic, mayo and mustard. Spread the sauce over the fish and smooth evenly over the fillets.

Next, chop the pecans and sprinkle them over the fish. Place the cookie sheet back into the oven and cook for 5 minutes. Remove one last time, stirring the potatoes, and the vegetables. If the vegetables seem a bit dry , drizzle a bit more olive oil over top. Place back in the oven for 5 more minutes, or until the fish registers at 145ºF/65ºC.

Remove, and plate. Serve immediately and enjoy!

Happy eating.

Gorgeous and Green Citrus Cucumber Salad

Cucumber Salad

Prep Time 10 minutes
Course Salad, Side Dish

Ingredients
  

  • 1 large english cucumber (sliced thin)
  • 1/2 cup fresh parsley (chopped)
  • 1 small shallot (sliced thin)
  • 1 avocado (peeled, pitted and cut into pieces)
  • 1 orange (juiced)
  • 1 Tbsp white wine vinegar
  • 1 Tbsp olive oil
  • salt and fresh ground pepper (to taste)

Instructions
 

  • Slice the cucumber and shallots very thin. Place in a bowl, and mix in the parsley, shallots, and avocados. Add the orange juice, vinegar, and oil. Mix well, then stay and pepper to taste. Serve.
Keyword Avocado, Cucumber, Orange, Salad, Salad Dressing

And now for the details…

Well folks, we are over halfway through the quarantine 14 day challenge, coming into day 8.

Today’s recipe is nice and simple. And since spring is attempting to be upon us, and warmer weather is around the corner, I figured it was appropriate to share a recipe that really could be likened to summer in a bowl. It’s nice and fresh, with a citrus kick from the orange juice, and richness provided from the avocado.

I use my Japanese knife for slicing the vegetables super thin. A quick sidebar for how much I love my Japanese knife… I really love this knife. And it’s not just because it was a gift from my grandma (a gift given with a coin, so as not to sever our relationship). Well maybe it’s partially because it was a gift from my grandma. But also… because the knife is beautiful. And works so well. I have only sharpened it once in the almost six years of owning it, and it is incredibly sharp (as the ends of fingers I have almost sliced off can attest). The knife is from a line called Kumo, for cloud, which is what the pattern on the knife seems to exhibit. Japanese knives have a different angle than traditional western blades, and are sharper than western blades, which makes them great for slicing things very thinly. It’s an awesome knife.

If you don’t have a super sharp Japanese blade? Well, a mandolin could also work. Or as sharp a knife as you may have. Maybe you just have better knife skills than I do. Possible. My knife skills could use work (as the ends of fingers I have almost sliced off can attest).

Cut the cucumber as thin as you can. Same with the shallot. Add them and the parsley to a bowl.

Toss the vegetables together, and add the avocado.

Squeeze the orange juice in, add the vinegar and oil, then add the salt and pepper to your flavour preference, and serve. It is that easy.

Happy eating.

Instant Pot Tonkotsu Ramen

Instant Pot Tonkotsu Ramen

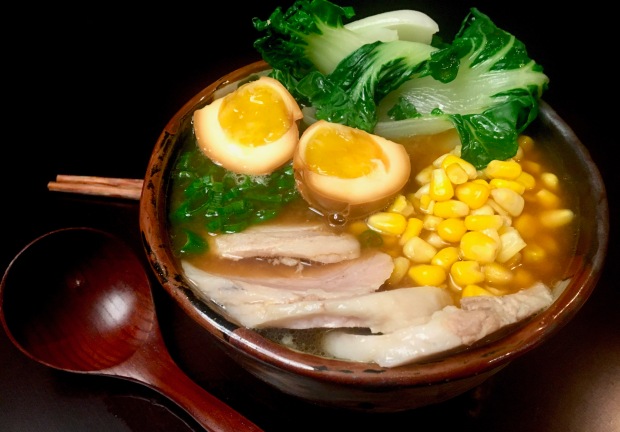
Umami-rich Ramen Soup, including a broth from scratch, in way less time thanks to the use of the Instant Pot!
Prep Time 15 minutes
Cook Time 3 hours 45 minutes
Total Time 4 hours
Course Main Course, Soup

Ingredients
  

  • 2 pork trotters (split)
  • 2 chicken backs
  • 2 leeks (green ends trimmed off, cut into chunks)
  • 2 shallots (peeled and cut into chunks)
  • 8 cm piece of ginger (peeled and cut into chunks)
  • 4 baby king oyster mushrooms (sliced, or 1 king oyster mushroom, sliced)
  • 600 g pork belly (rolled and tied tightly with kitchen twine)
  • 4 eggs (soft boiled)
  • 400 g fresh ramen noodles
  • 1 cup fresh or frozen corn kernels
  • 4 baby bok choy (leaves separated)
  • 3 green onions (chopped)
  • 2 Tbsps soy sauve
  • 2 Tbsps mirin

Instructions
 

  • Place pig trotters and chicken backs in a pot on stove of boiling water, reduce temperature to simmer. Simmer for a minimum of 10 minutes, skimming off foam as it cooks. Remove trotters and backs, set aside, discard liquid. Pick out any dark or bloody bits from trotters and backs.
  • Place trotters, backs, leeks, shallots, ginger, mushrooms, and pot belly in instant pot. Close pot and cook on "soup/broth" setting for 2.5 hours.
  • Place soy sauce, mirin and 4 Tbsps water in ziplock bag, place eggs in bag, and place in refrigerator, turn occasionally (can be done night before).
  • After 2.5 hours, release pressure and open. Remove belly, wrap tightly in cling film wrap and place in refrigerator. Close Instant Pot back up, set for another 60 minutes on "soup/broth" setting.
  • Once done, release pressure, then strain broth and throw out solids.
  • In separate pot on stove, boil water. Using a small mesh strainer, cook ramen in water until done, remove and strain, and place in bowls. Using same mesh strainer, cook bok choy leaves in same pot of boiling water for 30-60 seconds, strain.
  • Take pork belly from refrigerator, remove cling film and slice thinly. Arrange pork belly, bok choy, corn and green onions in bowl over ramen noodles. Ladle hot broth over other ingredients, top with halved eggs and serve.
Keyword Broth, Egg, Noodles, Pork, Pork Belly, Ramen, Soup, Tonkotsu

And now for the details…

Ramen. Delicious, delicious ramen. Until about a decade ago, I had no idea what real ramen was or could be. Before that, my brain associated the word ramen with Mr. Noodles or Ichiban, and I had no idea that there was so much more that ramen had to offer than instant noodles.

Since then, I have sought out ramen wherever I may roam. My favourite that I have tried so far is from the chain Tenkaippin in Japan. We made return trips to the same restaurant in Kyoto, several years ago. The broth is super flavourful, thick and rich. I have dreams about it even still. This recipe… is not that soup unfortunately. But, it is a nice rich broth that is pretty tasty, if I do say so myself. Cooking for an extended period of time in the Instant Pot is allowing the collagen to release from trotters and chicken backs, providing a thick mouth feel.

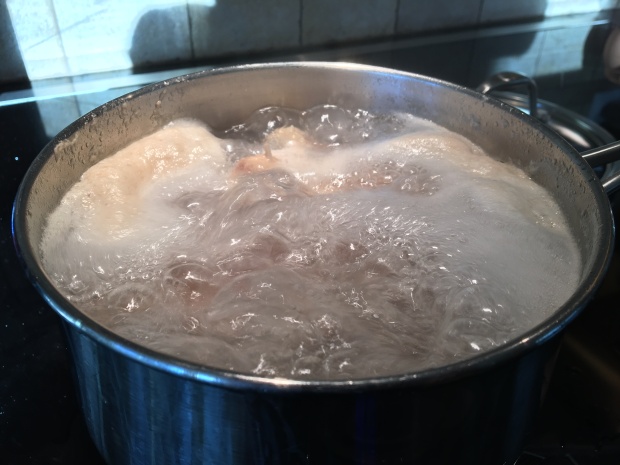
Let’s get started. We will start by “cleaning” the pig trotters and chicken backs. Bring a pot to a rolling boil and add the trotters and backs. Reduce to a simmer and cook for around 10 minutes, skimming off any gunky foam off the top. Once that’s done, dump the liquid. Using a fork, knife, or chopstick, we are going to pick at the trotters and back, removing any darkened bits or pieces that obviously have blood. We are doing this to clean out any bloody bits so we have a nice clear broth, rather than a skanky, cloudy, dark broth.

That icky looking foam is what you skim off and dispose of…

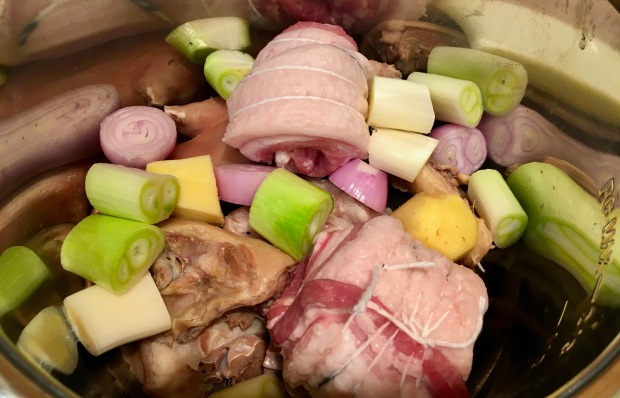
Once cleaned, place the trotters and backs in your instant pot. Stack in the leeks, shallots, ginger, and mushrooms. We are also going to roll the pork belly pieces and tie them tight with butchers twine, and place that in the pot with everything else.

Fill the pot with water up to the “MAX” line, and then close the pot, ensuring it is in the “Sealing” position and set for 2.5 hours on the “Soup/Broth” setting.

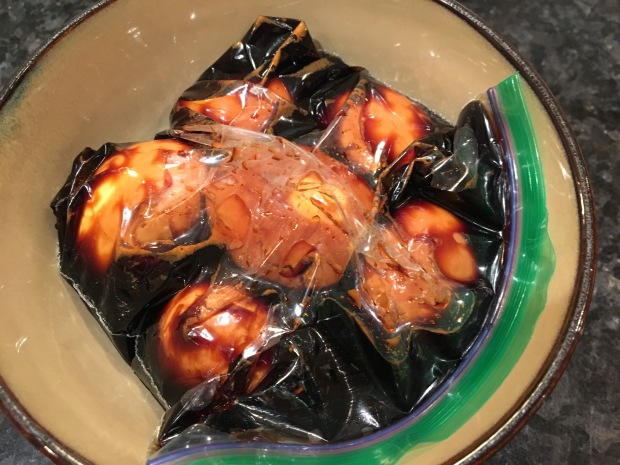
While the broth is cooking, we’ll set the eggs to marinating. We are making ajitsuke tamago, or seasoned eggs, to add to the ramen later. Mix the soy sauce, mirin, and 4 tablespoons of water in a ziplock bag, and then place your soft boiled eggs inside (need a refresher on how to soft boil an egg? Directions are included in this recipe). Close the ziplock up tight so as little air as possible is left inside, and then place in the fridge. Turn them around after an hour or two so they marinate evenly on all sides.

After 2.5 hours of cooking, release the pressure from the pot, and open ‘er up. Remove the pork belly, then close the pot back up, including resetting to “Sealing” position and set the pot back to “Soup/Broth” setting and cook again for 60 minutes. Wrap the pork belly tightly in cling wrap, and place in the refrigerator. The pork belly is more than cooked by now, and chilling the belly will allow us to cut it nice and thin to place in the bowl later.

Once the broth is done, strain it into a container, and discard any solids. I like using cheese cloth to help with the straining to get rid of any small, gritty bits.

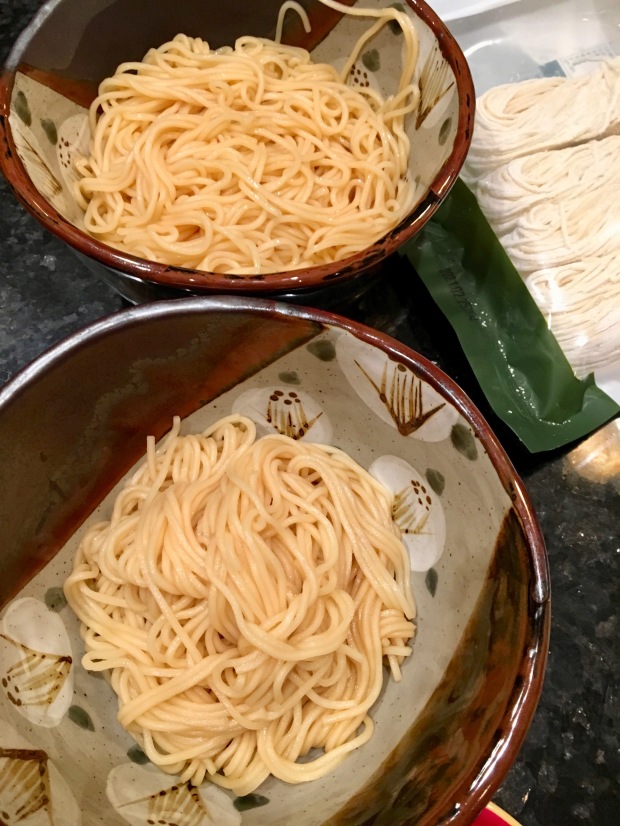
Time to get everything ready. Boil water in a pot, and place the ramen noodles in a wire mesh strainer. Dip the strainer into the pot to cook the noodles, and when done, drain the noodles and place in the bottom of a large bowl.

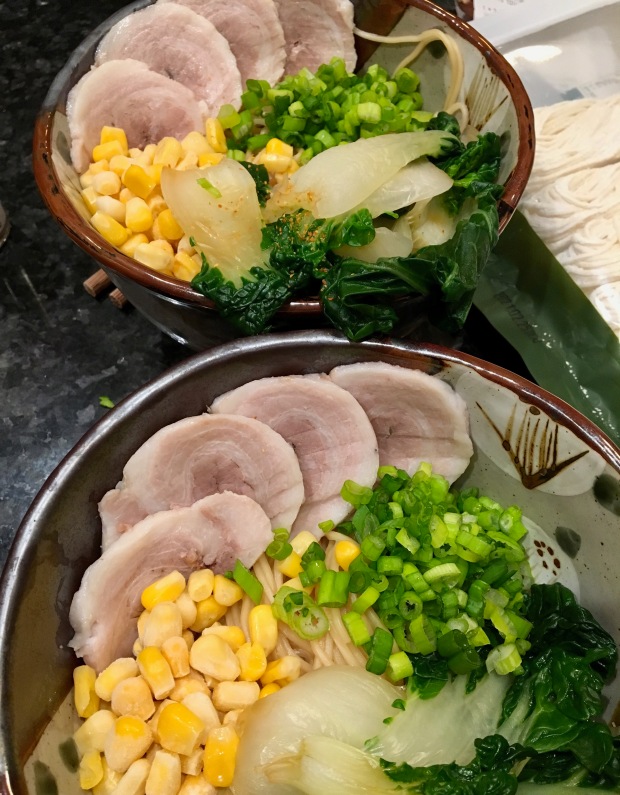
Using the same strainer and boiling water, cook the bok choy until the leave just turn vibrant green. Place the boy choy, green onions, and corn into the bowl. Remove the pork belly from the fridge, and take out of the cling wrap. Slice the pork belly thinly and place in the ramen bowl.

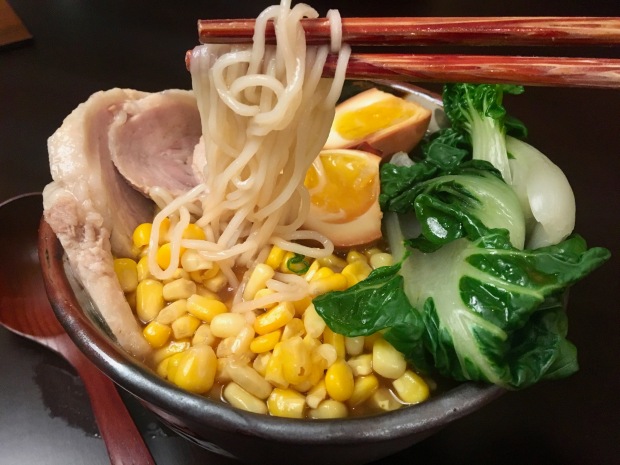
Finish the soup off by taking the eggs out of the marinating liquid, cutting in half, and placing in the bowl. Ladle the still-hot broth over the soup contents, and serve immediately. Enjoy immediately!

Happy eating.

Leeks Poached in Coconut Milk and Makrut Lime Scented Dressing

Leek Salad with Coconut Milk Dressing

A simple green salad with poached leeks and a makrut lime scented coconut milk dressing
Prep Time 20 minutes
Course Main Course, Side Dish

Ingredients
  

  • 1 cup coconut milk
  • 4 makrut lime leaves
  • 2 leeks (green ends trimmed, cut into 2.5cm or 1" slices)
  • 1 Tbsp dijon mustard
  • 1 Tbsp white wine vinegar
  • salt and pepper (to taste)
  • 4 cups arugula
  • 1/2 cup walnut halves (toasted)

Instructions
 

  • Heat the coconut milk and lime leaves in a large skillet over medium-low heat until it starts to simmer. Add the leeks, laying them flat. Cook for 12 minutes total, turning them halfway through. Remove leeks and set aside.
  • Whisk the dijon and vinegar into the remaining liquid, cooking until it just starts to simmer, remove from heat.
  • Place leeks on serving dish, top with arugula, drizzle dressing on top, finish with walnut pieces.
Keyword Arugula, Coconut Milk, Leeks, Makrut Lime Leaves, Salad, Salad Dressing

And now for the details…

Infomercial style: “Tired of the same old salad?” *Person in black and white takes a bite of a pitiful looking salad and give the camera an exaggerated sad face* “Wondering if there’s something different out there to replace raw vegetables covered with oily dressing?” *Same person throws their hands in the air and rolls their eyes as if they cannot imagine there is anything in the world that can help* “Try this amazing poached leek salad with a creamy makrut lime dressing” *Person, now in colour, takes a bite of the salad and gives a beatific smile and thumbs up to the camera*

Okay, so I can’t help myself, I have scenes that play out in my head like this all the time. An overactive imagination… horrible if I’m home alone and hear a random sound somewhere in the house, but great for hours of self-entertainment. Onto the food…

The leeks in this salad add the savoury, umami character, while we are getting a rich creaminess in the dressing, plus a floral, citrusy hit thanks to the makrut lime leaves.

So let’s cook.

Start by cutting the leeks into about 1″ thick pieces. Stop a few inches below the green ends, and discard the ends. Heat the coconut milk in a pan on medium heat with the makrut lime leaves. If you do not have lime leaves, move forward with the recipe as is, and I will give you an alternative a little later. Once the milk is heated and bubbling slightly, add the leeks in a single layer in the milk. Turn down the heat slightly if the milk is really bubbling.

Cover the pan, and cook the leeks for 6 minutes, then turn them over, and cook for another 6 minutes. Keep an eye on the pan to make sure the milk does not boil over. Turn the heat down if you need to, or uncover them to allow the bubbling to come down.

The leeks should be done after about 12 minutes, test one with a fork, they should be tender, but not falling apart. Take the leeks out of the pan and transfer to a serving dish, spreading across the dish.

Add the mustard and vinegar to the pan, whisking into the liquid. Here is where our alternative is if you did not have lime leaves. From a fresh lime, shave off several pieces of its peel, trying to avoid the pith, and add the pieces to the liquid. Keep the pan on the heat, and whisk constantly until the sauce starts to simmer. If it is still very liquidy, simmer until it thickens slightly, whisking constantly.

Scatter the arugula over the leeks on the serving dish, then drizzle the dressing overtop. Crumble the walnut halves into pieces over the salad, and serve immediately.

Happy eating.

Chefs Salad (a.k.a. Operation Use Leftover Ham) with Chipotle Ranch Dressing

Chef’s Salad with Chipotle Ranch Dressing

Prep Time 20 minutes
Total Time 20 minutes
Course Main Course, Salad

Ingredients
  

  • 6 cups arugula (or other green leaf lettuce)
  • 1 cup cherry tomatoes (halved)
  • 2 mini cucumbers (sliced)
  • 1 avocado (peeled, pitted and sliced)
  • 1/2 cup shredded cheese (cheddar, havarti, or other)
  • 1 cup cooked ham (cut into bite-sized chunks)
  • 2/3 cups walnut halves (roasted)
  • 3 eggs (soft- or hard-boiled to preference)
  • 4 Tbsps sour cream
  • 2 Tbsps mayonnaise
  • 1/2 tsp salt
  • 1 tsp dried dill
  • 1 clove garlic (shredded)
  • 1 tsp chipotle oil or chipotle powder
  • 1/4 lemon (juiced)

Instructions
 

  • Whish together the sour cream, mayonnaise, salt, dill, garlic, chilli oil and lemon juice. Arrange the other ingredients on a large plate or platter. Drizzle with the dressing. Serve.
Keyword Avocado, Egg, Ham, Salad, Salad Dressing, Vegetables

And now for the details…

Yep, it’s another fairly simple recipe I’m putting forward today. But I couldn’t help it; we had so much ham leftover after our New Years Eve party that I needed to find a number of uses for it. This recipe actually only put a small dent in the leftovers. I am making this ham and bean soup tonight in an effort to use up even more. And we still have some left. Seriously. That’s too many hams. Although it does remind me of Robert Kelly’s (ew, no, not THAT Robert Kelly, I’m talking comedian Robert Kelly) skit about his love of food… “ham, just give me ham” (the whole thing is hilarious, but skip ahead to 4:40 for the quote).

I got a bit liberal with the different ingredients in this salad. Feel free to mix and match the toppings depending on what you have on hand. I did really enjoy the texture combination I had here, but it’s not prescriptive. Typical chef’s salad has some combination of meat, cheese, egg and veggie assortment.

Start with roasting the walnuts so you have them mostly cooled and ready for the last step. Place the walnuts on a small pan and spread them out so they are in a single layer. Place in a 350ºF/175ºC oven for 5-8 minutes until they smell toasty. Let them sit to cool once done.

Next up: the dressing. I made a chipotle ranch-style dressing. Again… because, well, these were the ingredients I happened to have on hand. A good ol’ “let’s clean out the refrigerator” kind of recipe.

Mix together the sour cream, mayonnaise, salt, dill, garlic, lemon juice, and chilli oil. I used Huipi Chil mango-chipotle salsa for my chilli flavour, but if you want the same flavour and don’t have a chipotle chilli oil available, use 1/2 tsp of dried chipotle powder instead. If you prefer a less viscous dressing, you could use buttermilk instead of sour cream.

Next, we need to cook the eggs. I prefer a soft boiled egg, but the traditional chefs salad seems to be a hard boiled egg. Go with you preference. I went into detail on how to do a soft boiled egg in my Rainbow Vegetable Bowl recipe, but long story short: boil water, add eggs, simmer 6-7 minutes, ice bath, peel.

Finally, we assemble the salad. Arrange the rest of the ingredients on a large plate, with the arugula serving as your base.

Drizzle the dressing over the salad, and gently crumble the walnuts with your hands over the salad. The walnuts are serving as the crunch for this salad, eliminating the need for croutons, while giving us an added bite and richness.

Serve immediately and enjoy!

Happy eating.

Crispy Sweet and Salty Maple Bacon Brussel Sprouts

Crispy Maple Bacon Brussel Sprouts

Prep Time 5 minutes
Cook Time 25 minutes
Total Time 30 minutes
Course Side Dish

Ingredients
  

  • 454 g brussel sprouts (1 lb; trimmed and halved)
  • 4 slices bacon (cut into lardons)
  • 1 garlic clove (peeled and sliced)
  • 2 Tbsps butter
  • 2 Tbsps olive oil
  • 2 Tbsps maple syrup
  • 1/2 tsp salt (or to taste)
  • 1 tsp chilli oil (optional)

Instructions
 

  • Trim and halve the brussel sprouts.
  • In a large pan, cook the lardons over medium-high heat until browned and crispy. Strain and remove to plate lined with paper towels, set aside.
  • Put pan back on the heat, add the butter, oil, and garlic. Cook until butter is completely melted and garlic is slightly browned. Add sprouts and salt, toss to coat with butter/oil.
  • Cook until sprouts are cooked through and slightly browned. Add the syrup and cook until syrup starts to caramelize the Brussels sprouts. Add the chilli oil and bacon back into the pan. Cook for 60 seconds, stirring constantly. Serve.
Keyword Bacon, Brussel Sprouts, Maple Syrup, Vegetables

And now for the details…

This is one of my favourite side dishes. Crispy, sweet, and hot Brussel sprouts, that are rich and satisfying. This is saying a lot for me. I used to hate brussel sprouts. Remember my thoughts on cooked cabbage? (Reminder: smells like farts.) This extends to brussel sprouts. Especially if they have been steamed. Blech.

However, when I discovered pan fried brussel sprouts for the first time, I was shocked at the transformation of this veggie from a mushy, flatulent predicament, to a crispy, caramelized bundle of joy.

This recipe pulls together sweet, salty, spicy and rich. Is it still a vegetable dish? Oh sure. But are they just a vegetable when they’re browned, slightly crispy and oh so goooooood.

Let’s get started.

Prepare the brussel sprouts by washing them, trimming the ends, and cutting them in half. If any excess leaves come off when you trim the ends, dispose of those, especially if they are looking a little rough. Prepare the garlic by peeling it and cutting it into slices.

Before we start cooking the sprouts, we are going to cook the bacon. Cut the bacon into small slices, also known as lardons. Cook them on medium-high heat until they are browned and crispy. Set the bacon aside on a dish lined with paper towels. Drain off most of the bacon fat from the pan, but don’t worry about wiping it down.

Next, add the butter and oil to the pan, then add the garlic slices. Cook until the garlic has just started to brown, then add the brussel sprouts and season with salt to taste. Stir the sprouts regularly, allowing the sprouts to cook through and brown on the outsides.

Once the sprouts have cooked most of the way through, add the maple syrup and chilli oil to the pan. Stir, coating all the sprouts with the syrup, and allowing the syrup to start caramelizing and crisping up the sprouts.

Once the liquid has completely cooked down and the sprouts are your preferred level of brown and crispy, add the lardons back into the pan and cook for one more minute to heat everything through. Transfer to a dish and serve!

Happy eating.

Ukrainian Instant Pot Beet Borscht, just like Grandma used to make

Ukrainian Beet Borscht

Prep Time 15 minutes
Cook Time 15 minutes
Total Time 30 minutes
Course Main Course, Soup

Ingredients
  

  • 1 small onion (shredded)
  • 6 small red beets (peeled and shredded)
  • 4 medium carrots (peeled and shredded)
  • 4 fingerling potatoes (roughly chopped)
  • 4 garlic cloves (peeled and minced)
  • 6 cups chicken or vegetable broth
  • 1 can tomato paste
  • 2 Tbsps dried dill
  • 3 bay leaves
  • 1 Tbsp olive oil
  • salt and pepper (to taste)

Instructions
 

  • Peel and shred the veggies, either in a food processor, or using a grater.
  • Add the olive oil to the instant pot on Sauté setting. Add the onions, garlic and carrots, sautéing until the carrots start to soften. Add the rest of the ingredients, stirring well.
  • Set pot on Soup/Broth setting and cook on pressure for 10 minutes.
  • Serve with fresh dill and sour cream.
Keyword Beets, Instant Pot, Soup, Vegetables, Vegetarian

And now for the details…

My family on both sides have always had a focus around food. Since I was a little girl, I remember all getting together for big family meals, cracking out some snack or recently baked good when someone would come to visit, and most importantly to me, often cooking or baking together. I must have been so annoying to my mom, grandmas and aunties, because from a young age “I help too” was a common phrase coming out of my mouth, quickly followed by the screech of the kitchen chair legs against the floor as I insistently dragged it over to the counter to stand higher and “help”.

One of the people I would insist regularly on “helping” was my Grandma on my dad’s side. Since my Grandma was Ukrainian, this resulted in me learning to make foods like perogies, periski, holupchi, or borscht. And as the weather turns cooler and root vegetables are readily available now that it is officially fall, my craving for borscht peaks at an all-time high. Even though this classifies as a soup, I feel as though borscht should be more of a stew. Hearty, rich, and hitting the spot on a cool fall day. The addition of the potatoes gives a nice thick broth, and the deep, earthiness and sweetness of the beets gets elevated with the herbaceousness of the dill and the zing of the tomato paste. Admittedly, my Grandma’s borscht was a bit more on the “soup” side of things, but the main thing I did pick up from her, and I hold tight to, was on her being quite adamant that borscht should not contain cabbage. Cooked cabbage… is not my cup of tea. Let’s be frank people, it smells like farts. And so, zero cabbage in this recipe. Is it un-Ukrainian? Possibly. But since I learned this from my Grandma, I’m going to claim a certain level of authenticity!

For this recipe, we are making it in the Instant Pot. You can always make this exact same recipe in a regular pot, it will just need to cook on the stove on medium-low heat for much longer (about 5 times as long).

Let’s start by prepping our veggies. I used a food processor to shred all my veggies. You can always use a hand grater instead. Peel the carrots, onion, and beets first. Then shred the carrots and onion. Remove them from the processor into the pot, and do the beets next. We are doing these all separately so we can sauté the other veggies without the beets, as a sort of mirepoix, without the celery. Mince your garlic and add it to the pot as well. Add a splash of olive oil, set the pot to “Sauté” (medium high on a pot on the stove), and cook the veggies, stirring occasionally, until the carrots start to soften and the garlic and onions are fragrant.

While those veggies are cooking, peel and diced your potatoes. Once they are ready, add the potatoes and beets to the pot, and the broth (chicken for Grandma’s, vegetable if you are going vegetarian with your borscht) and stir well, mixing everything all together.

Add the last few ingredients to the pot, give it one last stir to mix everything in, especially the tomato paste, and the cover your pot and set to “Soup/Broth” setting, with pressure on. If no Instant Pot, turn the temperature down to medium-low temperature. We are going to cook here for 10 minutes in the Instant Pot, or 50-60 minutes on the stove, stirring occasionally if on the stove.

Once the cooking time is done, give the borscht one last stir, then serve in bowls. You can serve just like this, or if you’d like to go the way I had it at Grandma’s, add a dollop of sour cream and stir it in before your first big, soul-warming bite.

Happy eating.

Rainbow Vegetable Bowl with Peanut Satay Sauce

Rainbow Veggie Bowl with Satay Sauce

Prep Time 20 minutes
Cook Time 10 minutes
Total Time 30 minutes
Course Main Course
Servings 2 servings

Ingredients
  

  • 1/4 red cabbage (sliced thin)
  • 2 large carrots (peeled and sliced)
  • 3 kale leaves (destalked and sliced into strips)
  • 1 shallot (sliced)
  • 1 cup brussel sprouts (sliced thin)
  • 1/2 red pepper (sliced)
  • 1/2 inch piece fresh ginger (grated)
  • 2 garlic cloves (peeled and sliced)
  • 1/2 Tbsp olive oil
  • 3 Tbsps peanut butter
  • 3 Tbsps sweet chilli sauce
  • 6 Tbsps coconut milk
  • 1 Tbsp soy sauce
  • 1 Tbsp sambal olek
  • 2 eggs (soft boiled)

Instructions
 

  • Prepare your veggies.
  • Mix together the peanut butter, chilli sauce, coconut milk and soy sauce, and set aside.
  • Add the shallots, garlic  and carrots to a large pan with the oil and sauté on medium high heat until the shallows start to brown. Add the ginger and stir, then add the cabbage and brussel sprouts, stirring while cooking until the sprout and cabbage have just started to soften. Stir in the kale and red pepper, and cook until the kale has turned bright green.
  • Separate the veggies into two bowls. Top with the satay sauce and eggs, and serve.
Keyword Cabbage, Cruciferous, Kale, Vegetables, Vegetarian

And now for the details…

Guilty admission: this recipe was created when I was trying to clean out our refrigerator. I had all these random bits of veg left over from other recipes that I had made and I needed to find something to do with them. Et voilà: a rainbow smorgasbord of sautéed veggies with a satay dressing and soft boiled eggs to top them off.

This recipe comes together fairly quickly, and so is a great option for a weekday meal. And since the main protein source is egg, it’s also appropriate for the non meat eaters out there! Have a vegan in the crowd? Swap out the eggs for pan fried tofu, and you are in business! The recipe also scales up an down quite easily, depending on the number in your crowd.

Start everything off my prepping your veggies and sauce. Once the cooking starts, this recipe comes together very quickly, so you want everything ready to go so you can just toss each element into the pan and plate immediately.

Slicing of your sprouts and cabbage could be done by hand or in a food processor, whichever is your preference. I like slicing by hand since it allows me more control and I prefer the veggies to be sliced thinner than the food processor will allow.

For the sauce, we simply whisk together the peanut butter, chilli sauce, coconut milk and soy sauce until they are fully mixed. I like using crunchy peanut butter for this so you get little bites of peanut in the dish after mixing the sauce into the veggies. I also added some sambal oelek for added spice, but if you prefer a milder flavour, you can omit it.

Next it’s on to cooking. Start with your soft boiled eggs. Bring a pot of water to a boil, carefully place the eggs inside (use a spoon or skimmer to help you do this to prevent dropping the eggs too fast and cracking the shells), then reduce the temperature to medium-low and cook the eggs for 6-7 minutes, depending on your preference of yolk smooshiness. Have an ice bath ready. While the eggs are cooking, we can start cooking the rest of the meal, but the moment the eggs are done, they should be removed from the hot water and placed in the ice bath.

Moving on to the veggies. Heat a large pan at medium-high heat with the oil, and add the ginger and garlic. Cook until just fragrant, then add your shallots and carrots. Stir, cooking until the shallots start to brown, then add the Brussel sprouts and cabbage. Stir, cooking just until the cabbage starts to soften, and add the kale and red pepper. One last stir and cook until the kale turns bright green and just starts to wilt, then remove from the heat and place into your bowls for serving.

Pour the satay sauce over the veggies, peel the eggs (yes, I definitely massacred them in this photo…), cut them in half and place on top, and you are ready to for dinner!

Happy eating.

The Simple Side Dish: Easy Creamy Buttermilk Coleslaw

Creamy Buttermilk Coleslaw

Prep Time 20 minutes
Course Side Dish

Ingredients
  

  • 1 small cabbage (sliced thinly)
  • 2 large carrots (peeled and shredded)
  • 1/2 onion (shredded)
  • 2 garlic cloves (shredded)
  • 1 Tbsp dijon mustard
  • 1/4 cup mayonnaise
  • 1/2 cup buttermilk
  • 1 Tbsp red wine vinegar
  • 1 tsp salt
  • fresh ground pepper (to taste)

Instructions
 

  • Mix together the cabbage and carrots. Whisk together the rest of the ingredients in the dressing, then pour over the vegetables and toss until evenly coated.
Keyword Cabbage, Coleslaw, Salad, Vegetables, Vegetarian

And now for the details…

Well, this recipe is not terrible pretty, but it sure is yummy. I feel as though the Netflix show ‘Ugly Delicious’ could take its title and attach it to this side. Cole slaw’s are not usually overly pretty and do not offer the same presentation possibilities as many other dishes, but are tasty and very versatile in their use. I mean, really, what other salad do you know that you can put together completely, dress, and have it not only taste great the next day, but often even better than it did the first!

And man, does this salad have lasting power. I will make it at the beginning of the week, and we often have it multiple times throughout the week, minimizing the evening meal prep, and it holds well when taking it to work as a side.

Prep on this salad is relatively easy, but is definitely easier with the use of a very sharp knife. I use my Japanese knife to cut the cabbage quite fine, since this is my preference. If a super sharp knife is not available to you, feel free to use a food processor to shred your cabbage, carrots, and onions. They will not be as fine, but will still be fresh and crunchy and will soak up the dressing.

A quick note on cabbage: I have used green cabbage, pretty standard, in this recipe. You can use Napa or savoy instead, but the salad will not last quite as long. My grandma used to grow cabbage that would form earlier than the green cabbage. It was sweeter and more tender than its later-blooming cousin, but either work well for cole slaws.

After your veggies have been shredded and mixed, whisk together the dressing ingredients. To get a better consistency to the mix, stir the garlic and onions in with the dressing ingredients, not with the veggies.

Finally, pour the dressing over the vegetables and toss vigorously, until everything has mixed well together. Serve the cole slaw on its own as a side, or as a topping (hint: it goes really well on tacos… future post? Highly likely.)

Happy eating.

The Ultimate Vegetable Dish: Ratatouille

Ratatouille with Boursin Cheese

Prep Time 20 minutes
Cook Time 50 minutes
Course Main Course, Side Dish

Ingredients
  

  • 3 garlic cloves (peeled and minced)
  • 1/2 onion (peeled and diced)
  • 2 Tbsps olive oil (plus 1 Tbsp for topping)
  • 1+1/2 cups passata (or canned puréed tomatoes)
  • 1/2 cup fresh basil (chopped)
  • 1 small to medium green zucchini (sliced thin)
  • 1 small to medium yellow zucchini (sliced thin)
  • 1 small to medium eggplant (sliced thin)
  • 3 medium tomatoes (sliced thin)
  • 1 tsp salt
  • fresh ground pepper (to taste)
  • 1-2 Tbsps pesto
  • 1/4 cup Garlic and Herb Boursin cheese (crumbled)

Instructions
 

  • Preheat oven to 375ºF.
  • Mince the garlic and dice the onion. Heat a cast iron pan over medium high heat, adding the olive oil. Add the garlic and onion and sauté until the onion has softened and the garlic is fragrant. Add the passata and stir until the mixed consistently and the passata is heated through.
  • Remove from the heat and sprinkle the basil overtop, reserving 1 Tbsp of basil for topping at the end. Arrange the vegetables on the sauce, alternating between the different vegetables (photo above was eggplant, tomato, yellow zucchini, green zucchini). Drizzle with pesto. Cover the pan wither either an oven-ready lid, or with tin foil. Place in the oven and bake for 40 minutes, then remove foil and bake for another 10-20 minutes, until vegetables have reached desired level of doneness.
  • Remove from the oven, top with olive oil, cheese and basil, then serve.
Keyword Cheese, Eggplant, Tomatoes, Vegetables, Zucchini

And now for the details…

I am a bit of a Disney freak. I. Love. Disney. Cannot help myself. We have no kids, and yet I have seen pretty much every Disney cartoon or animated movie ever released. And am emotionally affected by said movies. (Up! Who wrote this screenplay? I am a sobbing mess every time I watch it… within 10 minutes)

And Ratatouille? Well. It was a Disney movie and about a rat who is obsessed with cooking perfectly blended ingredients. I could picture the harmony Remy refers to as he contemplates the flavour combinations that not only match, but bring the dish to life.

And after having watched that movie and having loved it… over a decade ago… I still had not made ratatouille. It was time.

Let’s get to cooking.

We will be cooking everything in a cast iron pan, which will allow an easy transition from stove to oven. If you do not have a cast iron pan, use an oven ready pan, which will work just as well. Not sure if your pan is oven ready? Typically it would have said so on the label, and may even note it on the bottom of the pan. But most pans that have no plastic or rubber pieces and are revited, rather than welded, should be able to withstand the heat of shifting into the oven.

Let’s start with the onions and garlic, which we will sauté in the olive oil until the onions have softened and the garlic is fragrant. Try to avoid cooking too long and caramelizing the onions or garlic.

While you are waiting for the onions and garlic to cook, slice the rest of the veggies into thin slices, consistent in size, and set them to the side.

Add the tomato passata to the pan, and stir until the garlic and onion have been thoroughly mixed in and the passata has heated until just bubbling. Add salt and pepper to the sauce to your taste. Remove from the heat and sprinkle the tomato sauce with the basil, reserving 1 Tbsp of the basil to the side for garnishing the ratatouille when it is done.

Next, we are going to add our veggies directly on top of the tomato sauce in our pan, keeping with a consistent pattern to increase both the visual appeal of the dish, but also allow us a nice bite of all four veggies in one once the dish is cooked and ready. I chose to go with the closest to ROYGBIV as I could with my colour distribution, going with tomato (R), zucchini (Y), zucchini (G), and eggplant (V), and I could see expanding this out to include the rest of the spectrum with, say, orange bell peppers (O), or even stretching this recipe with purple potatoes (I), but I stuck with some of the tried and true veggies in this recipe.

Extra veggies in the background? Yep. Just meant a second pan of ‘touille!

Next is our baking process. Before moving on, I drizzled some pesto over the ratatouille to emphasize the basil flavour. Cover the pan with tin foil or an oven ready lid, and place it in the oven for around 40 minutes. Depending on how thickly or thinly you have stacked your vegetables, you may need to monitor the cooking process at the 30 minute mark to check for doneness. The vegetables should be mostly done, but not completely done yet (the eggplant will have a bit of bounce left to it). At this point, remove the lid or tin foil and allow the ratatouille to cook for another 10-20 minutes, until the vegetables have caramelized slightly, and are completely done. Remove the pan from the oven, drizzle with the remaining olive oil, crumble with some of the Boursin on top, and sprinkle the reserved basil overtop, then serve! From our experience, it goes great with barbecued salmon or chimichurri flank steak tacos (you better believe those recipes are coming!), but this dish is so delicious, it could make up a meal of its own with some crusty bread, or pair with a whole selection of dishes!

Happy eating.