“Borscht” Pasta (AKA Deconstructed Borscht with Beet Noodles)

Borscht “Pasta”

Prep Time 10 minutes
Cook Time 20 minutes
Course Main Course, Side Dish
Servings 4 people

Ingredients
  

  • 1 large beet (peeled and spiralized into noodles)
  • 2 garlic cloves (minced)
  • 3 Tbsps butter or olive oil
  • 1/4 cup broth (vegetable chicken)
  • 15 cherry tomatoes
  • 1 Tbsp fresh dill (chopped, or 1 tsp dried dill)
  • salt and pepper (to taste)
  • sour cream, for garnish (optional)

Instructions
 

  • Heat the butter or oil in a large pan over medium heat. Add the garlic and sauté until the garlic is fragrant and is starting to brown. Add the tomatoes, and stir, cooking until the tomato skins blister and split. Next, add the beet noodles, stirring to coat the noodles with the butter/oil. Add the broth and cover the pan to allow the noodles to steam for about 5-8 minutes or until they become tender. Uncover and cook, stirring regularly, until the liquid is almost completely gone. Add the dill and stir. Serve with a dollop of sour cream, if desired.
Keyword Beet Noodles, Beets, Borscht, Tomatoes

And now for the details…

Beet noodles. No, not beet-infused pasta, but actual noodles made out of beets. You’re probably already familiar with zucchini or carrot noodles by spiralizing the vegetables, but how about spiralizing beets? The inspiration for this dish came while I was grocery shopping. The grocery store had beet noodles already prepped for sale and my first thought was “what the heck would you do with beet noodles?”

Well… my brain wouldn’t let it go and I felt the need to figure out what I would do with beet noodles. The earthy flavour of beets is quite pungent, so just throwing them in with any old dish as a pasta replacement would heavily change the flavour of meal. Besides, that beety flavour is so tasty, was there a way to highlight it and make the beet noodles the star of the dish? And then it came to me: a borscht-inspired “pasta” dish.

In order to minimize the mess at home, since I’d never tried spiralizing beets, I chose to use a golden beet instead of a purple/red beet. I can only imagine what the kitchen would have looked like after trying to do this with the deeply coloured purple/red beet. Dark red stains everywhere, it would heavily resemble the scene of a murder. So let’s avoid that and go with the golden beet, shall we? Same great flavour. Less mess. *cheesy smile and thumbs up*

When choosing a beet, try to pick one that’s a little on the larger side, between the size of a tennis ball and softball. In order to spiralize, we need to peel the beet first. Don’t worry about peeling off the bottom of the beet, that’s going to be anchored into the end of our spiralizer. The mistake I made here was to spiralize the whole beet without cutting the noodles as I went. This resulted in looooooooooong Rapunzel-like strands of beet noodles that were a little challenging to work with. I would suggest giving them a little snip with food scissors every 8″-12″/20-30cm as you spiralize to form reasonable-length noodles.

Next, we start cooking! Heat the butter or oil in a large pan/skillet over medium heat. Add your minced garlic and stir until the garlic becomes fragrant (is there a smell much better than garlic cooking in butter?) and add the tomatoes. Cook the tomatoes, stirring regularly, until the skin on the tomatoes blisters and splits open.

Add the beet noodles into the pan. Stir them well so they become coated with the garlicky butter/oil. I found the easiest way to do this was to use some tongs to pick up the noodles and shift them around the pan. Add the broth to the pan, and cover the pan, allowing the beet noodles to cook and soften. This will take about 5-8 minutes.

Finally, uncover the pan, and sprinkle with the dill, stirring well. If there is still quite a bit of liquid in the pan, keep stirring and cooking until most of the liquid has been absorbed/cooked off. Finally, transfer to a serving dish and serve with sour cream!

Happy eating.

Grilled and Garlic-filled Eggplant (Aubergine) Bruschetta

Eggplant Bruschetta

Prep Time 20 minutes
Cook Time 20 minutes
Course Appetizer, Snack

Ingredients
  

  • 1 medium sized eggplant/aubergine
  • 2 garlic cloves (peeled and shredded)
  • 10 cherry tomatoes (cut into 1/8ths)
  • 1/4 cup basil (chopped)
  • 2 Tbsps olive oil
  • 1/8 tsp smoked paprika
  • 1 tsp balsamic vinegar
  • salt and pepper (to taste)
  • Baguettes or crostini (to serve)

Instructions
 

  • Preheat the grill to medium-high heat (~400ºF/205ºC). Poke holes in eggplant skin, using a toothpick or skewer. Place eggplant on grill, and cook for 15-20 minutes, turning every few minutes, until eggplant skin has been blackened and eggplant is soft.
  • Remove eggplant to a strainer and allow to cool and any liquid to drain out while cooling.
  • Add the shredded garlic, tomatoes, basil, olive oil, and paprika to a bowl and stir.
  • Once the eggplant has cooled, remove and discard the skin. Cut the eggplant in quarters and place back int the strainer to drain for 5 more minutes. Slice the eggplant into small pieces, and add to the bowl with the tomato mixture. Stir, then season with salt and pepper to taste. Serve with pieces of baguette or crostini.
Keyword Aubergine, BBQ, Bruschetta, Eggplant, Grill

And now for the details…

Oh the eggplant. Also know as aubergine and brinjal in different parts of the globe, this piece of produce is used in a variety of ways, all over the world. Some of us know this “vegetable” (it is actually technically a berry) as the emoji symbol that represents… not… culinary activities… But despite its phallic representation in more recent media, I have a more romantic view of this produce. Not that kind of romance…

Eggplants have such a variety of possibilities when it comes to cooking. Because they are fairly flavourless, but absorb flavours so well, they have an ability to be incorporated into so many different dishes in many different ways. The can be the star of a dish and be served up, lightly dressed, all on their own, or they can be added into sauces, curries, dips, soups, stir fries, and the list goes on…

The fruit itself has such an unusual look and texture. The skin is such a deep, vibrant, shiny purple, and then by contrast, the flesh is a bright, stark, and matte white. Add in the bright green foliage, and the fruit presents its own, unique colour palette.

While it is beautiful to look at, raw eggplant is a bit unpleasant to consume. It’s astringent, and has a weird, spongy texture. However, once cooked, eggplant loses a lot of the tannin-like taste, and the texture instead becomes soft and silken. We are going to use that to add a different textural “bite” to the bruschetta topping in this recipe.

Let’s get to cooking.

Start by preheating your grill. Set it to medium-high heat, so that the temperature will sit around 400ºF/205ºC.

Before we place the eggplant on the grill, we are going to poke holes through the skin all over the eggplant. This will allow the heat to get into the eggplant a bit more thoroughly, and provide a means for the water trapped inside to escape while the eggplant is cooking. You can use a skewer, toothpick, or even a fork to do this. Try to get a fairly consistent pattern of holes all the way around the eggplant, and they can be spaced about 2cm apart.

We are going to place the eggplant on the grill, and cook it for 15-20 minutes, turning every couple minutes to get the char and cook consistent around the whole fruit. Timing will depend on your grill (and its temperature consistency) and the size of eggplant you are cooking. The goal is for the skin to partially char the entire way around, and for the flesh to have cooked all the way through. How do you tell if it is cooked all the way through? You can make a good assumption that once it has gone from being plump skin and is springy to the touch to shrivelled skin and feels squishy that you have reached your end point. The photo below shows the eggplant when it has first started cooking versus the halfway cooking point. While the skin is shrivelled in the photo on the right, the flesh was still a bit springy when pushed, and so the eggplant was not quite done cooking yet.

Once the eggplant is done, remove from the grill, and place in a wire mesh strainer and allow the liquid to drain from the eggplant as it cools. We are allowing this drainage to happen for a couple reasons, one being that we do not want to bruschetta to have all that liquid… it will turn our bread into a soggy mess. And the second reason is that the liquid has a lot of that astringent/bitter taste, and we want to to drain that off. Now, admittedly, from what I understand, eggplant nowadays are not nearly as bitter as they used to be, and the draining is not as necessary as it once was, but there’s still reason number 1, so just let that sucker drain.

And now you have an… *ahem* flaccid… eggplant… Our next step will be to remove the skin and cut the flesh into little pieces. Thanks to all that cooking, the skin should peel off very easily. Cut the top off, and then peel and discard the skin. Cut the eggplant flesh into four pieces, and place back into the strainer to drain for a few more minutes while you prepare the rest of the bruschetta.

Cut the tomatoes into small pieces. Roma or beefsteak tomatoes can be used instead of cherry tomatoes; I used the cherry tomatoes because they were what I had available. Regardless of what kind of tomato you used, it should be about 1/2-3/4 cup of tomato pieces once they’re all cut up. Place the tomatoes, basil, shredded garlic, smoked paprika, and olive oil into a bowl, and mix well.

Finally, bring the eggplant back to the cutting board, and cut it into small pieces, about 1cm in size. Mix the eggplant in with the other ingredients, and add salt and pepper to taste.

To serve, you can either split the topping between the bread or crostini and serve, or you can bring the bowl to the table and allow folks to scoop their preferred amount of topping onto their own bread or crostini. Technically, to be a true bruschetta, the bread should be toasted or grilled in some way, but I got super lazy with this one, and instead I just tore a few pieces of fresh, crispy baguette and in half, and scooped the bruschetta topping right onto the bread pieces and sprinkled with a little Maldon salt. It was delicious.

Happy eating.

Fresh Southwest Black Bean “Hummus”

Southwest Black Bean “Hummus”

Prep Time 15 minutes
Course Appetizer, Snack

Ingredients
  

  • 500 ml canned black beans (14 oz)
  • 3 garlic cloves (peeled and chopped loosely)
  • 1/4 cup fresh cilantro (loosely chopped)
  • 1 tsp ground cumin
  • 1 lime (juiced)
  • 2-4 Tbsps olive oil
  • 1/2 tsp salt

Instructions
 

  • Drain and rinse beans. Place beans, garlic, cilantro, cumin and lime juice in food processor. Blend until a loose mix has formed. Add olive oil and salt, and blend for several minutes or until smooth. Serve with veggies, pitas, or taco chips.
Keyword Black Bean, Cilantro, Hummus, Southwest

And now for the details…

Hummus enthusiasts may be horrified at the name used for the non-chickpea concoction that is this recipe… I mean, can it truly be called hummus when it contains no chickpeas? Well, probably not, technically, since according to my interweb searching, the English translation for the word hummus is… chickpeas. Ha! Whoops.

But.. don’t hate me… I’m not the biggest fan of chickpeas. They have a slightly grainy texture, even when mushed down into hummus, and that’s just not my cup of tea. Using black beans instead of chickpeas results in a different texture; I find the texture is silkier, smoother. And since we’re going so far off-base with the main ingredient of this hummus, we’re going to go even further by changing the flavour profile by adding in some southwestern tastes.

To get started, drain and rinse the beans under some cold water, then add them to your food processor or blender. Don’t have a food processor or blender to use? There are options: you could use a potato masher, or a mortar/pestle, but if you are going to go with a manual version, finely chop both the cilantro and garlic before you add them.

Next, add the rest of the ingredients to the blender/food processor. Only add about 2 tablespoons of the olive oil to start, we’ll reserve the rest of the oil in case the mix is a little too dry and need more liquid to blend properly.

Give the blender a couple pulses to start breaking up the beans and to get a little mixing action happening. Then, open the food processor/blender up, scrape down anything that’s collected at the top, back into the mix, and repeat until you stop getting loose bits fling up to the top of the food processor/blender.

Once the loose bits are back in the mix, blend the hell out of it until you get a nice, smooth texture. I blended mine for about five minutes straight. You could do more or less, depending on what kind of texture you want out of the hummus once it’s done. Now is also the time we will check in to determine if more oil is needed. If you do try to blend this, and it’s not quite “sticking” or become dip-like, you probably need a tad more oil to blend and bind everything together.

Once you’ve blended it down to your dip texture of choice, scrape out of the food processor/blender and serve! Anything you want to save for later keeps quite well in a sealed food storage container in the fridge for about a week.

For serving, you could go the healthy route and serve it with veggies, but my favourite thing to eat it with is taco chips!!!

Happy eating.

Super Simple Side of Roasted Butternut Squash

Roasted Butternut Squash

Prep Time 5 minutes
Cook Time 20 minutes
Total Time 25 minutes
Course Main Course, Side Dish

Ingredients
  

  • 1 medium sized butternut squash (peeled, cored and cut into chunks)
  • 2 Tbsp olive oil
  • 1 tsp ground cumin
  • 1/4 tsp cinnamon
  • 1 tsp cane sugar (can use regular sugar)
  • 1/4 tsp salt
  • 1/8 tsp cayenne pepper

Instructions
 

  • Preheat oven to 425ºF/220ºC. Place the squash pieces into a bowl. Drizzle with olive oil. Sprinkle the spices over the squash. Toss the squash pieces to even cover the pieces with oil and spices. Lay out onto a parchment paper-lined cookie sheet in a single layer. Place in oven for 10 minutes. Take out of oven, flip the pieces and place back in the oven for another 10 minutes. Remove from the oven and serve.
Keyword Baked, Butternut Squash, Vegetables, Vegetarian

And now for the details…

Always wanted to try making butternut squash, but not sure what to do with it? There are a number different options for butternut squash, you can mash it, turn it into soup, stuff it into ravioli… but one of my favourite ways to eat this squash is just by simply oven roasting it with some spices.

I haven’t had butternut squash in the house for quite awhile… the last time I made it, I dropped one of the raw pieces on the ground before they made it into the oven. And our dog swooped in and grabbed it, and ran off. Pretty normal for him, he loves vegetables (kale stalks are his favourite). But he also normally CHEWS before he swallows. Not so this time. Which resulted in a a sleepover for him at the animal hospital, and a very expensive vet bill for us… Thankfully, everyone’s okay, and needless to say, I was extremely careful to make sure none of the pieces fell on the floor this time.

Preheat your oven to 425ºF/220ºC.

We start by cutting the squash in half and scooping the seeds and guts out. Next, peel the skin off the squash. I find it is easier to do this by cutting the squash into quarters. If you find it really difficult, you can throw the squash pieces into the microwave for a minute or two to start the cooking process, which will really soften the flesh and make it easier to peel the skin off. Oh man… I just spent the day binge watching Criminal Minds, and that last sentence creeped me out a little bit…

Once the squash is peeled, cut it into cubes, about 1″ in size. Place those cubes in a medium sized mixing bowl. Drizzle with the olive oil. Then sprinkle the squash pieces with the spices, salt, and sugar. Mix well until the pieces have been thoroughly coated with oil and spices.

Next, lay parchment paper down on a large cookie sheet. Then lay the squash pieces in a single layer on the sheet. Place the squash in the oven for 10 minutes.

Take the squash out of the oven and turn the pieces over, then place back in the oven for another 10 minutes, or until the squash is tender and has caramelized/browned slightly.

Remove from the oven and serve immediately.

Happy eating.

Gorgeous and Green Citrus Cucumber Salad

Cucumber Salad

Prep Time 10 minutes
Course Salad, Side Dish

Ingredients
  

  • 1 large english cucumber (sliced thin)
  • 1/2 cup fresh parsley (chopped)
  • 1 small shallot (sliced thin)
  • 1 avocado (peeled, pitted and cut into pieces)
  • 1 orange (juiced)
  • 1 Tbsp white wine vinegar
  • 1 Tbsp olive oil
  • salt and fresh ground pepper (to taste)

Instructions
 

  • Slice the cucumber and shallots very thin. Place in a bowl, and mix in the parsley, shallots, and avocados. Add the orange juice, vinegar, and oil. Mix well, then stay and pepper to taste. Serve.
Keyword Avocado, Cucumber, Orange, Salad, Salad Dressing

And now for the details…

Well folks, we are over halfway through the quarantine 14 day challenge, coming into day 8.

Today’s recipe is nice and simple. And since spring is attempting to be upon us, and warmer weather is around the corner, I figured it was appropriate to share a recipe that really could be likened to summer in a bowl. It’s nice and fresh, with a citrus kick from the orange juice, and richness provided from the avocado.

I use my Japanese knife for slicing the vegetables super thin. A quick sidebar for how much I love my Japanese knife… I really love this knife. And it’s not just because it was a gift from my grandma (a gift given with a coin, so as not to sever our relationship). Well maybe it’s partially because it was a gift from my grandma. But also… because the knife is beautiful. And works so well. I have only sharpened it once in the almost six years of owning it, and it is incredibly sharp (as the ends of fingers I have almost sliced off can attest). The knife is from a line called Kumo, for cloud, which is what the pattern on the knife seems to exhibit. Japanese knives have a different angle than traditional western blades, and are sharper than western blades, which makes them great for slicing things very thinly. It’s an awesome knife.

If you don’t have a super sharp Japanese blade? Well, a mandolin could also work. Or as sharp a knife as you may have. Maybe you just have better knife skills than I do. Possible. My knife skills could use work (as the ends of fingers I have almost sliced off can attest).

Cut the cucumber as thin as you can. Same with the shallot. Add them and the parsley to a bowl.

Toss the vegetables together, and add the avocado.

Squeeze the orange juice in, add the vinegar and oil, then add the salt and pepper to your flavour preference, and serve. It is that easy.

Happy eating.

Leeks Poached in Coconut Milk and Makrut Lime Scented Dressing

Leek Salad with Coconut Milk Dressing

A simple green salad with poached leeks and a makrut lime scented coconut milk dressing
Prep Time 20 minutes
Course Main Course, Side Dish

Ingredients
  

  • 1 cup coconut milk
  • 4 makrut lime leaves
  • 2 leeks (green ends trimmed, cut into 2.5cm or 1" slices)
  • 1 Tbsp dijon mustard
  • 1 Tbsp white wine vinegar
  • salt and pepper (to taste)
  • 4 cups arugula
  • 1/2 cup walnut halves (toasted)

Instructions
 

  • Heat the coconut milk and lime leaves in a large skillet over medium-low heat until it starts to simmer. Add the leeks, laying them flat. Cook for 12 minutes total, turning them halfway through. Remove leeks and set aside.
  • Whisk the dijon and vinegar into the remaining liquid, cooking until it just starts to simmer, remove from heat.
  • Place leeks on serving dish, top with arugula, drizzle dressing on top, finish with walnut pieces.
Keyword Arugula, Coconut Milk, Leeks, Makrut Lime Leaves, Salad, Salad Dressing

And now for the details…

Infomercial style: “Tired of the same old salad?” *Person in black and white takes a bite of a pitiful looking salad and give the camera an exaggerated sad face* “Wondering if there’s something different out there to replace raw vegetables covered with oily dressing?” *Same person throws their hands in the air and rolls their eyes as if they cannot imagine there is anything in the world that can help* “Try this amazing poached leek salad with a creamy makrut lime dressing” *Person, now in colour, takes a bite of the salad and gives a beatific smile and thumbs up to the camera*

Okay, so I can’t help myself, I have scenes that play out in my head like this all the time. An overactive imagination… horrible if I’m home alone and hear a random sound somewhere in the house, but great for hours of self-entertainment. Onto the food…

The leeks in this salad add the savoury, umami character, while we are getting a rich creaminess in the dressing, plus a floral, citrusy hit thanks to the makrut lime leaves.

So let’s cook.

Start by cutting the leeks into about 1″ thick pieces. Stop a few inches below the green ends, and discard the ends. Heat the coconut milk in a pan on medium heat with the makrut lime leaves. If you do not have lime leaves, move forward with the recipe as is, and I will give you an alternative a little later. Once the milk is heated and bubbling slightly, add the leeks in a single layer in the milk. Turn down the heat slightly if the milk is really bubbling.

Cover the pan, and cook the leeks for 6 minutes, then turn them over, and cook for another 6 minutes. Keep an eye on the pan to make sure the milk does not boil over. Turn the heat down if you need to, or uncover them to allow the bubbling to come down.

The leeks should be done after about 12 minutes, test one with a fork, they should be tender, but not falling apart. Take the leeks out of the pan and transfer to a serving dish, spreading across the dish.

Add the mustard and vinegar to the pan, whisking into the liquid. Here is where our alternative is if you did not have lime leaves. From a fresh lime, shave off several pieces of its peel, trying to avoid the pith, and add the pieces to the liquid. Keep the pan on the heat, and whisk constantly until the sauce starts to simmer. If it is still very liquidy, simmer until it thickens slightly, whisking constantly.

Scatter the arugula over the leeks on the serving dish, then drizzle the dressing overtop. Crumble the walnut halves into pieces over the salad, and serve immediately.

Happy eating.

Ukrainian Instant Pot Beet Borscht, just like Grandma used to make

Ukrainian Beet Borscht

Prep Time 15 minutes
Cook Time 15 minutes
Total Time 30 minutes
Course Main Course, Soup

Ingredients
  

  • 1 small onion (shredded)
  • 6 small red beets (peeled and shredded)
  • 4 medium carrots (peeled and shredded)
  • 4 fingerling potatoes (roughly chopped)
  • 4 garlic cloves (peeled and minced)
  • 6 cups chicken or vegetable broth
  • 1 can tomato paste
  • 2 Tbsps dried dill
  • 3 bay leaves
  • 1 Tbsp olive oil
  • salt and pepper (to taste)

Instructions
 

  • Peel and shred the veggies, either in a food processor, or using a grater.
  • Add the olive oil to the instant pot on Sauté setting. Add the onions, garlic and carrots, sautéing until the carrots start to soften. Add the rest of the ingredients, stirring well.
  • Set pot on Soup/Broth setting and cook on pressure for 10 minutes.
  • Serve with fresh dill and sour cream.
Keyword Beets, Instant Pot, Soup, Vegetables, Vegetarian

And now for the details…

My family on both sides have always had a focus around food. Since I was a little girl, I remember all getting together for big family meals, cracking out some snack or recently baked good when someone would come to visit, and most importantly to me, often cooking or baking together. I must have been so annoying to my mom, grandmas and aunties, because from a young age “I help too” was a common phrase coming out of my mouth, quickly followed by the screech of the kitchen chair legs against the floor as I insistently dragged it over to the counter to stand higher and “help”.

One of the people I would insist regularly on “helping” was my Grandma on my dad’s side. Since my Grandma was Ukrainian, this resulted in me learning to make foods like perogies, periski, holupchi, or borscht. And as the weather turns cooler and root vegetables are readily available now that it is officially fall, my craving for borscht peaks at an all-time high. Even though this classifies as a soup, I feel as though borscht should be more of a stew. Hearty, rich, and hitting the spot on a cool fall day. The addition of the potatoes gives a nice thick broth, and the deep, earthiness and sweetness of the beets gets elevated with the herbaceousness of the dill and the zing of the tomato paste. Admittedly, my Grandma’s borscht was a bit more on the “soup” side of things, but the main thing I did pick up from her, and I hold tight to, was on her being quite adamant that borscht should not contain cabbage. Cooked cabbage… is not my cup of tea. Let’s be frank people, it smells like farts. And so, zero cabbage in this recipe. Is it un-Ukrainian? Possibly. But since I learned this from my Grandma, I’m going to claim a certain level of authenticity!

For this recipe, we are making it in the Instant Pot. You can always make this exact same recipe in a regular pot, it will just need to cook on the stove on medium-low heat for much longer (about 5 times as long).

Let’s start by prepping our veggies. I used a food processor to shred all my veggies. You can always use a hand grater instead. Peel the carrots, onion, and beets first. Then shred the carrots and onion. Remove them from the processor into the pot, and do the beets next. We are doing these all separately so we can sauté the other veggies without the beets, as a sort of mirepoix, without the celery. Mince your garlic and add it to the pot as well. Add a splash of olive oil, set the pot to “Sauté” (medium high on a pot on the stove), and cook the veggies, stirring occasionally, until the carrots start to soften and the garlic and onions are fragrant.

While those veggies are cooking, peel and diced your potatoes. Once they are ready, add the potatoes and beets to the pot, and the broth (chicken for Grandma’s, vegetable if you are going vegetarian with your borscht) and stir well, mixing everything all together.

Add the last few ingredients to the pot, give it one last stir to mix everything in, especially the tomato paste, and the cover your pot and set to “Soup/Broth” setting, with pressure on. If no Instant Pot, turn the temperature down to medium-low temperature. We are going to cook here for 10 minutes in the Instant Pot, or 50-60 minutes on the stove, stirring occasionally if on the stove.

Once the cooking time is done, give the borscht one last stir, then serve in bowls. You can serve just like this, or if you’d like to go the way I had it at Grandma’s, add a dollop of sour cream and stir it in before your first big, soul-warming bite.

Happy eating.

Rainbow Vegetable Bowl with Peanut Satay Sauce

Rainbow Veggie Bowl with Satay Sauce

Prep Time 20 minutes
Cook Time 10 minutes
Total Time 30 minutes
Course Main Course
Servings 2 servings

Ingredients
  

  • 1/4 red cabbage (sliced thin)
  • 2 large carrots (peeled and sliced)
  • 3 kale leaves (destalked and sliced into strips)
  • 1 shallot (sliced)
  • 1 cup brussel sprouts (sliced thin)
  • 1/2 red pepper (sliced)
  • 1/2 inch piece fresh ginger (grated)
  • 2 garlic cloves (peeled and sliced)
  • 1/2 Tbsp olive oil
  • 3 Tbsps peanut butter
  • 3 Tbsps sweet chilli sauce
  • 6 Tbsps coconut milk
  • 1 Tbsp soy sauce
  • 1 Tbsp sambal olek
  • 2 eggs (soft boiled)

Instructions
 

  • Prepare your veggies.
  • Mix together the peanut butter, chilli sauce, coconut milk and soy sauce, and set aside.
  • Add the shallots, garlic  and carrots to a large pan with the oil and sauté on medium high heat until the shallows start to brown. Add the ginger and stir, then add the cabbage and brussel sprouts, stirring while cooking until the sprout and cabbage have just started to soften. Stir in the kale and red pepper, and cook until the kale has turned bright green.
  • Separate the veggies into two bowls. Top with the satay sauce and eggs, and serve.
Keyword Cabbage, Cruciferous, Kale, Vegetables, Vegetarian

And now for the details…

Guilty admission: this recipe was created when I was trying to clean out our refrigerator. I had all these random bits of veg left over from other recipes that I had made and I needed to find something to do with them. Et voilà: a rainbow smorgasbord of sautéed veggies with a satay dressing and soft boiled eggs to top them off.

This recipe comes together fairly quickly, and so is a great option for a weekday meal. And since the main protein source is egg, it’s also appropriate for the non meat eaters out there! Have a vegan in the crowd? Swap out the eggs for pan fried tofu, and you are in business! The recipe also scales up an down quite easily, depending on the number in your crowd.

Start everything off my prepping your veggies and sauce. Once the cooking starts, this recipe comes together very quickly, so you want everything ready to go so you can just toss each element into the pan and plate immediately.

Slicing of your sprouts and cabbage could be done by hand or in a food processor, whichever is your preference. I like slicing by hand since it allows me more control and I prefer the veggies to be sliced thinner than the food processor will allow.

For the sauce, we simply whisk together the peanut butter, chilli sauce, coconut milk and soy sauce until they are fully mixed. I like using crunchy peanut butter for this so you get little bites of peanut in the dish after mixing the sauce into the veggies. I also added some sambal oelek for added spice, but if you prefer a milder flavour, you can omit it.

Next it’s on to cooking. Start with your soft boiled eggs. Bring a pot of water to a boil, carefully place the eggs inside (use a spoon or skimmer to help you do this to prevent dropping the eggs too fast and cracking the shells), then reduce the temperature to medium-low and cook the eggs for 6-7 minutes, depending on your preference of yolk smooshiness. Have an ice bath ready. While the eggs are cooking, we can start cooking the rest of the meal, but the moment the eggs are done, they should be removed from the hot water and placed in the ice bath.

Moving on to the veggies. Heat a large pan at medium-high heat with the oil, and add the ginger and garlic. Cook until just fragrant, then add your shallots and carrots. Stir, cooking until the shallots start to brown, then add the Brussel sprouts and cabbage. Stir, cooking just until the cabbage starts to soften, and add the kale and red pepper. One last stir and cook until the kale turns bright green and just starts to wilt, then remove from the heat and place into your bowls for serving.

Pour the satay sauce over the veggies, peel the eggs (yes, I definitely massacred them in this photo…), cut them in half and place on top, and you are ready to for dinner!

Happy eating.

How to Have Dessert for Breakfast: Passionfruit Chia Pudding with Berry Jam

Passionfruit Chia Pudding with Berry Jam

Prep Time 30 minutes
Resting Time (minimum) 1 hour
Course Breakfast, Dessert
Servings 5 Servings

Ingredients
  

  • 1 cup fresh strawberries (cored and cut into small pieces)
  • 1/2 cup fresh raspberries
  • 1 Tbsp honey
  • 1+1 tsps vanilla extract
  • 800 ml coconut milk (27 oz)
  • 1/3 cup passionfruit purée
  • 2 Tbsps turbinado sugar
  • 1/2 cup white chia seeds
  • 4 Tbsps shaved coconut (toasted, for garnish)

Instructions
 

  • Wash and cut strawberries into small chunks. Wash raspberries and add both to pot. Cook on low-medium heat, until cooked down (~10 minutes). Add 1 tsp vanilla and honey, cook until honey is dissolved. Cool and place in five sealable containers.
  • Mix together milk, passionfruit purée, 1 tsp vanilla and sugar until the sugar is dissolved. Add the chia seeds until just mixed, and pour over the compote. Seal the containers and let set in the fridge for a minimum of 60 minutes, or overnight.
  • When ready to eat, top with coconut and serve.
Keyword Berries, Chia, Coconut Milk, Compote, Passionfruit, Pudding

And now for the details…

I’ve been needing a good breakfast option lately, and have gotten into the bad habit of buying it at my coffee shop on the way to work. The option I have been purchasing frequently? Chia pudding with a fruit compote, similar to a jam. And every time I buy it, I question why I buy instead of make. It is relatively easy to make and WAAAAAAY cheaper for me to make it at home and take it to work instead of purchasing. Not to mention, I would be producing way less waste by making it in a reusable container instead of throwing the bought plastic into the recycling bin every day.

And so… I made some! In this recipe, I chose to amp up the pudding with some passionfruit purée, and made the compote from strawberries and raspberries that I had in the fridge, which were starting to look a little rough.

We start with our compote. Wash and trim the strawberries and cut into small chunks. These strawberries had seen better days and I needed to trim around the brown spots as well.

Place the strawberries into a medium sized pot and set them on the stove at medium-low heat. Wash the raspberries and add them to the pot with the strawberries.

Let the berries cook, stirring regularly to avoid the fruit from burning on the bottom of your pot, until they have softened and are breaking down into an almost jammy consistency. Add the honey and 1 tsp of vanilla, stirring until completely mixed in. Then allow to cool completely.

Next we will mix our pudding. Start by mixing the coconut milk and passionfruit purée together. The passionfruit is going to balance the creaminess of your coconut milk by adding a tart, fruity, and slightly floral flavour to your pudding. Passionfruit purée… where do I find it, you may ask? There are a few options. You could buy fresh passionfruit from a grocer who offers them, hope you have waited the right amount of time for them to ripen enough (unripe passionfruit are quite tasteless, make sure the fruit skin is super wrinkly), scoop the pulp to a blender, add a bit of water, purée, then strain and separate the liquid form the seeds. You could do that. Or… you can find it at your local latin market in the freezer section! You might be able to tell which option I prefer…

Add your sugar and vanilla, and stir until the sugar has completely dissolved. Finally, add your chia and stir until completely blended. Try to avoid stirring too much, which can make the pudding “tough”.

To get the pudding ready to serve, start by pouring your compote into your containers. I used a pastry bag made from parchment paper (a trick I learned by binging on Anna Olson shows) to help me avoid slopping up the sides of the container while I was pouring.

Next, pour in your chia pudding. Be careful to do this gently so it does not end up mixing into the compote and all ending up as one big blended mess!

And now? Put a lid on it! Bahahaha I’m so funny. But seriously. Cap your puddings and put them in the fridge to set. The chia seeds will soak up the liquid from the coconut milk and passionfruit purée and turn into more of a pudding texture. Once you are ready to eat (leave it at least overnight), top your pudding with some toasted coconut for texture (bake your coconut on a cookie tray at 350ºF until they are golden brown and cool), and eat!

Happy eating.

Fennel, Carrot and Radicchio Salad with Lime Leaf Dressing

Fennel, Carrot and Radicchio Salad with Lime Leaf Dressing

Prep Time 30 minutes

Ingredients
  

  • 2 cups kale (stalks removed, thinly sliced)
  • 5 carrots (shredded)
  • 1 fennel bulb (thinly sliced)
  • 1 small radicchio (thinly sliced)
  • 2 green onions (chopped)
  • 1/2 cup coconut milk (high fat)
  • 6-8 makrut lime leaves
  • 1 lime (juiced and zested)
  • 1/4 lemon (juiced)
  • 1 Tbsp dijon mustard
  • 1 tsp sugar
  • 1/2 tsp salt

Instructions
 

  • Prep the veggies. Heat the coconut milk with the lime leaves over low heat for 20-30 minutes. Let cool, and mix with the rest of the dressing ingredients. Pour over the veggies and mix.

And now for the details…

I have a bit of an obsession with makrut lime leaves. They are also known by the name kaffir lime leaves, but this title is now considered defunct due to the offensive nature of the k-word. Some use makrut, or simply lime leaves to describe these items of deliciousness. These leaves impart the fabulously floral, tropical, and citrusy flavour to many Thai curries, and offer a great flavour to many other items as well. Plus, when you store them in your fridge, you are welcomed by their amazing aroma every time you open the door.

I had a salad very similar to this once and thought it was a brilliant blend of veggies. The fennel offers its freshness, with a hint of liquorice. The carrot is earthy and sweet. And the radicchio provides a slight bitterness to balance the flavours. But to up the ante on the tropical look of the salad with all the colours, I wanted to impart an exotic flavour to add to the experience. Enter lime leaves. Their delicate flavour adds an air of mystery to the salad. The taste being somewhat familiar, but at the same time foreign or indeterminate compared to most western flavours.

Let’s get to cooking. To start ourselves off, we are going to cook the lime leaves in the coconut milk. Try and use a “premium” coconut milk, as these will be higher fat, and will provide you with a creamier and less watery dressing. Place the lime leaves in the milk and cook over low heat until the milk is infused, about 20-30 minutes.

I drool now at the memory.

I actually cooked too much, using the entire can of coconut milk. I saved and froze the leftovers, which could be used for a smoothie, a delicious addition to a cocktail in place of ice, or even melted into a curry for an added punch of flavour. Tasting it frozen, it does inspire me to make an attempt at a makrut lime ice cream sometime in my near future. A forthcoming blog post, you ask? I would say likely.

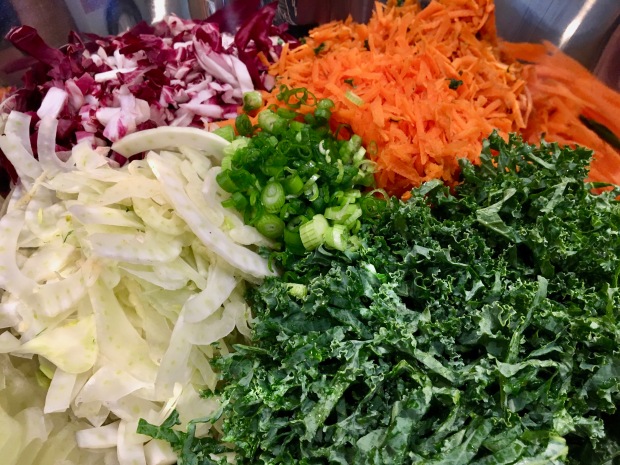
Now that we have the base of our dressing ready, and we are waiting for it to cool, we will prep our veggies. Wash everything and set on a a towel to dry. Have a large bowl ready for the veggies as they are ready. Removing the core, slice the fennel very thin, either using mandolin or a very sharp knife. If you want, you can reserve some of the fennel greens to add some visual pop to the presentation of the salad at the end. De-stalk the kale and slice thinly. Slice the radicchio. Peel and shred the carrots. Slice the green onions, including part of the white. Add everything into the bowl.

This balance of colours and flavours excites all elements of the palate!

Whisk all the dressing ingredients well together (make sure you have removed and discarded the lime leaves), then drench your veggies with the delicious mix and stir all together. Serve with some of the fennel greens as adornment.

Happy eating.