Easy Grilled Carrots with an Ume and Soy Glaze

Grilled Carrots with Ume and Soy Glaze

Prep Time 5 minutes
Cook Time 15 minutes
Total Time 20 minutes
Course Side Dish

Ingredients
  

  • 6 medium-sized carrots (peeled or washed/scrubbed)
  • 1 Tbsp soy sauce
  • 1 garlic clove (grated)
  • 1 tsp fresh ginger (peeled and grated)
  • 1 Tbsp plum (ume) extract syrup (can substitute with maple syrup)
  • 1 Tbsp rice wine vinegar
  • 1 tsp sesame oil
  • dash cayenne pepper
  • 2 Tbsps olive oil
  • lettuce (as garnish)

Instructions
 

  • Clean carrots well with vegetable scrub brush. Mix the marinade ingredients together. Brush carrots with marinade and place on a medium-high grill. Turn regularly, brushing with more marinade each time, until cooked through. Serve.
Keyword BBQ, Carrot, Grill, Soy Sauce, Vegetables

And now for the details…

I was hunting through my fridge at the end of the weekend for another veggie to go with our meal. I was hoping to find something I could grill, but the vegetable bin was pretty much empty and all I had left was celery and carrots. I have never really associated either with grilling, but at the same time, why not?

I chose the carrots, and if I was going to do them on the grill, I clearly needed to dress them with something. Some kind of dressing that would be sweet, salty, maybe even a tad bit spicy. I was already going down the thought process of soy and rice wine vinegar. But when I was debating between sugar or honey in my brain for the sweetness factor, I remembered another option I have in my fridge: plum extract.

I found the plum extract at our Japanese/Korean grocery store and bought it on a whim, without much thinking what I would do with it. The original inkling to buy it came from memories of the homemade Ume wine (a wine made from soaking Ume plums in liquor) we had at the ryokan we stayed in when we were in Nara, Japan. That Ume wine has haunted my since. It was sweet, tart, and fruity, and quite thick due to the high alcohol content. I figured this extract could be added to sparkling water and at least give me some remembrance of the flavour of that wine. But I regularly forget about it and it sits on the shelf of the fridge door, morosely waiting for the day it can be pulled out and become a feature of one of our meals (yes, I truly do feel this way about inanimate objects, I cannot help myself. Can’t you just see the sad eyes the bottle must be giving me every time I close the fridge and haven’t chosen it?) Now is it’s time!

After we have cleaned the carrots and set them aside, we will whisk the marinade ingredients (i.e. all the remaining ingredients in the recipe) together in a small bowl with a fork (or a tiny whisk; nod to you Binging with Babish). Yes, even the plum extract.

Next, brush the carrots on all sides with the marinade, and place on the hot grill.
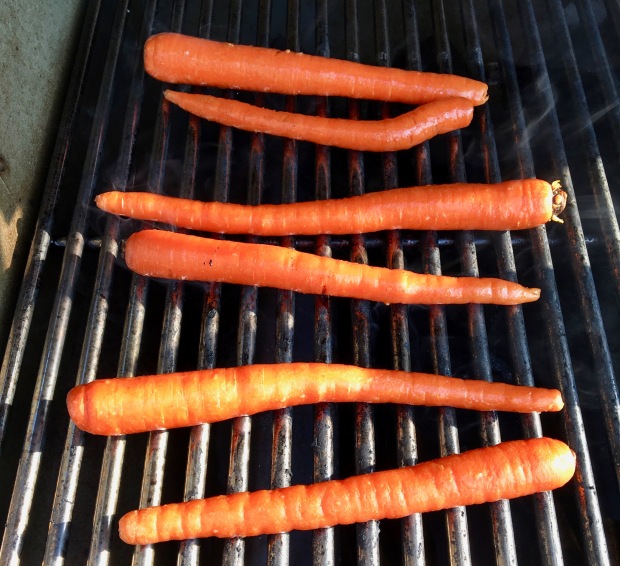
As the carrots cook, check in on them every couple of minutes. Re-brush with the marinade liberally, turn them, then let them cook some more.

Pretty soon, the carrots will kind of look like misshapen wieners with grill marks. As long as they have cooked to your preferred level of softness, they are ready to come off the grill. Plate them, and brush them one last time with the marinade, and maybe adding a bit of lettuce for a super kitschy presentation, and you are ready to enjoy!

Happy eating.

Quick, Easy Zucchini and Enoki Mushrooms with Caramelized Shallots

Zucchini and Enoki Mushrooms

Prep Time 5 minutes
Cook Time 10 minutes
Course Side Dish

Ingredients
  

  • 1 medium zucchini sliced
  • 1 package enoki mushrooms
  • 1.5 Tbsp mirin
  • 2 Tbsp soy sauce
  • 1 tsp fish sauce
  • 1 shallot (thinly sliced)
  • 2 garlic cloves (minced)
  • 1/2 cup olive oil

Instructions
 

  • Slice the shallots thin and dry on paper towels. Heat oil in a wok on medium to high heat and add the shallots. Cook, stirring regularly, until the shallots have caramelized. Transfer with a slotted spoon to paper towels.
  • Mix together the mirin, soy and fish sauce and set aside. Drain most of the oil except for a small coating in the bottom of the wok. Add the garlic, stir frying until fragrant. Add the zucchini and cook until browned slightly, then add the enoki mushrooms. Stir until the mushroom have just started to soften, then add the sauce. Cook until the sauce is almost completely reduced.
  • Top with the shallots and serve.
Keyword Enoki Mushrooms, Mushrooms, Zucchini

And now for the details…

I love mushrooms. No seriously, I do. All kinds of mushrooms. I love cremini mushrooms. Oyster mushrooms. Matsutake’s. Shimeji’s. Portobello’s… *drool* Deeeeelicious. I love them so much so that a friend of mine suggested that “Mushrooms for Emily” sounds like it would be a great band name. The hilarious part of this is that when I was younger, I hated mushrooms. It wasn’t until my late teens/early twenties (*ahem* which aren’t THAT far behind me…) that I started to appreciate them. And that appreciation grew at logarithmic levels. Yep. Nerd joke. My love for mushroom was fast and hard, so much so that I really don’t think it can increase much more over time.

Enoki mushroom (full name enokitake, and also known as straw or golden needle mushrooms) are such a fun mushroom option. Long and thin, but with that slightly springy, spongy texture, they are almost like a noodle replacement, but way better.

Fun fact, a study done in Japan demonstrated that regular consumption of enoki mushroom resulted in reduced cancer death rates. So eating enoki mushrooms isn’t only delicious, it’s good for your health! 😛

We are going to cook this dish in a wok. Because we are going to be cooking at high heat, mix the sauce together in advance, because once cooking starts, things are going to move quite quickly.

Prepare your veggies by slicing the zucchini, and slicing off the base of your mushrooms. once the base is cut, the mushrooms should separate quite easily.

Heat the oil in your wok on a heat just below high, until a drop of water sizzles. Okay, so maybe my job has infiltrated my home life, but safety first here. Any time I am cooking with a mass of hot oil, I make sure I am wearing my glasses and not my contacts. Safety first, and PPE (personal protective equipment) where possible!

Add your shallots, and cook, stirring regularly, until they have turned a nice golden brown. Remove the shallots with a slotted spoon to a dish lined with paper towels to allow the shallots to cool. Drain the oil into a container, you can reserve this for future cooking where you need a savoury, shallot-y flavour, it keeps very well in the fridge. There should be a bit of oil left in the pan for the next part.

Are those giant chopsticks for stir frying? You bet they are.

Keeping the temperature high, add the garlic, and stir until fragrant. Immediately add the zucchini and cook until the zucchini pieces have started to soften, and have a glassy surface (2-3 minutes).

Add your mushrooms and continue to stir, with a bit of a light touch at first to avoid breaking the mushrooms into pieces. As they cook and soften, they will become more malleable and will not break as easily.

Once the mushrooms have become soft, add your sauce and stir, allowing the sauce to cook down. This should not take very long at high heat, likely less than 60 seconds.

Turn out onto your serving platter and top with the shallots. Serve and enjoy!

Happy eating.

Grilled Halloumi and Tomato Salad

Grilled Halloumi and Tomato Salad

Prep Time 5 minutes
Cook Time 10 minutes
Total Time 15 minutes
Course Side Dish
Servings 2 people

Ingredients
  

  • 2 large tomatoes (sliced thick)
  • 160 g halloumi cheese (5.6 oz)
  • 1/4 cup olive oil (good quality)
  • 2 Tbsps chopped fresh cilantro
  • Maldon salt (to taste)

Instructions
 

  • Slice the tomatoes into 1.5-2cm (1/2-3/4") slices. Slice the halloumi into 1/2-1cm-thick slices. Oil the tomato and halloumi slices, reserving some of the oil. Grill at medium-high heat on either side for several minutes per side. Place tomatoes, top with the halloumi. Drizzle with reserved olive oil. Sprinkle with cilantro and Maldon salt and serve.
Keyword Cheese, Halloumi, Salad, Tomatoes

And now for the details…

Yeah okay, so this was a super simple recipe. But it is also super delicious. Field ripened tomatoes are just starting to become available, and I have a bit of an infatuation with halloumi.

Halloumi. How could one not enjoy this fabulous creation. It is a cheese that is strong enough to withstand being placed on the grill or a hot pan. The result? Melting, salty, creamy tastiness that has the crispy finish of toasty cheese on the outside. Good enough to eat on its own with no further additions, we are going to balance that creaminess with the slight tang from our tomatoes and the fresh herbaceousness of the cilantro. Did I just make up a word there? Perhaps, but its appropriately descriptive.

We start by slicing our tomatoes and halloumi, and oil each side. Slice the tomatoes nice and thick, as they are going to have to withstand the high heat of the grill. If your tomatoes are very ripe and quite soft, slice them a little thicker yet.

Next we move to the grill. A medium-high heat on the grill, place the tomatoes and halloumi directly on the grill. Heat them just enough to get a nice brown grill mark on one side (3-6 minutes), then flip and grill on the other side.

Am I grilling pineapple as well for another salad? Why yes, yes I am.

As soon as the tomatoes and halloumi are ready, place the tomatoes on a plate and top with the halloumi (I cut each of my halloumi pieces in half to have the right tomato-cheese ratio). Drizzle the entire salad generously with the olive oil, and finish by sprinkling the chopped cilantro and Maldon salt overtop (sea salt or kosher salt will work too), and serve. Highly advised to serve with some crusty bread to soak up that rich, tomatoey oil left on the plate after you have cleared off the vegetables!

Happy eating.

Fennel, Carrot and Radicchio Salad with Lime Leaf Dressing

Fennel, Carrot and Radicchio Salad with Lime Leaf Dressing

Prep Time 30 minutes

Ingredients
  

  • 2 cups kale (stalks removed, thinly sliced)
  • 5 carrots (shredded)
  • 1 fennel bulb (thinly sliced)
  • 1 small radicchio (thinly sliced)
  • 2 green onions (chopped)
  • 1/2 cup coconut milk (high fat)
  • 6-8 makrut lime leaves
  • 1 lime (juiced and zested)
  • 1/4 lemon (juiced)
  • 1 Tbsp dijon mustard
  • 1 tsp sugar
  • 1/2 tsp salt

Instructions
 

  • Prep the veggies. Heat the coconut milk with the lime leaves over low heat for 20-30 minutes. Let cool, and mix with the rest of the dressing ingredients. Pour over the veggies and mix.

And now for the details…

I have a bit of an obsession with makrut lime leaves. They are also known by the name kaffir lime leaves, but this title is now considered defunct due to the offensive nature of the k-word. Some use makrut, or simply lime leaves to describe these items of deliciousness. These leaves impart the fabulously floral, tropical, and citrusy flavour to many Thai curries, and offer a great flavour to many other items as well. Plus, when you store them in your fridge, you are welcomed by their amazing aroma every time you open the door.

I had a salad very similar to this once and thought it was a brilliant blend of veggies. The fennel offers its freshness, with a hint of liquorice. The carrot is earthy and sweet. And the radicchio provides a slight bitterness to balance the flavours. But to up the ante on the tropical look of the salad with all the colours, I wanted to impart an exotic flavour to add to the experience. Enter lime leaves. Their delicate flavour adds an air of mystery to the salad. The taste being somewhat familiar, but at the same time foreign or indeterminate compared to most western flavours.

Let’s get to cooking. To start ourselves off, we are going to cook the lime leaves in the coconut milk. Try and use a “premium” coconut milk, as these will be higher fat, and will provide you with a creamier and less watery dressing. Place the lime leaves in the milk and cook over low heat until the milk is infused, about 20-30 minutes.

I drool now at the memory.

I actually cooked too much, using the entire can of coconut milk. I saved and froze the leftovers, which could be used for a smoothie, a delicious addition to a cocktail in place of ice, or even melted into a curry for an added punch of flavour. Tasting it frozen, it does inspire me to make an attempt at a makrut lime ice cream sometime in my near future. A forthcoming blog post, you ask? I would say likely.

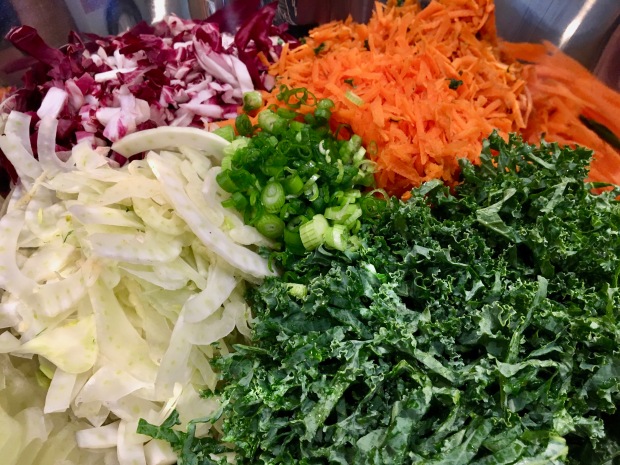
Now that we have the base of our dressing ready, and we are waiting for it to cool, we will prep our veggies. Wash everything and set on a a towel to dry. Have a large bowl ready for the veggies as they are ready. Removing the core, slice the fennel very thin, either using mandolin or a very sharp knife. If you want, you can reserve some of the fennel greens to add some visual pop to the presentation of the salad at the end. De-stalk the kale and slice thinly. Slice the radicchio. Peel and shred the carrots. Slice the green onions, including part of the white. Add everything into the bowl.

This balance of colours and flavours excites all elements of the palate!

Whisk all the dressing ingredients well together (make sure you have removed and discarded the lime leaves), then drench your veggies with the delicious mix and stir all together. Serve with some of the fennel greens as adornment.

Happy eating.

A Prairies attempt at cuisine Québécoise in three parts… Part III: Haricots Verts (Green Beans) with crispy shallots and caramelized nuts

Haricot Verts with Crispy Shallots and Caramelized Nuts

Prep Time 15 minutes
Cook Time 30 minutes
Course Side Dish

Ingredients
  

  • 1 lb greens beans/haricots verts (cleaned and trimmed)
  • 4-6 shallots sliced thin
  • 1/2 cup vegetable oil
  • 1 + 3 Tbsps butter
  • 3 Tbsp brown sugar
  • 1 tsp kosher or Maldon salt
  • 1/2 cup pecans chopped in large pieces

Instructions
 

  • Slice the shallots thin (approximately 2mm) and lay them on paper towels to dry. Heat the vegetable oil in a large shallow pan at medium to medium-high heat. Lay the shallots out in the oil and allow them to turn gold brown. Stir regularly to allow them to brown on all sides. Once golden brown, transfer to a dish with a paper towel to drain any excess oil and allow to cool. Melt 3 tablespoons of butter and add the sugar. Add the pecans and stir, allowing the sugar to melt in the butter. Continue to cook until the sugar is completely melted and browns slightly. Lay the cooked nuts out onto a plate covered in parchment paper, sprinkle with the salt and allow to cool completely. Melt 1 tablespoon of butter in a pan, add the beans, a bit of salt, and sauté until cooked through. Top with the crispy shallots and lightly chopped pecans.
Keyword Caramelized Nuts, Green Beans, Shallots, Vegetables


And now for the details…

So to “finish off” our Quebequoise night, we added a vegetable dish, being haricot verts, or green beans, with crispy shallots and caramelized nuts. Now… for our actual evening, we used walnuts, but when I recreated the recipe (since I kinda forgot to take enough photos the first go ’round), I had no walnuts in the house and used pecans instead. Both were delicious, and I feel filberts and almonds would be equally delicious with this recipe. However, if using the filberts or almonds, it would be a good idea to chop the nuts slightly before cooking, because they are quite a bit thicker and they would not toast through as well.

If you want additional accoutrements to your dinner besides the recipes listed, the suggestions that came from Krystal’s boyfriend, Philipe, was to add pickled beets and… pickles. Apparently sweet pickles are the traditional side dish, and he teased us that it would not be the same with garlic pickles… But… ummm… I am not the biggest fan of sweet pickles, so we settled for pickled beets and garlic pickles and left it at that. (Sorry Philipe!)

Right… the cooking… Let’s start by slicing the shallots nice and thin and laying them out on a paper towel to dry. Drying the shallots will allow them to crisp up nice and easy once they hit the oil, without steaming themselves first.

Heat the oil in a pan on medium to medium-high heat until adding a drop of water pops. Add the shallots to the pan, trying to keep them as spread out as possible, in a single layer. Let them cook, stirring regularly, to allow them to crisp up and get golden on all sides. As they cook, they will soften and break apart, but continue to push and pseudo flip them so that they brown on all sides. Once they have browned, use a slotted spoon to remove them and transfer onto a paper towel on a plate to allow them to drain any excess oil and to cool. If they are soft-ish when you remove them, fret not! As they cool, they will crisp up and be delicious little morsels of shalloty goodness.

Next, let’s caramelize the nuts. Like I said, I didn’t have any walnuts in the house and made this with pecans instead. Equally as delicious, and I made them the same way.

Start by adding the three tablespoons of butter and sugar to your pan. I used brown sugar, but you could replace this with cane or even white sugar instead, since the sugar will brown and caramelize. Allow the butter to fully melt and the sugar should start to kinda stick together in a paste. Add the nuts, and continue to cook until the sugar looks like it is melting into the butter and around your nuts.

Pour everything out onto a large plate lined with parchment paper, sprinkle with your salt, and allow to cool completely. As they cool, the sugar will harden, leaving a nice buttery, sweet crust, and the salt gives that sweet with savoury crunch. I have made these for salads as well, and added a wee sprinkle of cayenne pepper while the nuts were cooking. This led to a deliciously sweet, savoury and spicy topping that was so good, but the cayenne didn’t seem very French, so I left it out of this recipe 😉

Lastly is to cook your beans. The good news: have you noticed how all these steps can be done in one pan?? My husband loves my cooking, but points out that I seem to need to use every dish in our kitchen while I’m preparing meals… luckily, this is all in one dish!

Start by trimming the ends off the beans. Next, melt the remaining tablespoon of butter in your pan, then add your beans and little (or… a lot) of salt to the pan.

Cook until the beans have changed to a vibrant green and are cooked to your preferred level of doneness.Personally, I like a bit of bite, so that the beans are still a bit crisp, but feel free to cook as much or as little as you prefer. I also chose to cook my beans at a slightly higher temperature so I would get the level of doneness I prefer, as well as a tiny bit of char. It doesn’t add much flavour, but I like how it looks.

Turn the beans out into your serving dish of choice, top with the nuts and shallots and enjoy.

Now that we have gone through all three parts, I hope you enjoyed your Québecois-inspired meal! Until next time… happy eating!